Showing posts with label Dare 2B Artsy/Totally Tracy stamps. Show all posts

Wednesday, April 19, 2023

Cheers, Chick!

 Hello crafty friends and welcome!
I made a card that combines a few challenges
and I'd like to share it:


It looks rather CAS for me, but there's actually 5 layers on this, not
including the card base. I've used DP from a collection that
looks like alcohol ink blends. I cut a strip for the diagonal element,
as well as using more to fussy cut the wine in the glass. I used
a red marker to darken the 'surface' of the wine. The
tiny bunch of grapes came with the same stamp set as the 
wine glass, and I colored it with Prismacolor pencils.


I didn't want to hide that gorgeous strip of paper, so I cut
the circle element from vellum.
A couple stamped sentiments and a bit more of 
the same DP on the inside finishes my card.


That's it for now. We've had a nice run of beautiful days, and
so I'm going out to enjoy the day.
Thanks for visiting!


I'd like to enter this at:


Supplies:
Stamps: Dare2BArtzy/Totally Tracy - Always Wine Time; MFT - More Essential Sentiments, Girls Night Out
Ink: Memento - Tuxedo Black
DP: Craft Consortium - Ink Drops Vivid; Bazzill - Vellum
CS: Thunderbolt; Spectrum Noir; Bazzill
Accessories: MISIT; Spectrum Noir markers; Prismacolor pencils; GC; Sunny Studio - Stitched Circle die
Adhesives: SA by 3L - tape runner, thin 3D foam squares; Ranger multi medium matte


Sunday, August 19, 2018

Another fast watercolor card

Hi there and happy Sunday to you!
Just popping in with a another card I
made using the fast watercolor technique
I am really loving how this technique looks, and will
probably be making more cards. Be warned. LOL!
Anyway, here's my card:


couldn't resist a bit of snark on the inside:

just about dry:
 

The sentiment was stamped, then I doodled around the edge. Once I fussy
cut everything, the sunflowers were adhered with foam squares, and the leaves
directly to the card base.

Such an easy method, the only thing hard about it is waiting for
the ink to dry! LOL!
Thanks for visiting, and I hope you have a wonderful day!


I'd like to enter this at:


Supplies:
Stamps: Dare2BArtzy/Totally Tracy - find your purpose; Spellbinders/Richard Garay - just because; Inkadinkado - humorous birthday
Ink: Versamark; Memento - rich cocoa; Ranger DI - mustard seed, wild honey, gathered twigs, evergreen bough, twisted citron, vintage photo
CS: Strathmore watercolor paper; Thunderbolt
Accessories: Inkadinkado - black EP; heat gun; water mister; MISTI; Faber Castell - medium black Artist PITT pen
Adhesives: SA by 3L - tape runner, 3D & thin 3D foam squares

Wednesday, August 15, 2018

Fast watercolor flowers

Good morning all!
I want to share a card I made for the current
Just Us Girls challenge: fast watercolors. 

 There's a link on the challenge site to this technique by Jennifer McGuire.
It was a lot of fun, but waiting for the images to dry, ugh! LOL!
Here's what I created:


and the finished inside:

I remembered to snap a pic while the images were still wet:
 

Again, it was torture to put this aside to let air dry, but I did it. ☺

Once dry, I fussy cut the images.* I die cut my main panel using
a pierced rectangle die, and for more interest also die cut 
the ring collage die. (which of course is mostly covered from
the flowers. LOL!)
I stamped the sentiment, then arranged the flowers and adhered
with foam squares. Another sentiment finishes the inside.
I love how this turned out, so I'm going to be making more cards
using this technique! It was so much fun!

That's it for this post. I've got more card pictures to edit now. LOL!
Thanks for visiting and I hope you have a great day!


*I started to fussy cut these Monday, but then the mother of all storms let
loose over us, and I had to put down the scissors to combat the water
flowing into our basement. NOT a fun time, that. Luckily, we didn't get too much.
Finally finished my card yesterday.


Supplies:
Stamps: Dare2BArtzy/Totally Tracy - power of words; Simon Says Stamp - messages for everyday;
Hero Arts - good things
Ink: Versamark; Ranger DI - mermaid lagoon, wilted violet, spiced marmalade, picked raspberry, lucky clover, twisted citron; Memento - bahama blue
CS: Strathmore watercolor paper; Neenah
Accessories: water mister; Inkadinkadoo - black EP; heat gun; MISTI; GC; Avery Elle - pierced rectangle die; Poppystamps - ring collage die
Adhesives: SA by 3L - tape runner, thin 3D foam squares


Tuesday, June 5, 2018

SHOPPING OUR STASH # 357 - My Favorite Things


 Hiya and welcome!
This week at SHOPPING OUR STASH,
is all about a few of your favorite things. Could be a favorite stamp,
technique, embellishment, papers, holiday, etc.
Show us a few of your favorite things on your projects!

 Here's my card:


and the inside:


My favorite things on this card: 
Halloween - my favorite holiday!
Grumplings stamps by Taylored Expressions
Coloring, this with Prismacolor pencils
And of course, a bit of snark! LOL!

But wait, I have a two-fer:


and the inside:

My favorite things on this card:
Wine!
Coloring, this time with Spectrum Noir markers
CAS cards - I know, they are growing on me
Did I mention wine?

So what are a few of your favorite things to add to your projects? We'd love
to see them. Just link up at Shopping Our Stash so that we can
admire your work! For more great ideas, do check out what my teammies
 have deemed their favorites, and leave some bloggy lovin while there!
Thanks for visiting, and I hope you have a great day!


Supplies:
Halloween card:
Stamps: Taylored Expressions - Grumplings in Costume; Hero Arts - Celebrate Everyday
Ink: Memento - Tuxedo Black
DP: G45 - An Eerie Tale
CS: Thunderbolt; Bazzill; scraps
Accessories: Prismacolor pencils; Faber Castell - black artist Pitt pen; GC: SB - sm and lg standard circle nesties, Oval Bliss nesties; TE - Grumplings in costumes dies; EK Success - Deco Scallop Edger; MISTI
Adhesives: SA by 3L - tape runner, Thin 3D foam squares

Wine card:
Stamps: Dare2BArtzy/Tracey Weinzapfel - Always Wine Time; Avery Elle - Cheers
Ink: Memento - Tuxedo Black
CS: Crafter's Companion; Neenah
Accessories: Spectrum Noir markers; MISTI; Recollections - washi tape; Sakura - white Gelly Roll pen; Fiskars - corner rounder
Adhesives: SA by 3L - Thin 3D foam squares

Saturday, September 2, 2017

SISTERHOOD OF SNARKY STAMPERS #92 J is for Jumble


Greetings Snarky peeps!
Edna and the Sisters welcome you to our new challenge at the
J is for Jumble!
What's that mean? We want you to try your hand at a collage! 
Whether it be on a card, layout, canvas, whatever, we want to see it!
I created a mixed media canvas board:


As usual, I stalked Pinterest for inspiration, and came across this lovely collage by Pamela Towns.
(Thank you Pamela for being my muse!) Of course, I took the bones of her
gorgeous creation and went off on a mixed media tangent. 
I really intended to take pictures along the way, but I only got so far, and then 
I got so in the creative zone, I forgot to take more pictures. 

watered down acrylic paint - still wet.
I let this dry overnight.

Once the paint dried, I attached the long strip of ephemera with matte medium.
After that dried, I used a stencil and embossing paste in a couple corners.
I left this to air dry overnight.

At this point, I totally forgot to take pictures.
The hemp cord I braided myself. Except for the flower, sentiment and cord, all
the bits and pieces came from one ephemera pack. The flower was stamped
and fussy cut, and the swirl stamp is from the same stamp set.

 I thought it needed some bling, so I found some
ancient pearls to stick to the center of the flowers.


I'm actually quite pleased by how well this turned out. Collage is
not my strength, so I really fussed about placement of items forever on this.

I hope you find some time to play along in our Jumble challenge at the 
Sisterhood of Snarky Stampers! I can't wait to see what you create!
Need more ideas? Then do check out what my Sisters and our newest
Guest Designer - Ike have made to inspire you!
Thanks for visiting!


Supplies:
US Art Supply - 5" x 7" canvas panel
DecoArt Americana Acrylic paint - Ultra Blue Deep, Berry Red, Purple Pizzazz
DecoArt Media Fluid Acrylic paint - Carbon Black
water mister; various paint brushes
K & Co. - ephemera pack; Words & Phrases stickers
Dreamweaver - embossing paste; pallet knife
TCW - stencil
Golden - Matte Medium
Herschberg Schultz - hemp cord
Dare 2B Artzy/Totally Tracey stamps - Power of Flowers
Recollections - card stock
Staz-On - black ink
Ranger - Multi Medium Matte
SA by 3L - 3D & Thin  3D foam squares
Studio 112 - pearls

Tuesday, March 7, 2017

SHOPPING OUR STASH #293 - All That It's Cracked Up To Be


Good morning friends and welcome. 
This week at SHOPPING OUR STASH, we are challenging you to
use crackle paste or a crackle technique on your card or project!
For my project, I created an art journal page.
(You might want to get your favorite beverage, because this is a
photo heavy post!)


I based my page on this art journal page by Tracy Weinzapfel. Thanks Tracy! I recently
won some of Tracy's stamps and so (instead of hoarding them, like I usually do), 
I used one of the sets, called Heart Swirls & Doodles. Now, if you watch her video, you'll 
notice that she has pretty much every color of paint bottles on her back wall. (so jealous!),
Me? Not so much. In fact, most of the colors I used on this page, I mixed, because I only have 
about 15 colors of paint. LOL!

Here are the colors I used:
(a complete supplies list is at the bottom of my post)


I started off by first going over the page with Gesso and dried it with my heat gun. Then I mixed black and white paint to get a dark grey and added that. Again, heat gun to dry.
Next I took a little bit of Blue Harbor and a couple drips of Kelly Green and mixed that with
my crackle paste, and painted that on. I left that to dry naturally overnight. 
(Of course, I forgot to take pictures of those two steps.)

Ok, so instead of boring you any more with my blabbering,
I'm just gonna bombard you with a bunch of process photos,
(that I did take pictures of):


I stamped the hearts, then painted them. Once the paint dried (by heat gun), I re-stamped
the images, not caring if I didn't line them up exactly again, because,
this is ART people! LOL! I went over the lines with F-C black Artist Pitt pen to 
darken them. I used a black Prismacolor pencil and Fantastix to
blend the shadow around the hearts. Added shading and highlights.


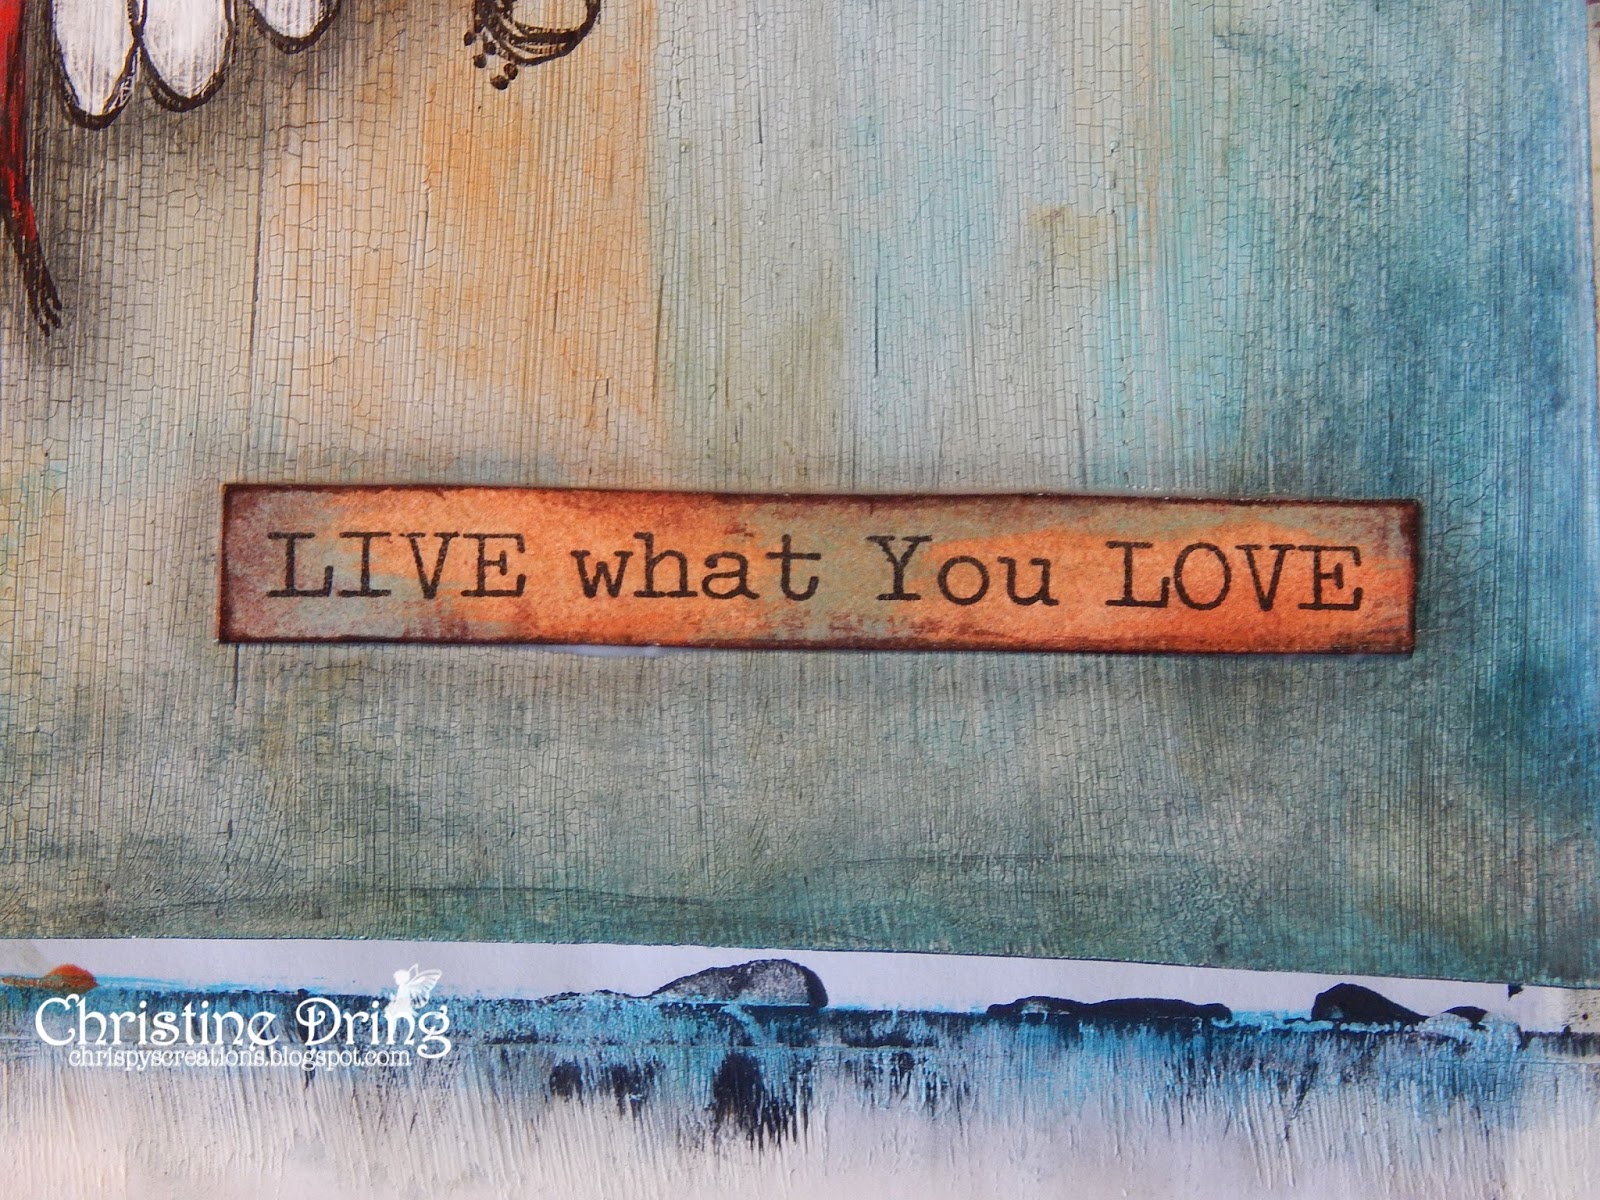
I stamped the sentiment onto some scrap paper, painted over it with some watered down
rust and turquoise paints, hit it with the heat gun, edged it with brown ink,
and adhered with Multi Medium. Hit it with the heat gun again, and went around it
with the Fantastix for some shading.


I cleaned up a bit before taking these shots, but yeah,
this is my happy place!


One last shot:


I hope that you step outside your comfort zone and try using crackle paste, or 
a crackle technique, and link up your project at Shopping Our Stash! We'd love to see it.
Looking for more ideas? Then check out what the SOS Crew, and our new Guest Designer,
Wendy Townsend, have created to inspire you. 

You made it to the end! Thanks for visiting. Have a great day!


I'd like to enter this at:


Supplies:
Stamps: Dare 2B Artzy/Totally Tracy stamps - Heart Swirls & Doodles
Ink: Staz On - Jet Black; Memento - Rich Cocoa
Accessories: Strathmore art journal; Golden - Gesso; Deco Art - Media Crackle paste & Multi Medium; Deco Art Media Acrylic paints - carbon black, titanium white, cadmium red hue, primary yellow; Deco Art Americana acrylic paints - blue harbor, kelly green, irish moss, dark chocolate; Ranger Adirondack acrylic paint daubers - stream, terra cotta; various paint brushes & sponge brush; water mister; Faber Castell - black fine Artist PITT pen; Prismacolor pencil - black; Fantastix; baby wipes; paper towels; heat gun
adding pinterest script 3. Changing the Position of the Pin it! button The cool thing about this code is that you have some freedom over where the Pinterest button for Blogger will go over the image. Take a look at the code that you just copied and pasted into the HTML for the word 'center'.