Tuesday, August 27, 2019

SHOPPING OUR STASH #403 - It's A Charmed Life


Good morning and welcome crafty friends!
I'm your hostess this fortnight at 
and as the title hints to, we'd like to see you incorporate a charm
on your project! Here's what I came up with:


It's hard to see in the above photo, but the charm on the butterfly
finishes the sentiment:


On the inside, I stamped Happy Birthday.
(Guess I forgot to take a pic of the inside.)

I hope you play along in our Charm challenge at Shopping Our Stash!
I can't wait to see what you come up with. For more 
fabulous ways of using charms, you need to check out 
what my dear teammies have created!

Thanks for visiting, have a great day!


I'd like to enter this at Seize the Birthday #172 - butterflies


Supplies:
Stamps: Stampendous - Party Invite; STAMPlorations - A snarky birthday to you
Ink: Memento - Tuxedo Black; Nautical Blue
DP: Teresa Colins - Sweetest Afternoon; scraps
CS: Neenah; Darice
Accessories: GC; CUTplorations - Flutter Zen 1 layering dies; Tim Holtz - typed tokens; Provo Craft - Victorian scissors; DMC floss; MISTI; Recollections - rhinestones
Adhesives: SA by 3L - tape runner 3D foam squares; Ranger - multi medium matte

Saturday, August 24, 2019

SISTERHOOD OF SNARKY STAMPERS #142 - V is for Violent


Hello and welcome snarky peeps!
First of all, gotta give props to our Graphic Arts Guru, 
Sistah Lee for this fabulous graphic! Spot on!!

I'm looking forward to seeing what everyone creates for the new
V is for VIOLENT!

I went super CAS on my card, but the stamp I've used had the
perfect combination of snark and violence. Here, check it out:


In case you can't read it:


This was originally a one layered card (GAH!), but my ears and eyes
started bleeding from all that white space, so I stamped it again, added
a black matte, and popped it up with some foam squares.
Wow, two nods to two movies on this post (Kill Bill for the graphic,
and The Princess Bride for my card). If you've never seen
either of these movies, what are you waiting for? They are fantastic!!

I hope you get to play along with our Violent challenge at the
Sisterhood of Snarky Stampers! We can't wait to see what you come up with!
Thanks for visiting. Have a great day!


Supplies:
Stamps: The Ink Road Stamps - As You Wish
Ink: Memento - Lady Bug, Tuxedo Black
CS: Neenah; Bazzill
Accessories: MISTI
Adhesives: SA by 3L - tape runner, Thin 3D foam squares

Thursday, August 22, 2019

Fun with paper doilies

Hello crafty peeps!
It's apparently a two post day today.

I created this card for my soon to be niece-in-law for
her bridal shower earlier this month.


and the inside:
 

I found some tutorials on Youtube in regards to folding paper doilies to make
a wedding dress. This was my second attempt, and I'm pretty happy with it.
I started by lightly sponging a pale blue ink through a stencil for the main
panel. Both the sentiment on front and back are computer generated.
Once I adhered the dress onto the front of the card, I added rhinestones 
for some pretty bling!

Thanks for visiting again! I should probably get off the computer and
do some housework. It may happen. LOL!


I'd like to enter this at:
Double D Challenge - pearls, gems or rhinestones


Supplies:
Ink: Memento - Summer Sky
CS: Neenah; Darice
Accessories: Wilton and Amscan - paper doilies; computer and printer; STAMPlorations - Flower Puzzle stencil; Picket Fence Studios blending brush; David Tutera and Nicole - rhinestones
Adhesives: SA by 3L - tape runner, thin 3D foam squares

Floral birthday

Good morning and hello crafty friends!
I had a play yesterday in the craft room and
had some fun using one of my favorite stencils::


I used bright pink and gray inks to blend, then with Prismacolor
pencils, went back over the flowers in red and gray on the leaves.
The sentiment is white heat embossed on a strip of black card stock.
I found some much neglected red washi tape and added
a strip before adhering the sentiment with foam squares.
 It still needed something, so I found some hot pink rhinestones
in my stash that matched the ink perfectly! Bonus!
Another stamped sentiment finishes the inside.  


That's it for this post. Thanks for visiting.
I hope you have a great day!


I'd like to enter this at Just Us Girls #501 - color week


Supplies:
Stamps: STAMPlorations - Sentiment Builders: Celebrate
Ink: Versamark; Memento - Lilac Posies, Gray Flannel, Lady Bug
CS: Strathmore mixed media paper; Neenah; Bazzill
Accessories: STAMPlorations - Bold Florals stencil; Picket Fence Studio blending brushes; Prismacolor pencils; Stampendous - white embossing powder; heat gun; MISTI; washi tape from stash; Colorbok - rhinestones
Adhesives: SA by 3L - tape runner, thin 3D foam squares

Monday, August 19, 2019

Pretty Dogwood Blooms

Hello crafty friends!
How was your weekend? I had an exciting Saturday, as
it was my first time as a card demonstrator for my LSS, Photo Scraps!
As an introvert, this was way outside my comfort zone, but
all the ladies made me feel so welcome and at ease, that I had
a great time. Plus, I'll be back in October for that month's Demo Day! YAY!

So on to my card. This is pretty CAS for me, (I love my layers!), and it's
almost a one layer card. 


I stamped the image in versamark ink onto watercolor paper, and heat
embossed it in black. Then I did the fast water coloring technique
using a few different Distress Inks. While that dried, I stamped the
image again onto my card base. I masked around the edges and added
some light blending with blue ink. Once the water colored image was dry,
I fussy cut it and adhered with foam squares. I added rhinestones and
a sentiment sticker, then rounded one of the corners.
 

That's all for now. We are trying to stay cool and keep indoors as it's
rather hot and humid here. I'm almost, but not quite, ready
for Autumn and cooler weather. LOL!
Thanks for visiting. Have a great day!


I'd like to enter this at:
The Flower Challenge #35 - use your favorite flower (yes, I know the dogwood is a tree,
but it does have these gorgeous flowers that bloom in Spring, so...)


Supplies:
Stamps: STAMPlorations - Framed Dogwood
Ink: versamark; Memento - Tuxedo Black, Summer Sky; Ranger DI - Worn Lipstick, Festive Berries, Fossilized Amber
CS: Strathmore water color paper; Neenah
Accessories: Stampendous - black EP; heat gun; MISTI; STAMPlorations - Just Everyday Greetings clear stickers; Picket Fence Studios blending brush; Recollections - rhinestones; Fiskars corner rounder
Adhesives: SA by 3L - 3D foam squares

Tuesday, August 13, 2019

SHOPPING OUR STASH #402 - Gone Fishin'


Hello crafty peeps and welcome!
It's the start of a new challenge at
Gone Fishin' is our theme this fortnight. We'd like to see
fish themed or a fish on your projects.
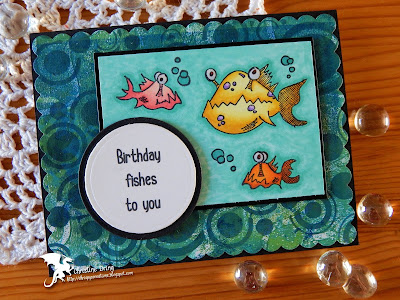
I made a couple punny fish cards:


For my first card, I broke out these creepy-cute fishes and colored them
with Spectrum Noir markers. The background is a gelli print that I made last
year. I simply used a circle stencil that I blended over it. I used my 
computer to print out the sentiment.


Here's the inside:


My Twofer is yet another punny (and perhaps bizarre), card:


Fish-as-Christmas-Ornaments? Sure, why not?
I stamped two different sizes of pine boughs with two colors of distress inks.
Stamped, colored and fussy cut my fish and popped them up with foam
squares. I dug in my Christmas stash and found these ancient mylar light bulb 
stickers. Last, I tied some silver floss around the fish tails, you know,
because they needed to be all festive like. LOL!

Here's the inside of this card:


I hope that you find some time to join in our Fish challenge at
Shopping Our Stash! We look forward to seeing what you come up with.
Needing more ideas? Simply visit the blogs of my teammies, and leave
some love while there. 
Thanks for visiting. Have a great day!


I'd like to enter the Birthday Fishes card at:


I'd like to enter the Merry Fishmas card at:


Supplies - Birthday Wishes card:
Stamps: Dylusions - Under the Sea; MFT - Birthday Greetings
Ink: Memento - Tuxedo Black, Nautical Blue
CS: Crafter's Companion; Neenah; Bazzill
Accessories: Gelli print using DecoArt Americana Acrylic paints; Gelli Plate; printer paper and brayer; Spectrum Noir markers; Ranger Glossy Accents; Wink of Stella pen; MISTI; GC; SB - Lg & Sm standard circle Nesties; Lawn Fawn - scalloped rectangle die; STAMPlorations - Retro Circles stencil; Picket Fence blending brush; computer and printer
Adhesives: SA by 3L - tape runner, 3D & thin 3D foam squares

Supplies - Merry Fishmas card:
Stamps: Dylusions - Under the Sea; Rubber Dance - Pine Fir Yew; The Ink Road stamps - Are you serious, Clark?
Ink: Memento - Tuxedo Black, Northern Pine; Ranger DI - Iced Spruce, Evergreen Bough
CS: Crafter's Companion; Neenah; Taylored Expressions; Darice
Accessories: Spectrum Noir markers; MISTI; Ranger Glossy Accents; Sticko - metallic lights stickers; DMC floss; computer and printer
Adhesives: SA by 3L - tape runner, 3D foam squares

Saturday, August 10, 2019

SISTERHOOD OF SNARKY STAMPERS #141 - R is for RIP


Hello and welcome snarky peeps!
We have a new challenge starting today at the
R is for RIP!

My Sistahs came up with various ways to interpret this. You could
simply rip up some paper, use the letters R.I.P., or use the American
slang term, 'Let one rip', (which means to pass gas! LOL!)

I decided to rip up parts of the paper I used on my card:

and the inside:


I scored this paper kit cheap last year at Tuesday Morning and it's the first time
I've used it. The glittery, dimensional witch sticker has been in my stash for quite a few 
years and went perfectly with the sentiment sticker I used from the paper kit.


A stamped sentiment on the inside plus more ripping and distressing finishes
my card. Now it's your turn to play along! Simply link up your ripped creations
to the Sisterhood of Snarky Stampers so we can admire them!
Looking for more ideas? Do visit the blogs of my Sistahs, and our reigning
Queen, Samantha, for their creative takes on the challenge. 
Thanks for popping by!


Supplies:
Stamps: Inkadinkado - All Hallow's Eve
Ink: Memento - Tuxedo Black; Ranger DI - Ground Espresso
DP: Echo Park - Hocus Pocus
CS: Taylored Expressions; Thunderbolt
Accessories: Anna Griffin - witch sticker; blending tool; Tonic - distressing tool; MISTI; Recollections - spider sticker; Faber Castell - black Artist PITT pen
Adhesives: SA by 3L - tape runner, thin 3D foam squares

Thursday, August 8, 2019

Dude!

Hello crafty peeps and welcome!
Got a card to share that I just made. I kept adding to it, and now
I think it's 'finally' finished. LOL!


 Here's the inside:


Things I kept going back and adding: detail coloring with Prismacolor pencils; I extended the
sand to the edges (originally just under the table and dude); added the ocean; masked and 
stenciled the clouds. I've been working on this panel on and off the last couple of days.
Anyone else like that? Anyone? Beuller? (crickets chirping)
Sigh.
Anyhoo, I'm really happy how it turned out and amazed that I didn't 
destroy it with all the additions. LOL!
That's all I have for now. I have more cards I've made, just 
can't blog about them yet. ☺

Thanks for hanging out. Have a great day!


I'd like to enter this at:
Addicted to Stamps and More #352 - Make Your Mark -
Oops! This one closed! Grrrrr!


Supplies:
Stamps: Simply Betty Stamps - Surfin Christian digi stamp; Paper Smooches - Slang Gang, Digits, Happy Birthday
Ink: Memento - Tuxedo Black; Ranger DI - Salty Ocean
CS: Crafter's Companion; Thunderbolt; Darice
Accessories: Spectrum Noir markers; Prismacolor pencils; MISTI; Sakura - white Gelly Roll pen; Cloud template; Picket Fence Studios - blending brushes; GC; Avery Elle - pierced rectangle die
Adhesives: SA by 3L - tape runner
adding pinterest script 3. Changing the Position of the Pin it! button The cool thing about this code is that you have some freedom over where the Pinterest button for Blogger will go over the image. Take a look at the code that you just copied and pasted into the HTML for the word 'center'.