Showing posts with label HLS ATG with dies. Show all posts

Sunday, November 12, 2023

It's Christmas card making mode now!

 Hello and welcome crafty friends!
Look at that, it's already almost halfway through
November, and I'm way behind making
my Christmas cards. My crafty mojo has
been MIA for the last 4 months or so,
and it finally reappeared at the end of October.
I did finally start on cards last month, and will
be posting about them soon. In the
meantime, here's a little something
that I came up with:


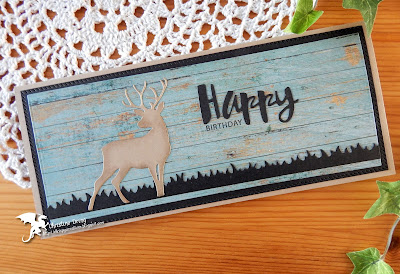
I'm finally playing with the Christmas Poinsettias card kit from
My Favorite Things, that I purchased in September. A lot
of die cutting, a snowflake embossing folder, a snippet of
paper, and some gold Stickles. Plus, the sentiment was
first stamped in black ink, then I heat embossed it with
clear embossing powder before die cutting it. 


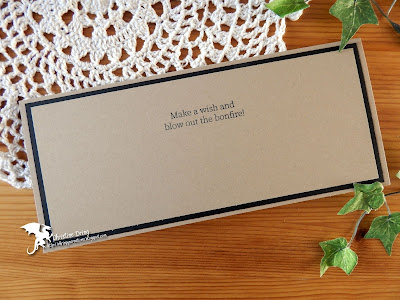
I used another stamp from the same set to finish the inside:


I'm glad that I saved the cardstock that came with the kit, and
used what I already had on hand, because, you know, I 
really want to make those cards! LOL!
That's it for now. I appreciate that you stopped by for a visit!
Have a great day!


I'd like to enter this at:
NBUS #56


Supplies:
Stamps: MFT - Christmas Wishes
Ink: Memento - Tuxedo Black; Versamark
DP: Carta Bella - Home for Christmas
CS: Thunderbolt; Neenah; Taylored Expressions; Recollections
Accessories: MFT - Winter Poinsettias & Christmas Wishes dies; Lawn Fawn - scalloped rectangle die; Nicole - scalloped square die; Darice - Snowflake Background EF; Fiskars - corner rounder; WOW! - clear EP; heat gun; MISTI; Ranger - gold Stickles
Adhesives: 3L - tape runner, Thin 3D foam squares; Ranger - MMM


Sunday, March 20, 2022

A dude card

 Hello and welcome!
I've managed to finally make a masculine card, something
of which I need more of. Why are they so hard to make?!
Anyway, here it is:


and the inside:


I've used a bunch of dies from various companies to put this together,
and I like how well it came out. I even did some clever die cutting with
the grass die to extend it to fit my slimline card. (it's an A2 sized die)

Well, that's all for today. I wish you a happy first day of Spring!
Thanks for visiting!


I'd like to enter this at:


Supplies:
Stamps: Lawn Fawn - Offset Sayings Birthday; Honey Bee - Inside Snarky Birthday
Ink: Memento - Tuxedo Black, Rich Cocoa
DP: Photo Play - Our Friendship Thru the Years
CS: Thunderbolt; Cardstock Warehouse
Accessories: GC; Simon Says Stamp - Painted Happy word die; Taylored Expressions - grass border, deer from Birch Tree Accessories and blending brushes; Pinkfresh Studio - Slim Diagonal Stitched Rectangle dies; MISTI
Adhesives: SA by 3L - tape runner; Ranger - MMM; Scor Tape


Thursday, January 9, 2020

Cute penguins? Yes please!

Hello and happy Thursday to you!
I have another Christmas card to share. (I know, I'm just
as surprised as you are)


 I'm not sure how long this will last, but I'm trying to actually use my supplies
instead of just hoarding them. LOL! When I trimmed the mountain paper to size,
I didn't pay particular attention as to where it might show up in the circle die cut.
But with sheer dumb luck, you can see it peeking out behind my happy penguin.
I adhered a snippet of white card stock to the inside bottom of the cut out to ground
my little friend. The white panel, and penguin have been adhered with foam squares,
as is the sentiment strip.


Here's the finished inside:


I think now I really must concentrate on making birthday cards, as I'm
dangerously low on them. (But there may be more Christmas cards
showing up here too. It could happen. *wink*)

Thanks for visiting. Have a great day!


I'd like to enter this at:
ABC Christmas Challenge - B is for Bingo (patterned paper/lots of layers/die cuts


Supplies:
Stamps: Avery Elle - Polar Playtime
Ink: Memento - Tuxedo Black
CS: SN: Bazzill; Core'dinations
DP: American Craft - Jack Frost
Accessories: Spectrum Noir markers; Gemini; Avery Elle - Polar Playtime dies; Penny Black - Stitched Circles dies; Nuvo Glitter Drops - White Blizzard; MISTI; red Prismacolor pencil (on inside candy cane)
Adhesives: SA by 3L - tape runner, 3D & thin 3D foam squares

Saturday, January 12, 2019

SISTERHOOD OF SNARKY STAMPERS #126 - B is for Books


 Hello and welcome snarky peeps!
The SISTERHOOD OF SNARKY STAMPERS is back from their
holiday break, and raring to go this year!
The first challenge of 2019 is something near and dear to my heart:
B is for Books!
For my card, I used a new (to me) die from Lawn Fawn called Double Slider Surprise.
You pull the tab and.... 


Ta-da!


If you watch the how-to video, you'll discover that the item used to make
the slider mechanism work is a poop bag! Once it was assembled
 I attached it to a standard A2 card base, and stamped
another book related sentiment on the inside.


I hope that you find some time to join in our Book challenge at the
Sisterhood of Snarky Stampers! We'd love to see your take on it. Need
more ideas? Do yourself a favor and check out what my Sistahs, and
our newest Queen and GD - Cornelia, have created for your viewing pleasure.
Thanks for visiting. Have a fantastic day!


I'd like to enter this at:
Simon Says Stamp Monday Challenge - Use Something New
Craft Stamper TIMI January Challenge
Happy Little Stampers - ATG with dies


Supplies:
Stamps: Unity - books from the December 2012 KOM; STAMPlorations - Good Books & Coffee; Hero Arts - tweed pattern
Ink: Memento - Tuxedo Black, Gray Flannel
CS: Neenah; Crafter's Companion; TE
Accessories: GC; Lawn Fawn - Double Slider Surprise die; Spectrum Noir markers; MISTI; Inkadinkado - masking paper; Computer & printer; Sakura - gold Gelly Roll pen; poop bag
Adhesives: Score Tape; SA by 3L - tape runner, 3D foam squares

Thursday, May 10, 2018

And now for a little subversive cross stitching...

Hello crafty friends!
I broke out my neglected embroidery floss to
work on an idea for a card I had rolling around in my head.
I've been working on this card for a couple days,
and I'm finally finished with it.
Check it out:


and the inside:
 
I used some ancient floss for this project. I think I've had this floss for at least 20 years,
from back when I was doing a lot of cross stitching projects.
I have a booklet of different cross stitch alphabets and I picked 
this one to use, mostly because it fit. LOL!
I used the stitched circle die along with the embroidery hoop die. The embroidery 
hoop was cut 4 times, stacked, and glued.
The patterned papers I used are from the same collection. (2012)
I cut flowers and leaves from the flower dies set (2015) and added them to the hoop.
My sentiment is stamped on the inside using the Happy Birthday set (2014).

I gotta say, this is probably one of my favorite cards to date. I'm sure
happy that my family shares the same sarcastic sense of humor I have because
some lucky member will get this in the future. LOL!

That's all I have for now. Thanks for visiting, and I hope you have a great day!


I'd like to enter this at:


Supplies:
Stamps: Paper Smooches - Happy Birthday (2014)
Ink: Memento - Tuxedo Black
DP: My Mind's Eye - The Sweetest Thing (2012)
CS: Neenah; Thunderbolt; scraps
Accessories: GC; Paper Smooches dies - embroidery hoop, stitched circle, flowers (2015); DMC floss; needle; STAMPlorations - Art Edges die; MISTI; Goodnatured Girls - Alphabet Order cross stitch pattern booklet
Adhesives: SA by 3L - tape runner, 3D & Thin 3D foam squares; Ranger - multi medium matte

Tuesday, January 30, 2018

SHOPPING OUR STASH #339 - He Loves Me, He Loves Me Not


Hello and welcome back crafty peeps!
This week at
we are getting all lovey dovey!
Yep, in case you weren't sick of Valentine's Day yet,
we are jumping on the band wagon 
and challenge you
to make a Valentine's Day card or project!

 Here is my card:

 Here's the inside:

Did a little die cut inlay for this.
The papers I used on the front either are shimmery or have foil accents,
thus the reason for the weird photos.
(Soooo hard to photograph those types of papers!)

Here you can see the shimmer of the bottom part and
the foil dots in the hearts. 

The heart die I just bought a month ago (year end sales ROCK!), but 
the stamps and papers are probably at least 8 years old.

I hope you find some time to crank out a V-Day card or project
and link up with us at Shopping Our Stash! We'd love to see
what you made! For more ideas, simply visits the blogs of
the SOS CREW and leave some love while there!
Thanks for visiting. Have a great day!


Supplies:
Stamps: MFT - You Make My Day; Hero Arts - Celebrate Everyday
Ink: VersaMark; Memento - Elderberry
DP: DCWV - Black Currant
CS: Neenah; Recollections
Accessories: GC; Poppystamps - Heart String die; STAMPlorations - Crazy Double Running Stitch Nesting die; Stampendous - detail White EP; heat gun; MISTI
Adhesives: SA by 3L - tape runner; Ranger - Multi Medium Matte

Tuesday, July 11, 2017

SHOPPING OUR STASH #311 - CAS for National Simplicity Day


Hello crafty peeps and welcome!
So for the new challenge at
we want to see your CAS cards!
 In the spirit of NSD, you can also include
something recycled or upcycled on your CAS project, but it's not mandatory.

For my card, I recycled a bit of cardboard from a box:

 and the inside:

Also in the spirit of NSD, I've recycled a birthday age. (wink!)

The pineapple and festive drink was die cut, colored, then I covered both
with a layer of Wink of Stella for some subtle shimmer.


 Now it's your turn to create a CAS card! (you know you want to!) Just link up at
Shopping Our Stash so we can admire it! For more ideas, please visit the blogs
of my teammates and leave some lovin while there!
Thanks for visiting!


I'd like to enter this at:


Supplies:
Stamps: Paper Smooches - Pineapple Crush, Getta Outta Town, Birthday Sampler
Ink: Memento - Tuxedo Black, Tangelo
CS: TE, Crafter's Companion
Accessories: STAMPlorations - Merry Go Round stencil; Recycled cardboard from a box; MISTI; Spectrum Noir markers; Wink of Stella pen; blending tool
Adhesives: Recollections - red tape; Ranger Multi Matte Medium
adding pinterest script 3. Changing the Position of the Pin it! button The cool thing about this code is that you have some freedom over where the Pinterest button for Blogger will go over the image. Take a look at the code that you just copied and pasted into the HTML for the word 'center'.