Tuesday, March 30, 2021

SHOPPING OUR STASH #442 - Here Comes Peter Cottontail


Hello and welcome crafty friends!

It's time for the new challenge at SHOPPING OUR STASH!

This fortnight, we want to see projects with a bunny(s), or

a Passover or Easter theme.

Here's what I made:

I love this image of a bunny eating a chocolate bunny! LOL!

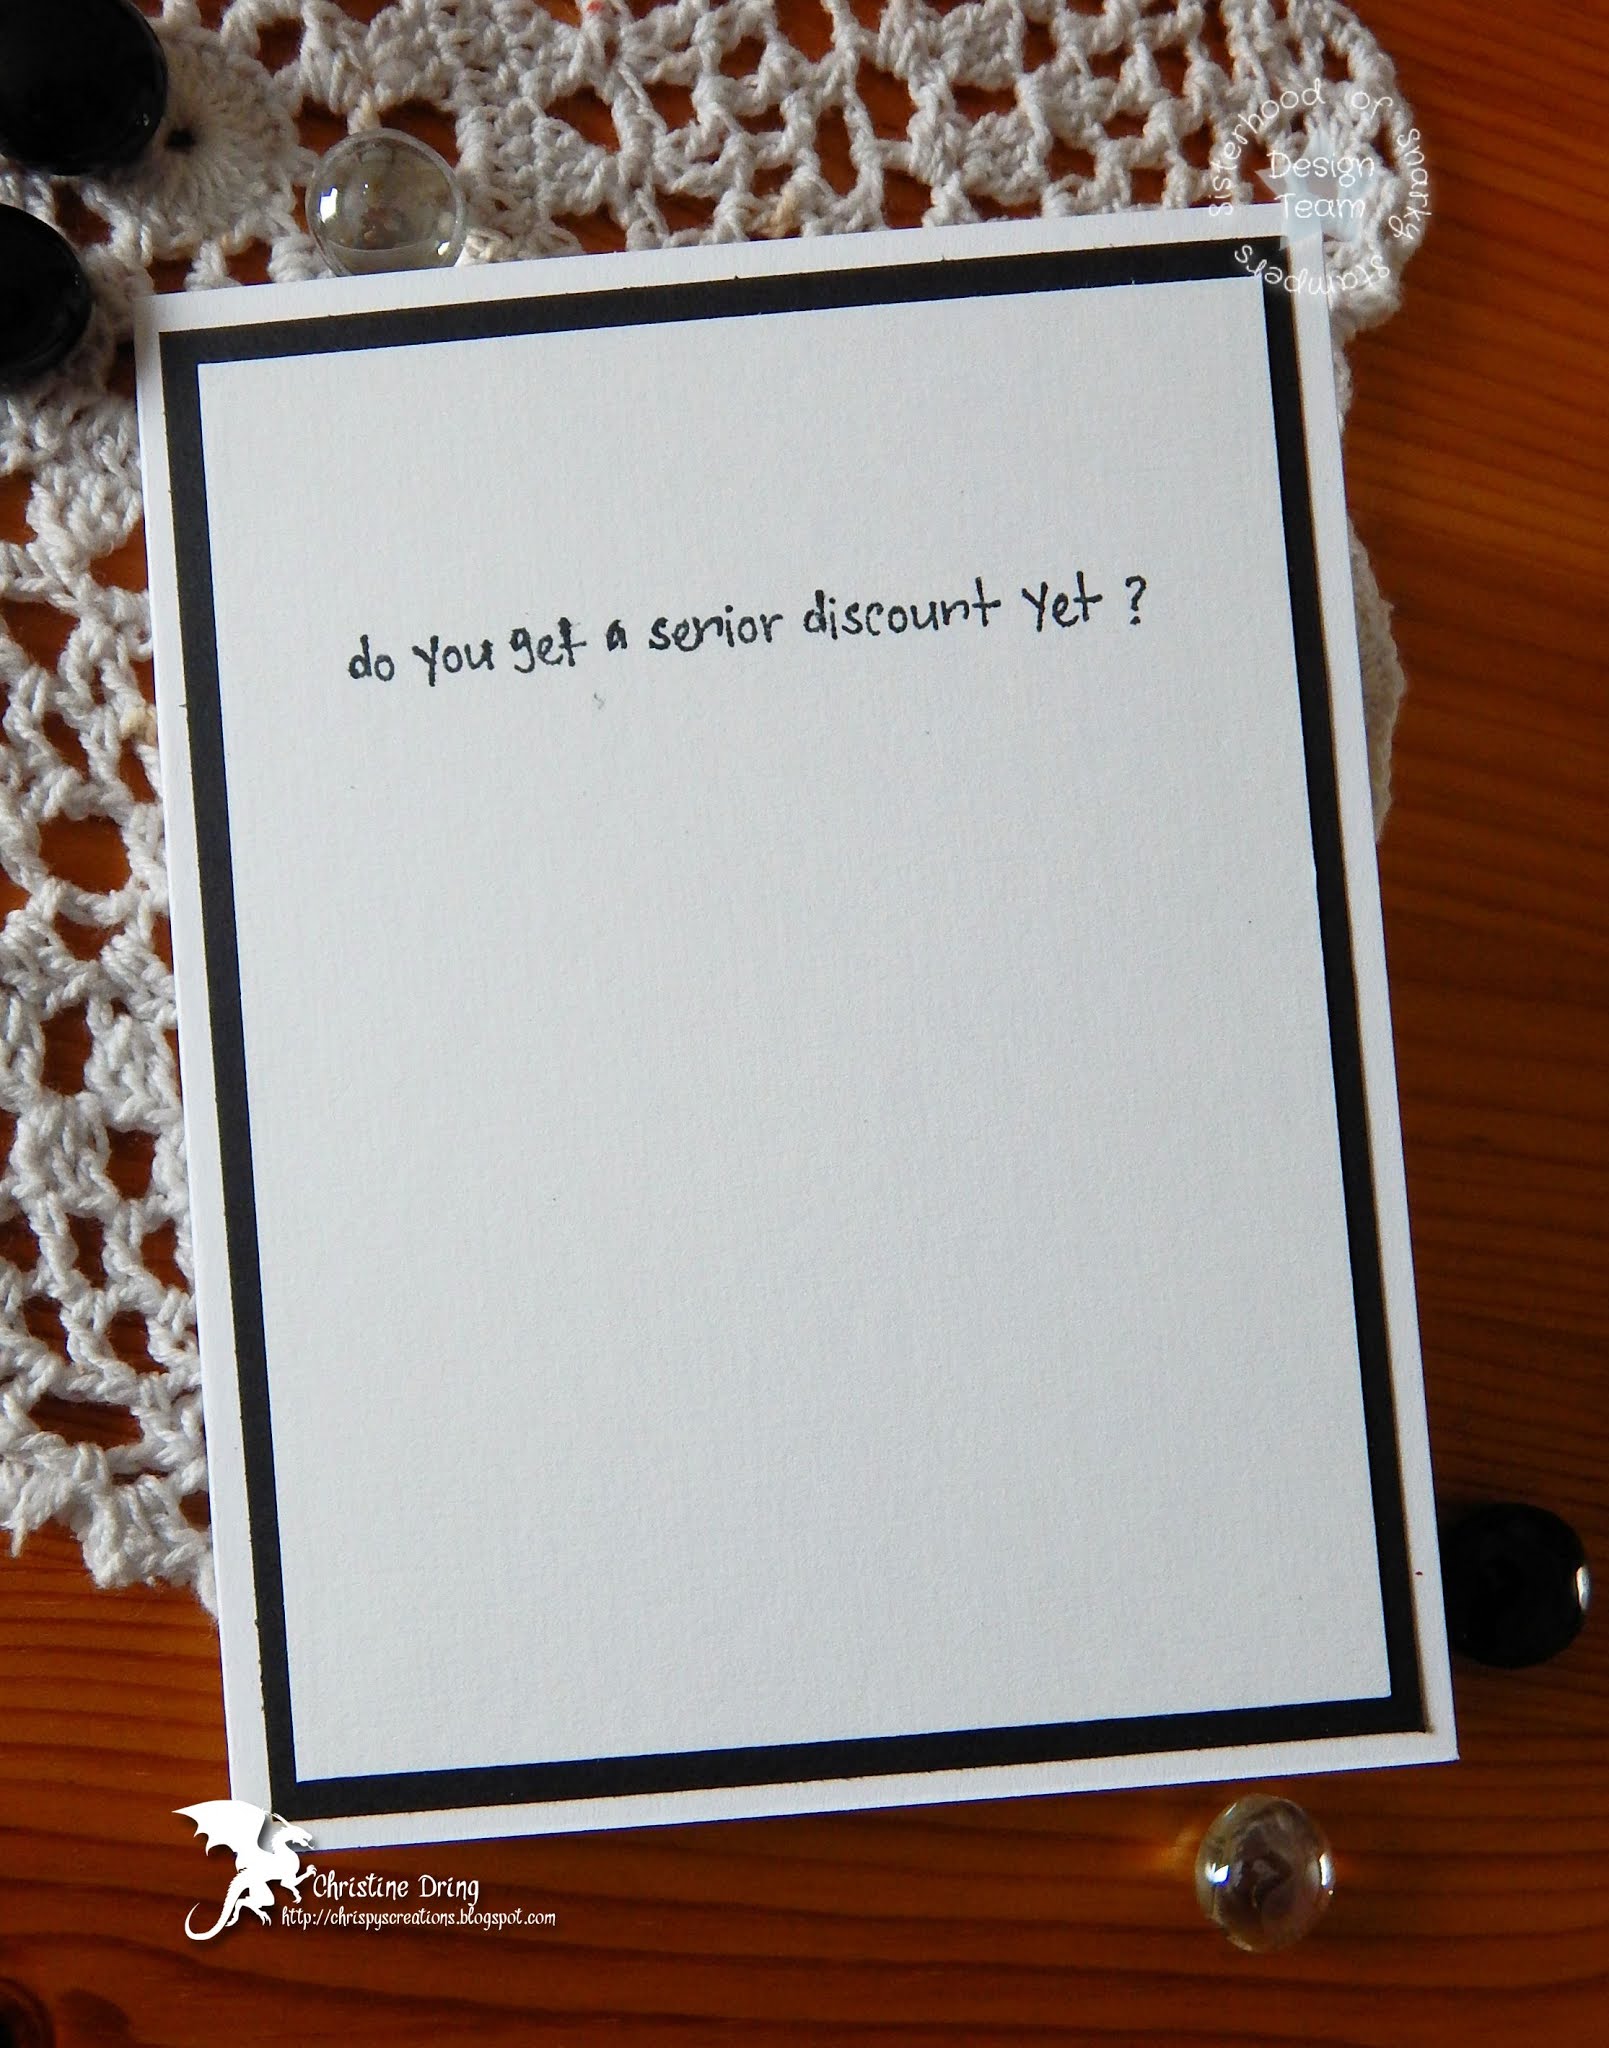
Something simple finishes the inside:

You know how bunnies are, they keep multiplying...

...and multiplying!


I hope that you find some time to play along in our Peter Cottontail challenge

at Shopping Our Stash! For more inspiration, do check out what my

teammies created to wow you!

Thanks for visiting, have a wonderful day!


Supplies:

Stamps: Sunny Studio - Chubby Bunny, A Good Egg; Simon Says Stamp - Oh Bunny

Ink: Memento - Tuxedo Black, Teal Zeal, Bamboo Leaves, Summer Sky, Grape Jelly, Lilac Posies; Ranger DI - Peacock Feathers

CS: Spectrum Noir; Cardstock Warehouse; scraps

DP: Lawn Fawn; Doodlebug Designs; Sandylion; freebie from Cardmaking & Papercraft magazine

Accessories: Spectrum Noir markers; MISTI; GC; SB - std oval die; MFT - stitched oval frame die;  PFS - blending brush; Sakura - white Gelly Roll marker

Adhesives: SA by 3L - tape runner, 3D foam squares; Ranger - MMM

Saturday, March 20, 2021

SISTERHOOD OF SNARKY STAMPERS #181 - L is for Layers


Welcome and happy first day of Spring!!!

This fortnight at the SISTERHOOD OF SNARKY STAMPERS,

we are looking for projects with lots of layers on them. Of course,

some of my Sistahs thought outside the box on this one, which

is so brilliant! Here's what I came up with:


 Lots of layers here, especially that cake die. Each piece is a die cut!
You'd think this was a very fancy, swanky card, with the elegant
black and white theme and that white glitter paper behind the cake....


 ...but then there's the inside:

I hope that you'll find some time to join us in our Layers challenge over

at the Sisterhood of Snarky Stampers. For more ideas, please do 

visit the blogs of my Sistahs, and our reigning Queen (and forever Sistah), Jane,

to see the genius things they came up with!

Thanks for visiting!


I'd like to enter this at Color Hues #14


 Supplies:

Stamps: MFT - More Essential Sentiments; Paper Issues - Aah Real Birthday Sentiments

Ink: Versamark; Memento - Tuxedo Black

CS: Neenah; Taylored Expressions; Nicole

DP: Pebbles Garden Party; mystery white glitter paper

Accessories: GC; SB - Oval Bliss die; Love Nicole - layer cake die; Stampendous - white EP; Heat gun; MISTI; Ranger - Diamond Stickles

Adhesives: SA by 3L - tape runner, thin 3D foam squares: Ranger - MMM

Monday, March 15, 2021

It's Sticker Monday at STAMPlorations!


Good morning crafty friends!

Guess what? I'm doing my first Sticker Monday post over at STAMPlorations! 

Each month we randomly draw a lucky commenter's name to win a $15 prize code

when they leave a comment on both the Sticker Monday posts and also 

on the designer's blog. 

(This post contains affiliate links. When you click on any of the STAMPlorations 

store links below and place an order, I will receive a small commission at

no additional cost to you.)

 I'm showcasing the Coffee Feel Good stickers for my projects.

I decided to use the same color combo for all my projects.

First up is a shaker card:


The great thing about using these stickers, is that you can cut them apart when

needed, as I've done on my shaker card. Along with the stickers, I've also used

the Dots 'n Beans stencil, Zen Coffee Cup Layering dies, and the

Mocha Swirl ShakerBlends.

*****

Here's my second card:


I created a frame around the sticker using the coffee cup-to-go image

from the Gone Postal stamp set. (You can also get this image in

digital format here.) On the card base, I stamped around the edges with one

of the images from the Mixed Media Grunge set.

*****

My third card:


Along with the same stencil and cup image already used, the background panel is

cut using a Crazy Double Running Stitch Rectangle Nesting die. The green

strip was cut with one of the Art Edges dies.

 These are just a few ways to incorporate stickers into your projects. So, what do you think? 

I'd love to hear, and look forward to reading your comments!

Thanks so much for visiting!


Other supplies used:

Ink: Memento - Tuxedo Black, Rich Cocoa

CS: Thunderbolt; Nicole; Spectrum Noir

DP: Recollections(?) - gold mirror

Accessories: GC; PFS - blending brush; Grafix - acetate; Spectrum Noir markers; Prismacolor pencils; MISTI; Tim Holtz - distressing tool; Hero Art - wood frame die

Adhesives: SA by 3L - tape runner, thin 3D foam squares: DecoArt Media - liquid glass; Scotch foam tape

Have you joined in yet at


 Good morning and welcome!
 
Just popping in to remind you all about this month's
 
 
 For my card, I heat embossed images from the
 
Brave One stamp set onto watercolor paper. Using a water brush
 
and various Distress Inks, I painted the images. Once dry, I fussy cut
 
them and arranged them into a frame on my card base.
 
I stamped a sentiment from the
 
Balloons and Banners stamp set, and added the 30 Thickers,

(This post contains affiliate links. When you click on any of the
STAMPlorations store links and place an order, I'll receive a 
small commission at no additional cost to you.)


On the inside, I used a sentiment from the

Celebrate Big stamp set.


There's still plenty of time to link up your project at

STAMPlorations Theme & Photo Prompt Challenge!

If you feel a shopping spree is in order at the

STAMPlorations store, feel free to use my discount code for

an extra 20% off:


 Thanks for visiting! Have a great day!


Supplies:

Stamps: STAMPlorations - Brave One, Balloons and Banners, Celebrate Big

Ink: Versamark; Ranger DI: Dusty Concord, Worn Lipstick, Mermaid Lagoon, Peeled Paint, Rustic Wilderness; Memento - Tuxedo Black

CS: Strathmore watercolor paper; Neenah; scraps

Accessories: MISTI; water brush; Inkadinkado - black EP; heat gun; Thickeres - number stickers; Fiskars - corner rounder

Adhesives: SA by 3L - tape runner, thin 3D foam squares; Ranger - MMM

Monday, March 8, 2021

Women's Day Insta Hop, Blog Hop & Linky Party


Hello and welcome crafty friends!

I'm thrilled to be joining in the

International Women's Day Insta and Blog Hop & Linky Party!

STAMPlorations is one of the many amazing

sponsors joining in this fun hop & linky party.

Just look at all of these fabulous companies

who are contributing! WOW!


Today we celebrate all women, all around the globe, in all their diversity!

It's a beautiful thing!

For my card, I started by die cutting water color paper using the largest die from the

Crazy Double Running Stitch Rectangle Nesting dies.

Once I heat embossed in gold the images and sentiment from the

Shine Bright stamp set, I set about

 coloring the light bulbs using Derwent

Inktense blocks. After the panel dried, I drew

some 'cords' to have them hanging off the top edge:


So shiny!


For all the details about the hop and linky party, do visit

the Women.beyoutifully,you blog.

Today, and everyday, is all about lifting women up!

Come join the celebration!!

Hugs,


Supplies:

Stamps: STAMPlorations - Shine Bright

Ink: Versamark

CS: Strathmore water color paper; Neenah

Accessories: Derwent Inktense Blocks; paintbrush; MISTI; CUTplorations - crazy double running stitch rectangle nesting die; MISTI; Stampendous - Champagne EP; heat gun; GC; Faber Castell - black artist PITT pen and ruler; WOS pen

Adhesives: SA by 3L - tape runner


Saturday, March 6, 2021

SISTERHOOD OF SNARKY STAMPERS #180 Z is for Zoom Meeting


 Good morning snarky peeps!

It's time for our next challenge at the

SISTERHOOD OF SNARKY STAMPERS!

This fortnight is all about ZOOM MEETINGS!

I've never been in one, but seeing all the funny mishaps

about them that make it onto the news and memes 

gave me so much inspiration: 


 Here are some close ups:


...and we can't forget about the inside of my card:

This was a collaboration with my hubby, as we both came up with various

phrases to use. Also, the day after I printed out all the phrases, that

viral zoom meeting with the lawyer-as-cat made it on the news.

Andy said it would be funny if I added a cat to my card.

Challenge accepted! A little fancy masking made this two kitty

stamp a solo one. Of course, he needed googly eyes.

I hope that you can join in our Zoom Meeting challenge at the

Sisterhood of Snarky Stampers. If you need more ideas,

simply check out what my Sistahs and our reigning Queen

Beverly have created for this challenge.

Thanks for visiting!


Spectrum Noir markers used on the cat:

BG1, BG3, PP3, MG4, TB1

Supplies:

Stamps: Sunny Studio - Meow and Furever

Ink: Memento - Tuxedo Black

DP: Carta Bella - Family Night

CS: Spectrum Noir; Cardstock Warehouse; scraps

Accessories: MISTI; Spectrum Noir markers; computer and printer; Nicole - googly eyes

Adhesives: SA by 3L - tape runner; Score Tape

Tuesday, March 2, 2021

SHOPPING OUR STASH #440 - Oh, The Places We'll Go....(after the pandemic)


Hello and happy Tuesday, crafty peeps!

It's time for the new challenge at SHOPPING OUR STASH!

As the title suggests, we want to see the places

you want to go, once the pandemic is over.

For me, it will always be the beach!

I think I've only used this stamp once before, and I'm glad to have

used it again. I loved building this lovely beach scene.

I used kraft ink for my sandy beach, and three colors of

DI for my ocean. Then I masked the horizon and used a 

sun rays stencil and three more colors of DI for the sunrise. Some

seagulls, a dolphin, foot prints and the sentiment finishes the scene.

I added some crystal Stickles to the waves and surf because, sparkle!


So, where are you headed when the pandemic is over? 

We'd love to see your travel themed projects linked up at

Shopping Our Stash! 

For more ideas on where to get away, simply check out

what my teammies have created for your viewing pleasure.

Thanks for visiting. I hope you have a great day!


Supplies:

Stamps: Taylored Expressions - Build a Background: Waves; Hero Arts - Color Layering Sea & Sky

Ink: Ranger DI: Tumbled Glass, Mermaid Lagoon, Salty Ocean, Vintage Photo, Fossilized Amber, Spiced Marmalade, Abandoned Coral; Memento - Tuxedo Black; Gina K - Kraft

CS: Neenah; Thunderbolt

Accessories: MISTI; Tim Holtz - Rays stencil; Picket Fence Studio - blending brushes; Ranger - Crystal Stickles

Adhesives: SA by 3L - tape runner

The Sisterhood of Snarky Stampers are guest elves at Christmas Kickstart!


 Hello friends! I'm back with a special post today!

The Sisterhood of Snarky Stampers is Guest Elving

at Christmas Kickstart Challenge!

The prompt for the new challenge is to use the color GREEN

predominately on your card.

 It's no secret that I have a bizarre sense of humor, and

so does my family. LOL! So I made this

card with them in mind:


A strange family calls for strange images. LOL!

I colored them with Prismacolor pencils using various hues of green,

 along with a bit of red accents. Of course, I had to

add a snarky sentiment!

For the inside, a simple stamped sentiment finishes my card:


I hope that you'll play along in the Green Christmas challenge
 
 
Thank you, Jo, for letting the Sisterhood crash your
 
Christmas party! Let the shenanigans begin!


My card uses Mojo Monday #554


Supplies:

Stamps: Viva Las Vegas stamps - images from plates 1474 & 1503; Riley & Co - Deck the Halls; Taylored Expressions - Hand lettered Holidays 2

Ink: Memento - Tuxedo Black, Bamboo Leaves

DP: Recollections - Believe

CS: Neenah; Bazzill

Accessories: Prismacolor pencils; GC; SB - Std Lg Circle die; Nicole - stitched square die; Sizzix/TH stencil; PFS - blending brush; MISTI

Adhesives: SA by 3L - tape runner, thin 3D foam squares


Monday, March 1, 2021

STAMPlorations March Theme & Photo Prompt Challenge!


Hello crafty friends and welcome!

It's March first and time for the

STAMPlorations Theme & Photo Prompt Challenge! 

For my card, I went with just the theme: Stamps and Numbers:

(This post contains affiliate links. When you click on any of the STAMPlorations store links below 

and place an order, I will receive a small commission at no additional cost to you.)


A Christmas card in March? You bet! I make them all throughout the year.

It saves me the end of the year madness of cranking out a gazillion cards. LOL!

I started by using the wonky stitched grid texture cover plate

on the card base. I die cut two frames using both label dies together

from the Succulently coordinating dies,

stacking and gluing them together. Using a couple different shades of 

green card stock, I stamped leaves from the Christmas Bell Medley 

stamp set and fussy cut them. I stamped one of the fun reindeer images from

the Yuletide Deer stamp set and fussy cut also.

After arranging and gluing everything, I added some gold glittery 

number stickers to signify December 25th, and added three

drops of Ruby Slippers Nuvo glitter drops to complete.

On the inside, I created another frame, and, before sticking it to the

card base, trimmed the edges of the sticker from the 

Merry clear sticker pack,

then glued the frame over it.

You have the whole month to play along in this month's

Theme & Photo Prompt Challenge. I look forward to seeing

your link and how you interpret them!

If you feel the urge to purchase anything from the

STAMPlorations store, feel free to use my discount code

for an extra 20% off and a freebie of your choice:


Thanks for visiting. I hope that you have a wonderful day!


Supplies:

Stamps: Yuletide Deer, Christmas Medley

Ink: Memento - Tuxedo Black, Rich Cocoa, Northern Pine

CS: Neenah; Thunderbolt; Cardstock Warehouse; scraps

Accessories: GC; CUTplorations - Wonky Stitched Grid Texture Cover Plate;, Succulently coordinating dies; Merry clear stickers; MISTI; K & Co. - number stickers; Nuvo Glitter Drops - Ruby Slippers

Adhesives: SA by 3L - tape runner, thin 3D foam squares; Ranger - MMM


adding pinterest script 3. Changing the Position of the Pin it! button The cool thing about this code is that you have some freedom over where the Pinterest button for Blogger will go over the image. Take a look at the code that you just copied and pasted into the HTML for the word 'center'.