Showing posts with label Carta Bella. Show all posts

Tuesday, August 12, 2025

Time to get it started

 Hello and welcome!
I'm sharing the second Christmas card
I've made so far this year.
Gulp. Better get going on those now. LOL!


I went riffling through my Christmas stash and rediscovered
this cute, quirky reindeer. I colored him up with Copic markers
then blended Vintage Photo DI around the edge of 
the oval, the back panel and sentiment strip.


Another simple sentiment finishes the inside.


Jingle Belles has a sketch challenge that's just about
ended, so I'm squeaking in at the last minute to enter that.


Thanks for visiting. I hope you have a great day!


Supplies:
Stamps: Cosmo Cricket - Jolly Days; Honey Bee - Inside Holiday Sentiments
Ink: Memento - Tuxedo Black, Cottage Ivy; Ranger DI - Vintage Photo
DP: Carta Bella - A very Merry Christmas
CS: Spectrum Noir; Taylored Expressions
Accessories: Copic markers; Sunny Studio - Rounded Rectangle Mat & Stitched Oval dies; MISTI
Adhesives: Scrapbook Adhesives - tape runner, foam squares


Monday, July 15, 2024

Joy Christmas card

 Hello and welcome, friends!
This is my second post today, and
it's another Christmas card!


I still used traditional colors, but that black snowflake panel makes
this card a bit more dramatic. 


Here is the inside:


It's been some time since I've made any Christmas cards, so I'm
happy to have this and the one on my previous post done.
I probably only need to make around 100 more, or so. LOL!

Thanks for stopping by. Have a great rest of your day!


I'd like to enter this at Christmas Kickstart #88


Supplies:
Stamps: Honey Bee - Peace Love Joy (& dies)
Ink: Versamark; Memento - Tuxedo Black
DP: Carta Bella - Farmhouse Christmas
CS: Thunderbolt; Neenah; Cardstock Warehouse
Accessories: Honey Bee - Pierced Fancy Flakes cover plate; Hero Arts - Wood Frames dies; MFT - Winter Poinsettias dies (berries); Nicole - rhinestones; Spectrum Noir DR7 marker (to color the rhinestones); Stampendous - Champagne EP; heat gun; MISTI
Adhesives: SA - tape runner, thin 3D foam squares; Bearly Arts glue


Happy Holidays poinsettia

 Hello and good Monday to you all!
I'm popping in with a card I'd like to share:


I made a bunch of these poinsettias last December and had
this one left to use, so, here it is! LOL!


Here's the finished inside:


This post is short and sweet, as one of the challenges I want
to add this to is about to end. 😄

Thank you for visiting. Have a wonderful day!

:


I'd like to enter this at:


Supplies:
Stamps: Honey Bee Stamps - Home for the Holidays
Ink: Versamark; Memento - Tuxedo Black
DP: Carta Bella - Farmhouse Christmas
CS: Thunderbolt; Recollections; scraps
Accessories: MFT - Winter Poinsettias dies, scalloped rectangle die from Blueprints 27; Avery Elle - double pierced rectangle dies; Ranger - gold Stickles: Nuvo glitter drops - white blizzard; Stampendous - Champagne EP; heat gun; MISTI
Adhesives: SA - tape runner; Bearly Arts glue


Sunday, November 12, 2023

It's Christmas card making mode now!

 Hello and welcome crafty friends!
Look at that, it's already almost halfway through
November, and I'm way behind making
my Christmas cards. My crafty mojo has
been MIA for the last 4 months or so,
and it finally reappeared at the end of October.
I did finally start on cards last month, and will
be posting about them soon. In the
meantime, here's a little something
that I came up with:


I'm finally playing with the Christmas Poinsettias card kit from
My Favorite Things, that I purchased in September. A lot
of die cutting, a snowflake embossing folder, a snippet of
paper, and some gold Stickles. Plus, the sentiment was
first stamped in black ink, then I heat embossed it with
clear embossing powder before die cutting it. 


I used another stamp from the same set to finish the inside:


I'm glad that I saved the cardstock that came with the kit, and
used what I already had on hand, because, you know, I 
really want to make those cards! LOL!
That's it for now. I appreciate that you stopped by for a visit!
Have a great day!


I'd like to enter this at:
NBUS #56


Supplies:
Stamps: MFT - Christmas Wishes
Ink: Memento - Tuxedo Black; Versamark
DP: Carta Bella - Home for Christmas
CS: Thunderbolt; Neenah; Taylored Expressions; Recollections
Accessories: MFT - Winter Poinsettias & Christmas Wishes dies; Lawn Fawn - scalloped rectangle die; Nicole - scalloped square die; Darice - Snowflake Background EF; Fiskars - corner rounder; WOW! - clear EP; heat gun; MISTI; Ranger - gold Stickles
Adhesives: 3L - tape runner, Thin 3D foam squares; Ranger - MMM


Saturday, May 13, 2023

SISTERHOOD OF SNARKY STAMPERS #234 - Y is for Yo Momma


Hello and welcome back, snarky peeps!
This fortnight's challenge at the
celebrates all mothers for Mother's Day!
I usually make a pretty card for my Mom,
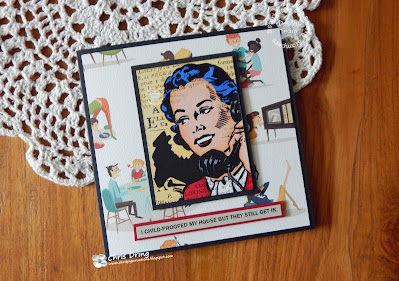
but this year I decided to go the snarky route:


I used some family themed paper for my background,
then colored one of the ATC's from the
My sentiment is computer generated.


A simple sentiment finishes the inside of my card:


I hope that you find some time to play along in the Yo Momma challenge
For more inspiration, please do check out what my sisters
and our reigning Queen, Mia,
created for your viewing pleasure!
Thanks for stopping by.
Wishing all Moms a very Happy Mother's Day!


(This post contains affiliate links, at no additional cost to you!)

Supplies:
Stamps - Hero Arts - Happy Mom's Day
Ink: Memento - Tuxedo Black
DP: Carta Bella - Family Night
CS: Cardstock Warehouse; Darice
Accessories: STAMPlorations - Retro People ATC ephemera pack; Spectrum Noir markers; computer & printer; MISTI
Adhesives: SA by 3L - tape runner, thin 3D foam squares


Sunday, April 2, 2023

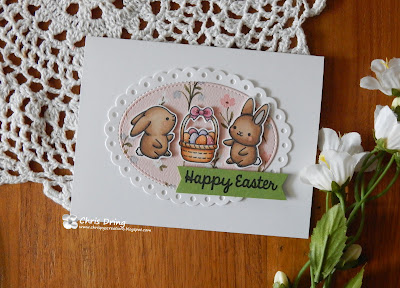
Bunnies and a basket

 Hello and welcome crafty friends!
I have a card to share using some adorable bunnies:


I've had this stamp set for a few years, and these images
have only just been inked and colored for the first time.
What was I thinking?! LOL!
Once everything was colored, I gave the eggs and the bow
a bit of sparkle with some Nuvo glitter drops.
To ground the bunnies, I stamped the sentiment onto 
green card stock to give the illusion of grass.


These bunnies are just so cute!!
That's all for now. Thank you for stopping by!
I hope that you have a great day!


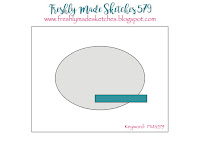
I'd like to enter this at Freshly Made Sketches #579


Supplies:
Stamps: Sunny Studio - Chubby Bunny, A Good Egg
Ink: Memento - Tuxedo Black
DP: Carta Bella - Flora #5
CS: Spectrum Noir; Neenah; scrap
Accessories: Spectrum Noir markers; GC; Sunny Studio - Stitched Oval #1 & Scalloped Oval mat #2; Nuvo white blizzard Glitter Drops; MISTI
Adhesives: SA by 3L - tape runner, thin 3D foam squares


Tuesday, March 15, 2022

A Tiny Craft (ATC) Challenge - Masculine

 Greetings and welcome!
The latest challenge at
and this month's theme is 
MASCULINE.
Artist Trading Cards or Coins are both welcome.
I've made both:


Here are some close-ups:


On the coin, I fussy cut the pocket watch from an embossing
folder I used with gold metallic paper. I brayered black paint over the
image to make it stand out, and also swiped a black ink pad around
the edges to distress it a bit. The black matte measures 2-1/2".
For the sentiment, I used a snarky small talk sticker of Tim's.

The cards came together really easily, by using papers, stamps
and ephemera from a card kit. All that was needed was a bit
of distressing and the added brads on the last ATC.

I hope that you'll join us this month for the masculine challenge
at A Tiny Craft (ATC) challenge! For more inspiration,
simply check out what my teammates created to wow you!

Thanks for visiting. I hope that you have a great day!


Supplies:
DP, racecar stamp, ephemera: Carta Bella - Work Hard Play Hard
CS: Bazzill - gold metallic. Cardstock Warehouse - black
Accessories: GC; Sizzix - Pocket Watches EF; mystery brads; MISTI; paper piercer; Tim Holz - distressing tool
Adhesives: SA by 3L - tape runner, thin 3D foam squares; Scor Tape


Friday, August 20, 2021

August Demo Day to Go at Photo Scraps!

 Hey there crafty friends!
Just popping in to tell you that I'll have two card kits
available for purchase tomorrow for 
Demo Day to Go at Photo Scraps!
From 10 am to 4 pm you can stop in and pick these up along
with at least 18+ other kits by other demonstrators. 😁
 
 Here's the first card:


I use Spectrum Noir markers and chose colors to match that fun
background paper, but feel free to color the image however you want:


Tip: a grid mat is your friend when placing the half circle pieces, but
not necessary. Just so long as they are no less than 1/4" in from the edges, 
you'll be good to go.


*** Here's the second card ***


Spectrum Noir colors used:


I hope that you can stop by. You can also call the shop or let
them know on their Facebook page which card kits you'd like.
(Keep in mind that those who come in to the shop have first
choice of the kits available) Help support a
terrific small business!

Have a great day!


adding pinterest script 3. Changing the Position of the Pin it! button The cool thing about this code is that you have some freedom over where the Pinterest button for Blogger will go over the image. Take a look at the code that you just copied and pasted into the HTML for the word 'center'.