Showing posts with label Inkadinkado Stamps. Show all posts

Monday, November 11, 2024

Oh Holy Night

 Hello friends and welcome!
I hope that your day is going well.
I'm sharing yet another Christmas card:


This was a rather quick card for me to make, sort of.
I die cut the main panel from a stitched rectangle die, then 
gold heat embossed the sentiment and image onto it
before adhering with foam squares onto the card base.


Another sentiment finishes the inside:


The challenge at Christmas Kickstart #92 is called Wise Men Three,
so that's where I'll be entering this at.


Thanks for visiting. Have a great day!


Supplies:
Stamps: Inkadinkado - O Holy Night; Honey Bee - Artsy Angel
Ink: Versamark; Memento - Tuxedo Black
CS: Cardstock Warehouse; Neenah
Accessories: WOW! - Metallic gold rich EP; heat gun; MISTI; Queen & Co. - stitched rectangle die
Adhesives: Scrapbook Adhesives - tape runner, foam squares


Wednesday, September 15, 2021

A TINY CRAFT ATC SEPTEMBER CHALLENGE

 
Hello and welcome back, crafty peeps!
We are on to our second challenge at 
A Tiny Craft (ATC) Challenge! For this challenge,
we want to see your Fall/Autumn themed 
Artist Trading Cards or Coins.
I went with the coins this time around:


Here are some close ups:


Lots piled onto these coins. Stamped, colored and fussy cut pumpkins,
die cut leaves, sunflower patterned paper, text paper spritzed with
Magenta Nuance powder inks, copper heat embossed border, some of
Tim's Small Talk stickers. Yep, lots!

I hope you find time to play along in our Fall/Autumn theme ATC challenge
at A Tiny Craft (ATC) Challenge! For more amazing ideas, please
do visit the blogs of my teammates to check out what they created.
Thanks for visiting, have a wonderful day!


I'd like to enter this at ATC's mit Herz - Fall Time 


Supplies:
Stamps: Inkadinkado - All Hallow's Eve; Gina K - Autumn Wreath Builder
Ink: Memento - Tuxedo Black, Rich Cocoa; Versamark
DP: Jen Hadfield - Warm & Cozy; G45 text paper
CS: Thunderbolt; Spectrum Noir; scraps
Accessories: Spectrum Noir markers; MISTI; GC; Lawn Fawn - Stitched Leaves dies; Paper Smooches - leaf from Flowers dies: DecoArt Media - matte medium; paintbrush; Stampendous - detail copper EP; heat gun; Tim Holtz - Small Talk Occasions stickers; WOS pen; Magenta Nuance powder inks
Adhesives: SA by 3L - tape runner, thin 3D foam squares; Scotch foam tape; Ranger - MMM

Saturday, October 17, 2020

SISTERHOOD OF SNARKY STAMPERS #171 H is for Halloween (in pink!)


Hello and welcome snarky peeps!

It's time for our annul PINK HALLOWEEN challenge

at the SISTERHOOD OF SNARKY STAMPERS!

 Edna and the Sisters are doing their part to help

promote Breast Cancer Awareness Month,

and also Halloween!

 For this challenge, we want to see your Halloween 

projects that incorporate the color pink in it.

Here's what I came up with:


 and the inside:


I started with a pink panel and blended a couple colors of Distress ink on it, then spritzed and dripped 

water onto it. I splattered Dylusions black ink spray too. Once dry, I stamped the image in black ink a 

few times to get it nice and dark, then again with versamark ink. I embossed it in clear EP. I added some

 black soot DI around the edges, and also distressed the edges. Another sentiment finishes the inside.

I hope that you find some time to play along in our Pink Halloween challenge at the

Sisterhood of Snarky Stampers!

For more pinkish Halloween inspiration, do check out what my Sistahs and our

reigning Queen, Beverly, have created for your viewing pleasure.

Thanks for visiting, now go forth and get your pink on!


I'd like to enter this at Two Old Bats Halloween Challenge


Supplies:

Stamps: Crackerbox & Suzy Stamps - Contagion; Inkadinkado - All Hallow's Eve

Ink: Memento - Tuxedo Black; Ranger DI - Crackling Campfire, Candied Apple, Black Soot; Versamark

CS: TE; Cardstock Warehouse

Accessories: MISTI; PFS - blending brushes; Tim Holtz distressing tool; water mister; Dylusions - Black Marble ink spray; WOW! clear EP; heat gun

Adhesives: SA by 3L - tape runner


Saturday, May 5, 2018

SISTERHOOD OF SNARKY STAMPERS #109 - E is for Engineering


Hello and welcome back snarky peeps!
It's time again for one of our favorite challenges at the

E is for Engineering! 
(otherwise known as our STEAMPUNK CHALLENGE!)
I made not one, but 4 Steampunk Halloween cards: 


It's pretty easy to make multiple cards if you use designer paper that mostly 
does all the work for you. (Like this paper from Graphic 45)
Here are the individual cards:


They all look the same on the inside:

I could have made these a lot quicker by using the people cut outs as they were printed, but I wanted 
to pop them up for some dimension. That meant I fussy cut them out, die cut the beige panels (sponging vintage photo DI on them then stamping a grungy stamp for more interest. You can
see this better on the inside panel), and die cutting the smaller panel and rounding out the corners.
Yeah, could have made this easier, but why would I do that?! LOL!
I cut 4 panels from black card and used a couple embossing folders (cogs and pocket watches), and
even used some Halloween sticker sentiments (I sponged over them also with the vintage photo DI)

I hope you find some time to join in on our Engineering (Steampunk) challenge at the
Sisterhood of Snarky Stampers! You know we love to see what fabulous creations you
come up with. For more inspiration, do check out what my Sisters created along with our
newest Guest Designer, Sharon, and leave some bloggy lovin!
Thanks for popping in! Have a great day!


I'd like to enter this at Simone Says Stamp Monday Challenge: Time Out


Supplies:
Stamps: IndigoBlu - Tasty Textures; Inkadinkado - All Hallow's Eve
Ink: Ranger DI - Vintage Photo; Memento - Rich Cocoa
DP: Graphic 45 - Steampunk Spells
CS: TE; Nicole
Accessories: GC; Tim Holtz/Sizzix - Steampunk & Pocket Watches EF; Tim Holtz - small talk stickers; blending tool; MFT - zig zag stitched sq dies; Lifestyle Crafts - inverted scallops sq dies;
Fiskars - corner rounder; MISTI
Adhesives: SA by 3L - tape runner, 3D foam squares; American Crafts - tacky tape


Thursday, October 19, 2017

Pink Christmas

Hello crafty friends!
I'm popping in today with a card made for a few challenges,
but most importantly for the


Lauren and Stephanie are at it again, raising money
to donate to the

They will both donate two dollars for every Christmas/holiday/winter card or project
linked up between October 13 thru 25!
The only catch? Your card or project must feature the 
color pink predominately on it.
Easy peasy (pink)lemon(ade) squeezy!
Here's my card:


 and the inside:

I love the combination of pink/gray/white/silver.
My ornament was stamped and heat embossed in silver EP, then fussy cut.
I punched a hole in the hanger and added some dark pink floss.
To continue the silver shininess, I edged a white card stock panel with versamark, sprinkled
more silver EP on it and heat set it. It made for a great matte for the pink DP I found
in my paper stash!

Ooh! Shiny!

If you haven't played along before, now's a great time to participate!
It's for such an important cause.
Now, I want to go and make some more pink colored Christmas cards,
and I hope you will too!
Thanks for visiting. Have a great day!


I'd also like to enter this at:


Supplies:
Stamps: Inkadinkado; Hero Arts
Ink: Versamark; Memento - Gray Flannel; Brilliance - Starlite Silver
DP: Teresa Collins - Sweet Afternoon
CS: Taylored Expressions; Recollections
Accessories: GC: MFT - dainty doilies duo die; Whispers - silver EP; heat gun; MISTI; EK Success - deco scallop edger punch; WRMK - floss; Wescott - hole punch
Adhesives - SA by 3L - tape runner, Thin 3D foam squares; Ranger - Multi Matte Medium

Tuesday, October 17, 2017

SHOPPING OUR STASH #325 - The Walking Dead


Hiya crafty peeps!
This week at
we challenge you to embrace your inner zombie!
That's right, we want to see your zombie creations.
Here's what I came up with:


and the inside:

My image is colored with SN markers, then I masked my zombie and bat balloon to stencil over the background in orange ink. I smudged black paint around the edges. The card base was stenciled in orange ink then I added the BOO alpha stickers. I added Glossy Accents to the zombie and bat eyes.
This guy is too cute to spook, wouldn't ya say?

Now it's your turn! Let's see those zombies! Just link up at Shopping Our Stash 
so we can admire your work! Need more inspiration? Then do check out what
my teammies came up with. You will be blown away!
Thanks for visiting!


I'd like to enter this at:


Supplies:
Stamps: Dilly Beans digi; Inkadinkado - All Hallows Eve
Ink: Memento - Tuxedo Black, Tangerine; Range DI - Black Soot
CS: Crafter's Companion; TE
Accessories: Spectrum Noir markers; Computer & printer; Ranger - Glossy Accents; Martha Stewart - alpha stickers; Andy Skinner snake's web stencil; Tim Holtz - burlap stencil; MISTI; Deco Art Media fluid acrylic paint - carbon black; Dylusions - white paint pen
Adhesives: SA by 3L - tape runner

Saturday, September 30, 2017

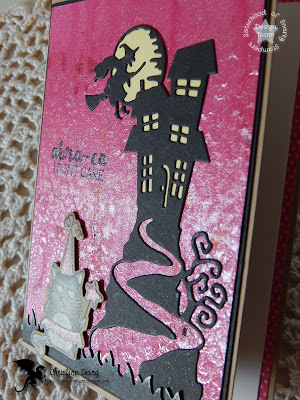
SISTERHOOD OF SNARKY STAMPERS #94 - P is for Pink Halloween


Hello and happy Saturday snarky peeps!
Today starts one of our most favorite challenges at the

P is for Pink Halloween!!

We've been doing this challenge for the last 4 years, to acknowledge
both Halloween and Breast Cancer Awareness Month!
So create anything Halloween themed, but the color 
pink must be the predominant color on it! 
(You can use other colors)

Here's card #1:


 and the inside:


My background was made using Magenta Nuance Powder Dyes in Hot Pink and Grey.
I used a grungy, painty stamp on all corners (NBUS), and had to ink up this 
fabulous skeleton family. (Also NBUS. Look closely at that
little one in the bottom corner! LOL!)

For my second card, my background is made using
Strawberry Cream Glimmer Mist. I die cut that awesome haunted house, colored and die cut 
the Grumpling Kitty. (All NBUS)


 and the inside:

 Look at all the shimmer!!


So now it's your turn to create your pink colored Halloween masterpieces! Be sure
to link up at the Sisterhood of Snarky Stampers so that we can admire it!
For more inspiration, please do yourself a favor by visiting the blogs of my
Sisters in Snark, and also our newest Guest Designer, Gina!

Thanks for stopping by!


I'd like to enter both of these cards at Darnell's NBUS challenge


Supplies Card #1:
Stamps: Viva Las Vegas Stamps - skeleton family; Rubber Dance - Sarcasm Superpower; Inkadinkado - All Hallow's Eave; Stampdendous - Brush Strokes
Ink: Memento - Tuxedo Black; Range DI - Antique Linen, Vintage Photo; Hero Arts - Neon Pink
DP: mystery polka dot scrap
CS: TE; Strathmore Mixed Media paper
Accessories: Magenta - Nuance Powder Dyes; water mister; heat gun; MISTI
Adhesives: SA by 3L - tape runner, Thin 3D foam squares

Card #2:
Stamps: Taylored Expressions - Grumplings in Costume; Stampendous - Tricky Words
Ink: Memento - Tuxedo Black; Brilliance - Platinum Planet
DP: mystery polka dot scrap
CS: TE; Thunderbolt Kraft; Strathmore Mixed Media paper
Accessories: Prisma Color pencils; GC; TE - Grumplings in Costume die, 13 Dead End Drive die, grass die; Tattered Angels - Strawberry Cream & Candy Apple Red Glimmer Mist; Magenta Nuance hot pink powder dye; MISTI; Wink of Stella pen; Faber Castell black sm. Artist PITT pen
Adhesives: SA by 3L - tape runner, thin 3D foam squares; Ranger - Multi Medium Matte; Recollections - tacky tape; scotch tape

Tuesday, November 1, 2016

SHOPPING OUR STASH #276 - Home Sweet Home


Hello friends! I hope that your Halloween was fun and festive, if you celebrated it! Can you believe that it's November 1st?!!!! WHERE did this year go?! I swear that I was just soaking up the sun at the beach. Now i'm starting to break out my sweaters and hat, gloves and winter coat. Sheesh!

Anyhoo, now that I've stepped down from the soapbox, it's time for a new challenge at SHOPPING OUR STASH! As the title suggests, we'd like to see images of houses or any kind of building on your card or project!

I, of course, don't have any stamps that are house shaped, so I went a different route:


 and the inside:

This may be the only religious stamp set I own, but I like it. I tried to make this more of a CAS card. Well, maybe this is more CAAS: clean and almost simple) I started with die cutting a circle from masking paper and sponging around it to create the sunset. My dilemma with the stamps was that they weren't proportional in size to each other, so I tried to make it look as if the three kings were in the background and behind the hill that the Holy Family were on. Once I stamped the images, I stamped them again (just the bottom) onto scraps of black card stock, then fussy cut the hills. To add a bit of highlighting, I took some gold ink and rubbed it onto the edge of the card stock with my finger before adhering them. For a final touch, I took a gold pen and filled in the letters and added dots to the halo and the arch on the stable. 

(Ohhh! Shiny!)

I hope you find some time to play along this week in our HOME SWEET HOME challenge at Shopping Our Stash! We'd love to see your take on this. For even more inspiration, do yourself a favor and visit the blogs of my teammates, and leave them some bloggy lovin! We also have a new Guest Designer joining us this month! Please welcome Cornelia Wenokor! We look forward to seeing what you create with our challenges this month!! Welcome!!

Just a reminder that we are looking for Guest Designers! If you would like to be considered for the month of December, simply leave a "DT" after your name when you link up! It's just that easy!

Thanks for visiting, and I hope you have a great day!!


Supplies:
Stamps: Inkadinkado - O Holy Night
Ink: Memento - Tuxedo Black; Ranger DI - Abandoned Coral, Spiced Marmalade, Wild Honey; Colorbox/Susan K. Weckesser - Shimmer
CS: Darice; scraps
Accessories: GC; SB - Std Sm Circle Nestie; Inkadinkado - masking paper; MISTI; Sakura - gold Gelly Roll pen
Adhesives: SA by 3L - tape runner
adding pinterest script 3. Changing the Position of the Pin it! button The cool thing about this code is that you have some freedom over where the Pinterest button for Blogger will go over the image. Take a look at the code that you just copied and pasted into the HTML for the word 'center'.