Showing posts with label STAMPlorations. Show all posts

Thursday, February 27, 2025

Seize the Birthday Surprise Party Guest!

 Hello crafty friends and welcome!
I'm very excited to be a surprise party guest at


The current challenge prompt is no stamping.
Check out what the design team have made and
join in the fun!


Here's my take on the challenge:


This card came together pretty quickly. Mostly because I had 
the ink blended panel already made, just not used yet.
I added some interest using a die that cuts the diagonal frame.
A die cut sentiment was all it needed to finish.


If you don't feel like using the challenge prompt, as always,
anything goes is welcome too!


Thanks again to the Seize the Birthday crew for the
chance to create along with you!

Thanks for visiting. Have a wonderful day!


Supplies:
CS: Neenah; Taylored Expressions
Ink: Taylored Expressions - Cookie Monster, Tropical Punch, Brussel Sprout, Mango Sweet Potato Pie; Memento - Rich Cocoa
Accessories: Taylored Expressions - Bird Party CIQ layering stencils, Diagonal Stitch rectangle frame die; STAMPlorations - Everyday Sentiments die
Adhesives: SA - tape runner, foam squares


Monday, October 28, 2024

Quilled flower birthday card

 Hello and welcome!
I'm popping in at the last minute
with a card I just made:


This came together rather quickly, which is rare for me,
as I usually take hours if not days to make a card.
The background is stenciled using an olive and a
mustard-y looking butterscotch ink


I went through my ever-growing UFO pile,
(Un-Finished Objects) and came upon
these quilled pieces I made years ago and never used.
They were all white, but I used the same inks to
color them.


All I added was a few rhinestones to finish the front.
Another sentiment was added to the inside:


The latest Color Hues challenge calls for, you guessed it,
olive and mustard, two great fall colors, so I'll be
entering this card there.


Thanks for visiting. Have a great rest of your day!


Supplies:
Stamps: Hero Arts - Let's Celebrate
Ink: Simon Says Stamp - Olive; Ranger Adirondack Earthtones - Butterscotch; Memento - Tuxedo Black
CS: Neenah; Thunderbolt; Bazzill
Accessories: STAMPlorations - Leaf Prints stencil; Avery Elle - Double pierced rectangle die; mystery rhinestones from my stash; MISTI
Adhesives: SA - tape runner; Bearly Art glue


Thursday, June 27, 2024

Seize the Birthday Surprise Party Guest!

Hello and welcome friends!
I'm beyond excited to be guest designing with the
ladies at Seize the Birthday!


For the current challenge, the topping is to add a star on
your birthday themed cards. But if the topping isn't your
thing, anything goes is good too, as long as it's a birthday card.


Here's what I came up with:


A star shaped shaker balloon? Yes please!
The shaker was made by die cutting the frame 8 times, and the solid
shape once from the blue card stock and again from acetate.
Seven of the frames were stacked and glued onto the solid blue piece.
I added the confetti then glued the acetate piece onto the stack,
then the last frame. I found some fun balloon paper for the
background panel to use also!


Here's the finished inside:


Thank you, ladies, for the honor of guesting with you!

Thank you for visiting, and I hope to see you joining in
the 'Add a Star challenge' at Seize the Birthday!


Supplies:
Stamps: Lawn Fawn - Wavy Sayings; Sunny Studio - Inside Greetings: Birthday
Ink: Memento - Tuxedo Black
DP: Doodlebug Design - Hey Cupcake
CS: Neenah; Taylored Expressions
Accessories: STAMPlorations - Star shaker balloon die; Lawn Fawn - Wavy Banner die; Avery Elle - double pierced rectangle dies; Taylored Expressions - confetti; Grafix - acetate; MISTI
Adhesives: SA - tape runner, thin 3D foam squares; Bearly Art glue


Friday, June 21, 2024

Tropical Happy Birthday

 Hello friends and happy Friday!
I'm just popping in to share
a card that I just made:

(This post contains affiliate links, at no cost to you!)

I must say that I was influenced by Nancy's card. I loved
that white die cut panel on the white card base, and her
gorgeous hibiscus flowers. I die cut the white panel
from the Bloomtangled #1 cover plate. Since the edges were
'open', I added two thin strips of green card stock on each side.
I used some stamp layering flower and leaf images for
my focal point. I then fussy cut them all out,
and added some rhinestones.
(Note to self: buy the dies for this set. That palm frond! Ugh!)


I finished the inside with another stamped sentiment:


This was a fun sketch, so I hope there will
be more of them on future challenges.
Thank you for visiting. Have a great weekend!


I'd like to enter this at The Flower Challenge #92


Supplies:
Stamps: Sunny Studio - Radiant Plumeria, Inside Greetings: Birthday
Ink: Memento - Lilac Posies, Lu Lu Lavender, Dandelion, New Sprout, Pear Tart, Cottage Ivy, Northern Pine, Simon Says Stamp - Lemon Chiffon; Hero Arts - Butter Bar, Orange Soda; Altemew - Puffy Heart, Rose Quartz; Taylored Expressions - Lime Zest, Jalapeno
CS: Neenah; Taylored Expressions
Accessories: STAMPlorations - Bloomtangled #1 cover plate; MISTI; Recollections - rhinestones
Adhesives: Bearly Art glue; SA - tape runner, 3D & thin 3D foam squares 


Saturday, March 2, 2024

SISTERHOOD OF SNARKY STAMPERS #248 - S is for Snarky

 
(This post contains affiliate links, at no cost to you,
and also, shameless self-promotion)

Hey there snarky peeps!
The latest challenge at the SISTERHOOD OF SNARKY STAMPERS
starts today, and the theme is one near and dear to our hearts: SNARK!
Let your freak flag fly and show us your sarcastic creations!
Here's what I created:


My design is based off of The Paper Players sketch #678.
(And because I didn't pay attention, the challenge ended yesterday. DOH!)
I stamped and colored the coffee lady with Prismacolor pencils, then
stamped the sentiment from my very own stamp set: Hot Mess


I hope that you'll find some time this month to play along in our
snarky challenge at the Sisterhood of Snarky Stampers!
For more amazing snarkiness, please do yourself a favor and
visit the blogs of my Sisters and our reigning Queen, Karen, and leave
some bloggy love!
Thanks for visiting. I hope you have a fabulous day!


Supplies:
Stamps: STAMPlorations/Chris Dring Designs - Hot Mess; Riley & Co. - Coffee Lady
Ink: Memento - Tuxedo Black
DP: My Mind's Eye - Follow Your Heart
CS: Neenah; Thunderbolt
Accessories: Prismacolor Pencils; MISTI
Adhesives: SA - tape runner, thin 3D foam squares


Wednesday, December 20, 2023

Three birds

Hello there and welcome!
I'm really trying to replenish my 
stash of birthday cards.
Here's another card I'd like to share: 


I had this (in hindsight, not so) brilliant idea to use the
negative of a die cut for my focal image, and let the
paper behind it show through. I forgot about the few itty bitty
pieces that had to be put back. Trying to glue a tiny bit
of cardstock that's smaller than a pin head made me
feel stabby, but I did it. (I'm never doing that again)
I did first try using a white marker to fill in the 
two tiny spots, but it wasn't opaque enough.


Here's the finished inside:


Now I have yet another birthday card done! Yay!
That's all for now. Thank you for visiting.
I hope that you have a great day!


I'd like to enter this at AAA Cards Challenge #255 - sketch and "cold"


Supplies:
Stamps: Honey Bee - Birthday Wishes
Ink: Memento - Gray Flannel
DP: Craft Consortium - Ink Drops Ocean
CS: Neenah
Accessories: STAMPlorations - For the Birds dies; Penny Black - Swirly Stitches rectangle die; MISTI
Adhesives: Ranger - MMM; 3L - tape runner


Sunday, July 23, 2023

Birthday Butterflies

 Hello and welcome crafty friends!
I'm popping in (at the last minute) with
a card I made for a couple challenges:

(This post contains affiliate links, at no additional cost to you!)

I used the Shower of Flutters stencil and blended three shades of
magenta from bottom left to almost top right, leaving some
white space at the corner. Using images from the
Trendy Butterflies stamp set, I randomly stamped over the
outlines of some of the butterflies. I placed the stencil back over
the images and splattered (too much!) black paint over the panel.
I trimmed the panel using the Crazy Double Running Stitch die
in the largest size. I then die cut twice, the Happy Birthday from
the Everyday Sentiments die set, stacked and glued to the card.


This card is much more vibrant in real life, but the day I
took the pictures, it was very overcast. Ugh!
Well, that's it for now. Thank you for
visiting, and I hope that you have a great
rest of your day!


I'd like to enter this at:


Supplies:
Stamps: STAMPlorations - Trundy Butterflies
Ink: Altenew - Purple Wine, Puffy Heart, Rose Quartz; Memento - Gray Flannel
CS: Neenah; scrap
Accessories: ARTplorations - Shower of Flutters stencil; CUTplorations - Crazy double running stitch die, Everyday Sentiments die; DecoArt Americana - black acryllic paint; tooth brush
Adhesives: Bearly Art glue; 3L - tape runner


Saturday, May 13, 2023

SISTERHOOD OF SNARKY STAMPERS #234 - Y is for Yo Momma


Hello and welcome back, snarky peeps!
This fortnight's challenge at the
celebrates all mothers for Mother's Day!
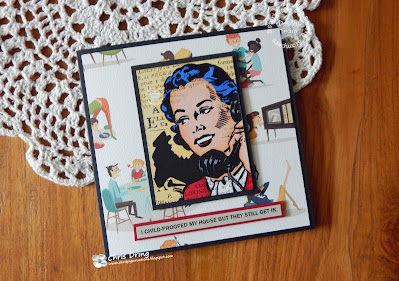
I usually make a pretty card for my Mom,
but this year I decided to go the snarky route:


I used some family themed paper for my background,
then colored one of the ATC's from the
My sentiment is computer generated.


A simple sentiment finishes the inside of my card:


I hope that you find some time to play along in the Yo Momma challenge
For more inspiration, please do check out what my sisters
and our reigning Queen, Mia,
created for your viewing pleasure!
Thanks for stopping by.
Wishing all Moms a very Happy Mother's Day!


(This post contains affiliate links, at no additional cost to you!)

Supplies:
Stamps - Hero Arts - Happy Mom's Day
Ink: Memento - Tuxedo Black
DP: Carta Bella - Family Night
CS: Cardstock Warehouse; Darice
Accessories: STAMPlorations - Retro People ATC ephemera pack; Spectrum Noir markers; computer & printer; MISTI
Adhesives: SA by 3L - tape runner, thin 3D foam squares


Saturday, April 29, 2023

SISTERHOOD OF SNARKY STAMPERS #233 F is for Flowers


Hello and welcome, snarky peeps!
It's time once again for the new challenge at the
This fortnight is all about flowers!
Pretty self explanatory, I think. Here's what I
came up with:


This card was too pretty to snark up. I die cut the pansy pieces out of
white card stock, then used different inks to blend the colors.
To bring out the fine lines of the petals and leaves, I used
Prismacolor pencils to trace over them.


Here's the inside:


I actually made this the beginning of last month, as this 
is the card I sent to my Sistah Barbara for her birthday.
(I'm so glad that you liked it! 💖)

So now it's your turn! Create a project that features a flower
 or more and link it up at the Sisterhood of Snarky Stampers.
For more inspiration, please do check out the blogs
of my sisters and our reigning Queen, Stephanie,
to see what amazing creations they made!
Thanks for visiting. I hope you have a great day!


I'd like to enter this at AAA Birthday Challenge #48 - Layer it up


Supplies:
Stamps - Honey Bee - Inside Birthday Sentiments
Ink: Memento - Tuxedo Black, Lulu Lavender, Lilac Posies, Grape Jelly, Bamboo Leaves, Cottage Ivy, Dandelion; Simon Says Stamp - Lavender; Ranger DI - Tumbled Glass
CS: Neenah
Accessories: GC; Honey Bee - Lovely Layers Pansy dies; STAMPlorations - Gridlocked stencil; Sakura - silver Gelly Roll pen
Adhesives: Ranger - Multi medium matte; SA by 3L - tape runner, thin 3D foam squares


Thursday, March 30, 2023

A couple of Christmas cards

 Hello crafty friends and welcome!
I have a couple of Christmas cards to share:


This was pretty easy to make, using a handful of items
from a Christmas themed ephemera package by STAMPlorations.
I watered down some white gesso and splattered it onto 
my card base for a starry sky, die cut the snowy hill and stamped
the sentiment before assembling my little scene. 

*****


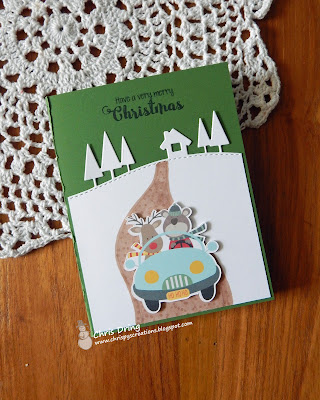
I made a similar card using another item from the ephemera package,
and the same stamp set for my sentiment.
The snowy background was cut using the
I adhered everything, I colored in a drive to ground the car.

I actually made these a couple weeks ago, and just
realized I never blogged about them.
which ends tomorrow, so I better get this linked! LOL!


Thanks for visiting! Have a great day!


Supplies:
Stamps: STAMPlorations - Holiday Expressions: Yuletide Cheer
Ink: Memento - Tuxedo Black
CS: Taylored Expressions; Neenah
Accessories: STAMPlorations - Christmas ephemera #1, stitched winter landscape die; MISTI; MB2 Spectrum Noir marker; GC; DecoArt Media white gesso; paintbrush
Adhesives: SA by 3L - tape runner, thin 3D foam squares


adding pinterest script 3. Changing the Position of the Pin it! button The cool thing about this code is that you have some freedom over where the Pinterest button for Blogger will go over the image. Take a look at the code that you just copied and pasted into the HTML for the word 'center'.