Monday, September 30, 2013

Drunken Stampers challenge #143: Thing - Die Cuts

Hello and good morning to you! Did you know the current challenge at Drunken Stampers is all about Die Cuts?!


Yepper! This is gonna be a huge challenge I predict! It's the Yellow Canaries turn this week to dazzle you with their creations, but you know I just had to play along! ☺


Here is the inside of the card:

I'm also going to enter this for the current CAS(E) this Sketch #47 challenge,


also for the Paper Smooches Sparks challenge - Anything Goes


and for the  Simon Says Stamp - Anything Goes challenge.

I love a simple design. I tend to gravitate toward CAS designs more than anything else. And since Halloween is upon us, I'm cranking out cards for that holiday. I used the Jumbo Squiggle Border Die-Namic from MFT in three different patterned papers. Check out that orange damask paper with the skull and cross bones! LOVE! I stamped, colored and fussy cut the cutie patootie monster (Don't have the outline die for him...yet!) and adhered him with foam squares. I also added some Glossy Accents to his eyes. I used some scrap of the die cut orange paper on the inside too. Stamped the sentiment to finish it off.

I hope you get a chance to play along with the Drunken Stampers Die Cut challenge! You have until Friday, October 4th, 11:59 pm PST to get your entry in! Have a great day and thanks for stopping by!

Craft on my friends!

Chris
Supplies:
Stamps: Paper Smooches - Falling for you, Halloweenies
Ink: Memento - Tuxedo Black
DP: Authentique - Thrilling (orange, black); Recollections - Simply Autumn (green)
CS: Bazzill Basics (purple); Recollections (white)
Accessories: Grand Calibur; MFT - Jumbo Squiggle border Die-Namic; Spectrum Noir markers; Ranger - Glossy Accents; SA by 3L adhesives


Sunday, September 29, 2013

Absolutely......

Hi again. I have another card to share. I didn't create this for any challenge, just free styled it. But of course, I realized I could enter this in the Simon Says Stamp - Anything Goes challenge, and so I will. ☺


Here is the inside:

I just purchased this die and stamp set and the perfect opportunity just happened for me to use it. Growing up we had a neighbor who was more like family to us. We even call her Aunt Marge, and Ginger, her daughter was like a cousin. I even babysat Ginger when I was a kid. Now Ginger is married and she just had her first child, a boy! So this card I made for her. After die cutting the word, I cut the blue card stock on an angle and adhered to the card base. I stamped the sentiment and embossed in white. Stamped and fussy cut the onsie and adhered with a foam square. Stamped the inside and was done! Gotta love a CAS design!

Thanks for stopping by! Stay crafty my friends!

Chris
Supplies
Stamps: Simon Says Stamp - Absolutely; Paper Smooches - Pip Squeaks; Lawn Fawn - Home Sweet Home
Ink: Versa Mark; Memento - Tuxedo Black
DP: DCWV - All Occasion Scrapbook Kit
CS: Recollections (white); Bazzill Basics (blue)
Accessories: Grand Calibur; SSS - Absolutely die; Stampendous - Detail white EP; heat gun; SA by 3L adhesives

Halloween Greetings..../MM#312

Good Morning my friends! It's the start of a new week and as usual, I'm entering challenges at the last minute! LOL! I made this card using the Mojo Mondays #312 sketch:

 Here is the inside...

...and the sketch:

It's a rare card that I make that doesn't have any stamping on it. This is one of those occurrences. All the paper, chipboard, and stickers are from the Graphic 45 Happy Haunting collection. Super easy. When I finished the card, it felt like it still needed something, so I added the swirly gems. Sort of an artsy fartsy pumpkin vine. (Well, that's how I was thinking it to be. ☺) The inside was finished with more stickers and I was done. 

Thanks for stopping by and I hope you have a great day!

Chris
Supplies
DP, chipboard and stickers: Graphic 45 - Happy Haunting
CS: Bazzill Basics (black); orange scrap
Accessories: Grand Calibur; Sizzix/TH - Bubble Wrapping EF; Mark Richards - crystal stickers; Ranger DI - Walnut Stain; SA by 3L and Glue Dots adhesives

Friday, September 27, 2013

The Witching Hour approaches....

Hi all and happy Friday to you! I was playing in my craft cave last night and came up with this card - at the last minute - for the Retro Sketches #82 challenge:


Here is the inside:

and the sketch:

Went with barely any color on the back panels so that the image I colored would pop more. I did add some green rhinestones in the center of the clocks for some bling. Yep, I used my Spectrum Noir markers. Yep, still trying to figure out how to color with alcohol markers, so please disregard the bleeding outside the lines. (figures that the very last thing I colored - tip of hat - came out crappy and it bled.) Oh well, I just need more practice. The inside sentiment was first stamped with a lavender ink, but it was too light. I went over it with Elderberry ink and purposely offset it. I like how that came out.

So what are your plans this weekend?  I stamped out a bunch of images on Xpress It paper and will be coloring to my little hearts content all weekend! Yay! Thanks for stopping by and have a great weekend!

Chris
Supplies
Stamps: Paper Smooches - Halloweenies
Ink: Memento Tuxedo Black, Elderberry; Hampton Arts A ls Mode - Lavender; Ranger DI - Walnut Stain
DP: Graphic 45
CS: David Tutera card base
Adhesives: SA by 3L - MyStik, 3D foam squares
Accessories: Spectrum Noir markers; Studio 112 rhinestones; Fiskars corner rounder

Thursday, September 26, 2013

Paper Smooches October blog hop!

Psssst! Hey you! Yes you! Did you know Paper Smooches has a blog hop going on right now to sneaky peek the new October release of stamps and dies? Here's a link to check it out!

http://papersmooches.blogspot.com/2013/09/september-dt-blog-hop.html?showComment=1380201458507#c4905500420825796886

Comment to win a prize on their blog!

Have a great day!

Chris

Wednesday, September 25, 2013

Happy 40th Birthday/DDWS#9

Good morning and hello my friends! I've been MIA these last couple of weeks due to back to back vacations. First a girls weekend with the ladies I play pool with. Then our beach vacation, which happily included both of my sisters joining us for part of the week. OMGee we had soooooo much fun! Lots of laughing, eating, goofing off, drinking wine, and just enjoying our time together!

See? We are a goofy bunch! LOL!

We all live in different states, and even though we talk/text on the phone all the time, it's rare that we get together in person. This vacation was an especially precious time for me! 

Ok, so enough about me, time to show you the card I made using the current Dahlhouse Designs Wanna Sketch #9:


Here is the inside:

I based this off of this sketch:


I flipped my card on it's side but otherwise I didn't stray too far from the sketch. I've used these stamps before, and had to ink them up again. One of my cousins that I've recently gotten back in touch with just turned 40, so of course I had to make a card for her! LOL! She shares our same goofy sense of humor so she'll appreciate it! The sentiment works perfectly with the paper bag die from Paper Smooches. After die cutting it, I crinkled it up, ripped the edge a couple times then went over it with Vintage Photo DI to make it look, well, old! LOL! I tucked the 40 Thickers inside the bag just enough so that you know what they are. Stamped that most excellent inside sentiment (lurves me a great punch line inside my cards!) and was done!

I hope you get to play along with Lisa's Wanna Sketch #9 challenge! This is another one of her sketches that I'm going to be using again and again!

Thanks for stopping by and I hope that you have a great day! I leave you with a parting shot:

Colby, our beach loving fur baby!

Chris
Supplies
Stamps: Unity Stamps - July 2012 KOM
Ink: Memento - Tuxedo Black; Ranger DI - Vintage Photo
DP: Studio Calico - Snippets
Card stock: Bazzill Basics (red); Recollections (kraft)
Adhesives: SA by 3L - MyStik; Recollections red tape
Accessories: Spellbinders Grand Calibur; Paper Smooches Shopping Bag Die; Doodlebug twine; American Crafts - Thickers and black marker

Saturday, September 21, 2013

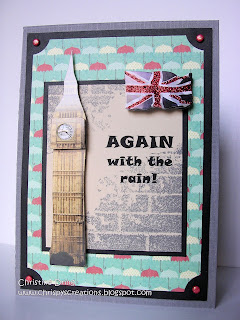
Drunken Stampers challenge #142 Place: London

Good morning and welcome to another fun filled challenge from the Drunken Stampers! This term our challenges are based on a person, place, or thing. This week is a place: London!


I've never been there. To be honest I never wanted to. (But to visit Scotland would be awesome! Something about a man wearing a kilt...yummy!) But I digress, back to the challenge at hand! Team Tropical Hooters is up this week with their interpretations of this challenge - here's what I came up with:


Here is the inside:

If you follow me, you know I love a good punch line on the inside of my cards! LOL! I always hear that London is rainy and foggy, so I used gray card stock and some paper with umbrellas on it. The center panel looked plain so I stamped the opposite corners with this brick stamp. (I won this set and thought it was about time to start using it!) I printed the sentiments from my computer and assembled the card. Again I thought the inside panel looked plain so I stamped a big mug of beer on it! Sweet! 3D stickers with a London theme made easy work of it!

I hope you find time to play along with us at Drunken Stampers. Make sure you stop by my Tropical Hooters teammies to see what they dreamed up! Thanks for stopping by!

Pip Pip Cherrio!

Chris

Supplies
Stamps: Raisin Boat - Edgy Accents; Unity - Keep Calm Have a Beer Itty Bitty
Ink: Memento - Gray Flannel
DP: MME - Quite Contrary Jack & Jill
Card stock: DCWV (gray); Recollections (black, beige)
Adhesive: SA by 3L - MyStik, 3D foam squares
Accessories: Paper House London Stickers; WRMK - glitter brads; Provo Craft Scalloped Scissors; Font: Snap ITC from Microsoft Word


Saturday, September 14, 2013

Drunken Stampers challenge #141 Person: Bartender

Good morning my friends! Today starts another challenge at the Drunken Stampers challenge blog! This week is focused on a person. A Bartender, to be exact!


The challenge is to base your card on a bartender, or use the prompts as a guide. In this case, drinks or a bar. What an amazingly fitting challenge for this blog! LOL! Also, it happens to be my birthday today, so drinks all around! YAY! (Go shorty! It's my birthday!) ☺

Technically, it's Team Yellow Canaries turn this week to inspire you, but you know I couldn't NOT make something for this challenge! LOL! Not only did I make something, but I made TWO somethings! HA! Check it out:


and the inside:

The planets must have been aligned since I just got the wine stamp from Unity, then Paper Smooches came out with drink themed stamps and dies. HAPPY HAPPY JOY JOY! I started with a card base made from "wine" colored card stock. Cut a strip of patterned paper and die cut the wine glass and adhered with foam dots. Stamped the sentiment and added some rhinestones for a bit of bling. On the inside I die cut the wine glass again and added the cheers sentiment. Super easy card!

My next card I totally cased from Laura Bassen. (Thanks Laura! You are brilliant!) I just fell in love with her card and KNEW I was going to make one myself!


Here's the inside:

another angle of the front so you can see the Glossy Accents in action!


I used my new Spectrum Noir markers to color this. (My Hubby surprised me with the last 7 sets I hinted at wanting for my birthday present. And gave me my gift early so I could play with them a bit this week! He is THE best husband in the Universe!! ♥ Love you Andy!!)

I plan on giving these to my sisters later today. As you are reading this, we (including our fur baby) are on our way to the beach house we rented in NC. Even better, BOTH of my sisters will be joining us for most of the week to drink ,celebrate, drink, bake in the sun, drink, and just have fun and be goofy! (Did I mention we'll be drinking?) This just may be the BEST birthday week for me EVER! I'm SO excited I can barely sit still!!

Ok, enough about me. Go check out what the Yellow Canaries team came up with at Drunken Stampers. I guarantee you won't be disappointed!

Bartender! Another round please!

Chris
Supplies

Drink your wine card:
Stamps: Unity - Drink your wine Itty Bitty; Paper Smooches - Birthday Sampler
Ink: Memento - Tuxedo Black
DP: Studio Calico - Snippets
Card stock: Bazzill Basics
Adhesives: SA by 3L - MyStik; American Crafts foam dots
Accessories: Spellbinders Grand Calibur; Paper Smooches dies - Drink Glasses; Colorbok & Studio 112 rhinestones; Fiskars corner rounder

Let's Celebrate card:
Stamps: Paper Smooches - Free Spirits, Birthday Sampler
Ink: Memento - Tuxedo Black
DP: Graphic 45 - Bohemian Bazaar
Card stock: Recollections
Adhesives: SA by 3L - MyStik, 3D foam squares
Accessories: X-Press It blending card; Spectrum Noir markers; Ranger Glossy Accents

Saturday, September 7, 2013

Drunken Stampers #140 Thing: Buttons

Good Morning friends! It's Saturday morning and that means another challenge at Drunken Stampers! This week's challenge is all about buttons!


Just use a button or buttons on your card! Easy peasy! It's Team Tropical Hooters turn this week to inspire you. Here's what I came up with:


And the inside:

Ok, it's the first Christmas card I made this year. A record really. I usually start making Christmas cards in November. Queen of procrastination: that's me! I dipped into my button stash. (yes I have a lot of buttons, no I rarely use them. Silly me) Well, to be honest, I store them in a mason jar which I dumped out on my desk and fished out green and brown buttons. Much more fun that way! I tied gold floss on the green buttons. I glued them with the floss on angles to make it look like the "tree" had "garland". The star is a shank button, I just took pliers to the shank and broke it off. I stamped then embossed the sentiments with champagne embossing powder. I thought it still needed a little somethin' somethin' so I traced a gold pen around the main panel. Stamped the inside in gold ink and I was done!

So, what are you waiting for? Go break out that stash of buttons you've been hording and make something pretty! But first, go check out what my Tropical Hooter teammates dreamed up! You have until Friday to link up to the Drunken Stampers challenge blog!  Happy crafting!

Chris
Supplies
Stamps: MFT - Seasonal Sentiments
Ink: Versa Mark; Clear Snap - gold
DP: MME - Ooh La La
Card stock: Bazzill Basics
Adhesives: SA by 3L - MyStik; Helmar 450 glue
Accessories: Buttons from my stash; DMC floss; Stampendous - champagne EP; Heat gun; Sakura - gold Gelly Roll pen


Sunday, September 1, 2013

You say Witch.....

Hello friends! I hope you are all enjoying your weekend, and Happy Labor Day weekend to my American and Canadian peeps! I'd like to share a card I made for the Simply Betty Stamps Facebook Fanpage August challenge, using the sketch from Mojo Monday #308.

Meet Mercedes the Witch:


Here is the inside:

and the sketch I based my card from. I made a round card! But I gave it a quarter turn to fit my needs:


Love Betty's images! Mercedes is a free digi! The only catch to get this is to join the fan page, and you have to use it for that challenge (Halloween colors for this challenge). Easy peasy! I'm still collecting Spectrum Noir marker sets, so this is another hybrid coloring, using SN and Marvy Uchida markers. Even more, I'm still trying to figure out how to color with the SN's. They react so differently from the MU's! Ugh! Well, I'll just keep coloring until I figure it out! ☺

Thanks for stopping by and I hope that you all have a great weekend! Craft on my friends!

Chris
Supplies
Stamps: SBS - Mercedes digi; Unity - You Witch! Itty Bitty; Hero Arts - Celebrate Everyday
Ink: Memento - Tuxedo Black; Tangelo; Clear Snap - Charcoal
DP: Authentique - Thrilling
Card stock: Bazzill Basics (black); Paper Smooches (kiwi); Recollections (purple); Bristol (white)
Adhesives: SA by 3L - MyStik, 3D foam squares; Elmer's extra strength glue stick
Accessories: Spellbinders Grand Calibur, Grand Circle and Labels 14 Nesties; Spectrum Noir markers; Marvy Uchida markers; Studio 112 gems; Jolee's Boutique - spider sticker; Tonic distressing tool; Martha Stewart - web punch

adding pinterest script 3. Changing the Position of the Pin it! button The cool thing about this code is that you have some freedom over where the Pinterest button for Blogger will go over the image. Take a look at the code that you just copied and pasted into the HTML for the word 'center'.