Showing posts with label Retro Sketches. Show all posts

Tuesday, August 30, 2016

SHOPPING OUR STASH #267 - Learn Something New (to you)


Hello crafty peeps! This week at SHOPPING OUR STASH, we challenge you to try a new (to you) technique. Whether it be something that's been around for years and you've yet to try it, or a brand spanking new technique that's all the rage, we'd like to see it! For my card, I tried out the shaving cream technique. This was the first time trying it out. It is messy. It is fun! 


Here's the finished inside:

I have about a dozen Spectrum Noir reinkers, so I used two of them for my project. I pretty much followed along exactly from the video tutorial. The only thing I did different was instead of putting another panel in the shaving cream, I smooshed the two panels together, then pealed apart, wiped them off and let them dry. I cut one of them down to size for my card. I loved trying this out! The only thing I don't really care for is that now my card reeks of shaving cream! LOL!

I hope to see what fun new (to you) techniques you use on your projects. Please be sure to link up at Shopping Our Stash so we can find more techniques to try, I mean, to see what you created! While there, please check out what my teammates came up with, and leave them some bloggy lovin! Thanks for visiting!


I'd like to enter this at:
Retro Sketches #229
Seize the Birthday - Anything Goes


Supplies:
Stamps: LOL Stamps - Officially Old; Paper Smooches - Happy Birthday
Ink: Memento - Tuxedo Black
DP & CS: scraps
Accessories: shaving cream; Spectrum Noir reinkers - CG4 & TB4; paper plate; craft stick; MISTI; Amscan - doily; Jo-Ann's - ribbon; mystery black metal dots; Fray Check
Adhesives: SA by 3L - tape runner; Recollections - red tape; Glue Dots

Thursday, March 27, 2014

Bear Hugs - Retro Sketch #107

Hi there, I'm back with another post today. It's a two for! Lucky you! LOL! (joking. sort of. wink!) Anyhooo, I based this card using the sketch from Retro Sketches #107:


Here's the inside:

and the sketch:

A long time ago, in a galaxy far, far away, I bought a handful of wood mount rubber stamps from a clearance bin at a big box craft store. Along with a black ink pad, I thought I'd try my hand at stamping. Fast forward to today, I finally inked up one of the stamps! Yay me! Glad I waited the, oh, 7 years to ink and color Pooh Bear, because back then my mad coloring skilz weren't so mad. (Not to say they are mad now, just better.) Anyway, I mirrored the sketch to have my negative die cut on the other side. The paper used to die cut the heart has a bit of shimmer to it, and therefore, it was a bit hard to photograph. Just when I was about to snap pictures, I had an epiphany: This needs a bee! Back up to the craft cave I went in search of this bee stamp. (I knew I had it, I used it before) I had to do the stamp kissing thing as it's actually buzzing in the opposite direction (I used the solid circle stamp from PS - Hullabaloo for the kiss. That's why it's in my supplies list) I traced the image with a black marker as it doesn't come out very dark, then colored with white and yellow Prismacolor pencils. I hand drew it's flighty flight path. There. THAT'S better! LOL!

Well, that's it for today. I think. I hear my wine bottle calling me, so I must go comfort it. (wink!) Have a great evening and stay crafty my friends!

Chris
Supplies:
Stamps: All Night Media - Pooh Bear; Paper Smooches - Chubby Chum Pals, Spring Fling, Hullabaloo, Cosmos
Ink: Memento - Tuxedo Black
CS: Recollections (kraft, white); DCWV (reds)
Accessories: Spectrum Noir markers; Slice die cut machine & Basics 1 cartridge; white & yellow Prismacolor pencils; AC Slick Writer pen
Adhesives: SA by 3L - MyStik permanent, 3D foam squares


Friday, February 14, 2014

2.14 - Deep Sympathy

So, we were 'blessed' with at least 14" of snow Wednesday night and into Thursday. Then it changed to rain. Then to freezing rain. Then back to snow. Then we had a few hours of zero precipitation before getting another couple of inches of snow last night. My muscles and carpal tunnel are protesting today from shoveling yesterday and again today. Oh, yeah, and we are getting another 2" to 4" inches again tonight. Is anyone else SICK of WINTER?!!!! Ugh!!

Ok, I'm done ranting. For now. ;) Onto my card. I had to make another sympathy card. I found out that my best friend's grandfather passed earlier this week, so I wanted to get a card out to them.


Here is the inside:

This is pretty self explanatory. The pink DP was first cut in a rectangle then cut on a diagonal. I used the left over piece on the inside to mimic the front. The colors were based on Color Throwdown #279


and the design based on Retro Sketches #101


Well, I have more blog posts, so hopefully I'll see you back soon! Thanks for stopping by!

Chris
Supplies
Stamps: MFT - Essential Sentiments; Inkadinkado - inside sentiment
Ink: Memento - Gray Flannel
DP: Teresa Collins - Sweet Afternoon
CS: Darice (white); scrap
Accessories: Martha Stewart - border punch; JoAnn Crafts - flower brad; MME - twine; Recollections - red rhinestones
Adhesives: SA by 3L - MyStik  permanent, 3D foam squares; Glossy Accents


Thursday, February 6, 2014

2.6.14 A sympathy card...

We all make them. We all need them. But that doesn't mean we have to like it. Yes, I'm talking about the dreaded sympathy card. We just found out that one of Andy's Aunts passed away after years of health issues. (Perhaps it was a blessing in disguise?) So, there I was, up in the craft cave making a card.


Here's the inside. I love this sentiment.

I had half a sheet of white card stock sitting on my desk, so I decided to get out the Distress Inks again and do some blending. After that I spritzed water on top of the colors to blend them a bit more. I die cut the main panel and stamped the sentiment and leaves. I dug into my box-o-bling and found some borders to adhere under it, along with some rhinestones from my stash. Went digging in another drawer and found my twine and tied that around the main panel. The inside is more of the paper I made finished with another sentiment.

This card is based on Retro Sketches #100:


Thanks for hanging out. I hope you get the chance to play along with this challenge. It's their 100th sketch and there's goodies to be had! Stay crafty my friends!

Chris
Supplies
Stamps: Paper Smooches - Good Gab, Botanicals 2; Inkadinkadoo - inside sentiment
Ink: Memento - Tuxedo Black; Ranger DI - Broken China, Peeled Paint; Dusty Concord; Antique Linen; Shaded Lilac
DP: ??? I have no clue
CS: Recollections (white, black); Bazzill (green)
Accessories: Grand Calibur, Labels One Nesties: K&Co. - adhesive borders; Doodlebug twine; rhinestones from my stash; water bottle spritzer
Adhesives: SA by 3L - MyStik permanent, 3D foam squares; Glue Dots

Monday, January 27, 2014

1.27 Peace....

Hello there! It's my second post today. Sometimes I get on a roll over the weekend and make numerous cards. It happens. Rarely. Anyhoooo, here's another card I made. I am playing along with Retro Sketches #99 and also Merry Monday #92. (I finished this card about a half hour after MM#92 closed. Grrrr!) Oh, well, it's another Christmas card done!


The inside:

and the challenges:


I love this wreath die. It is so versatile. I know I'll be using it for Spring/Easter themed cards. The vanilla panel looked so, um, vanilla, so I embossed it with snowflakes. It still looked too vanilla to me, so I took it a step further and inked the edges and the snowflakes with Walnut Stain DI. I think it adds to the rustic look of the card. The sentiments are heat embossed, and the finishing touch is that brown faux suede ribbon. I think this is the first time I used it, and I have to say, it looks pretty awesome! LOL!

Well, it's time to feed the fur baby, then make some food for human consumption also. Thanks for hanging out. I hope you get the chance to play along with these challenges! Stay crafty, my friends!

Chris
Supplies
Stamps: Paper Smooches - Joyful Greetings
Ink: Versa Mark; Ranger DI - Walnut Stain
DP: Recollections - Believe
CS: Recollections
Accessories: Grand Calibur; Lg Std Circles Nesties; Poppy Stamps - Breezy wreath die; Darice - snowflake EF; May Arts - faux suede ribbon; Stampendous - white EP; heat gun; Recollections - rhinestones
Adhesive: SA by 3L - MyStik permanent, 3D foam squares; Elmer's - extra strength glue stick; Recollections - red tape

Thursday, January 16, 2014

Happy Birthday Rocker.....

Happy Thursday to you all! I'm sharing a card I made for one of my nephews using Retro Sketches #97:


the inside:

and the sketch:

I am finding it hard to come up with ideas for cards to make for my nephews that, except for one that's 25 and one that's 14, are all turning 19 this year. They're not quite ready for the drinking themed cards, but too old for the cutie/sugary cards. (Yep, three nephews and one niece turning 19. Apparently, that year was a very fertile year for both sides of our families. HA!) 

So, since I see the kids in the hood always walking around with ear buds in their ears, I went with a music themed card. (Sometimes I get a treat and one of them is also singing/rapping as they walk. That's when I usually burst out laughing. And I can do that, because they are singing/rapping so loud that they can't hear me laughing at them! One of the 'perks' of being older! LOL!)

I picked that chevron paper because a) to me the colors were gender neutral, and b) I thought they were sort of like radio waves, but in an artsy fartsy way. I used the negative die cut of the bam bubble, stamped, colored and fussy cut the iPod and adhered using foam squares, after stamping the sentiment first. Another sentiment finishes the inside.

That's it for me. Thanks for hanging out and I hope you get to do some crafting today! Enjoy!

Chris
Supplies
Stamps: Paper Smooches - Teen Routine, Birthday Buddies; BeBoppin
Ink: Memento - Tuxedo Black
DP: Carta Bella - Well Played
CS: Darice; Copic X-Press It
Accessories: Grand Calibur; Paper Smooches - Bam Bubbles Die; Spectrum Noir markers
Adhesive: SA by 3L - MyStik permanent, 3D foam squares

Tuesday, October 22, 2013

Giving Thanks....

Hello and happy Tuesday! Well, at least I hope it's happy for you. We had a water main break in our neighborhood early this morning, and we are without water. There is a crew working on it as I type. They've been there since about 9:30 am. I just took my dog for a walk a bit ago, and they are still there. There was a worker standing chest deep in the hole they dug in the street! Yikes! It's not looking like they are gonna be done anytime soon. I haz a sad. Again.

Well, on to my thankful card! ☺ I made this using sketch #86 from Retro Sketches.


Here is the inside of my card:

...and the sketch:

Thankful for pumpkin pie? Why not? ☺ And would you look at that. I actually used not one, but two buttons on my card. Don't fall off your chair. I used coordinating stickers that came with the DP I used. Easy peasy. More of the same DP and another sticker on the inside, stamped with a sentiment, and I was done!

What am I thankful for? Washing four loads of laundry and also running the dish washer yesterday! I'd also be thankful if I'm able to take a shower today. Yeah. I'd really be thankful for that.

Have a great day!

Chris
Supplies:
Stamps: Hero Arts - Celebrate Everyday
Ink: Memento - Tuxedo Black
DP & stickers: - Basic Grey - Persimmon
Card stock: DCWV
Accessories: Grand Calibur; Paper Smooches - Notebook Bracket Die; American Crafts - buttons; string from my stash; pinking shears
Adhesives: SA by 3L - EZ runner, 3D foam squares; Recollections - red tape

Friday, September 27, 2013

The Witching Hour approaches....

Hi all and happy Friday to you! I was playing in my craft cave last night and came up with this card - at the last minute - for the Retro Sketches #82 challenge:


Here is the inside:

and the sketch:

Went with barely any color on the back panels so that the image I colored would pop more. I did add some green rhinestones in the center of the clocks for some bling. Yep, I used my Spectrum Noir markers. Yep, still trying to figure out how to color with alcohol markers, so please disregard the bleeding outside the lines. (figures that the very last thing I colored - tip of hat - came out crappy and it bled.) Oh well, I just need more practice. The inside sentiment was first stamped with a lavender ink, but it was too light. I went over it with Elderberry ink and purposely offset it. I like how that came out.

So what are your plans this weekend?  I stamped out a bunch of images on Xpress It paper and will be coloring to my little hearts content all weekend! Yay! Thanks for stopping by and have a great weekend!

Chris
Supplies
Stamps: Paper Smooches - Halloweenies
Ink: Memento Tuxedo Black, Elderberry; Hampton Arts A ls Mode - Lavender; Ranger DI - Walnut Stain
DP: Graphic 45
CS: David Tutera card base
Adhesives: SA by 3L - MyStik, 3D foam squares
Accessories: Spectrum Noir markers; Studio 112 rhinestones; Fiskars corner rounder

Wednesday, July 3, 2013

You're the Bomb/RS#70

Good morning all! It's raining here. Again. Does anyone on the east coast remember what a sunny day looks like? Anyone? My yard looks so much like a jungle from all the rain we've been getting. It's not that it's coming down in buckets, just that it's enough that you can't run the lawn mower or hedge trimmers. Just when you think you can use those, BAM!, more rain! Geesh!

Anyhoo, here is the card I made using Retro Sketches #70:


...the inside:

Here's the sketch I based it off of:


As I was looking at the sentiments on the Paper Smooches set: Slang Gang, "you're the bomb" caught my eye. Then I had the idea to cut out a circle for a bomb. Once I die cut it, I cut a little notch for the top. I pierced a hole close to the edge to run the twine through, but was too close and it ripped. DOH! All was not lost: I 'McGyvered' it (Anyone else watch that show? I loved it! LOL!) with some scotch tape on the back side! Speaking of McGyvering things, see that 'spark' sort of stamp at the end of the wick? That's the 'leaves' from the tomato pin cushion on the Needle Little Love set by Paper Smooches! Cool Beans!! LOL! I used some gold Stickles to color in the spark and the tip of the wick, then used it to hold the wick in place. I used a tiny spot of Glossy Accents to shape the wick how I wanted it to look on the card. After I stamped and embossed the sentiment, I added the main panel to the card base with some 3D foam squares. For the inside, I die cut another circle, using the negative from that, I cut the little top out and taped it from the back side. Stamped Happy Birthday, cut a tiny 'V' in the top where the twine came out from (taped to the back side). Added some more Stickles to the end of the wick. Once everything was dry I adhered to the card. (Wow, I just read back what I typed, and even though it looks like it took forever to make, this card came together pretty quickly! LOL!)

Thanks for hanging in till the end of my wind bag of a post! LOL! Hope you have a great day!

Chris
Supplies
Stamps: Paper Smooches - Slang Gang, Needle Little Love, Hullabaloo
Ink: Versa Mark; Memento - Tuxedo Black
DP: American Crafts - Color Crush
Card stock: Bazzill Basics
Adhesive: SA by 3L - MyStik, 3D foam squares
Accessories: Grand Calibur; Small Std. Circle Nestie; Doodlebug twine; Ranger - gold Stickles; Stampendous white EP; heat gun; Glossy Accents

Friday, May 31, 2013

Happy Anniversary.../RS#5

Hello and happy Friday! I made this card the other day, but only realized that I never blogged about it. And the challenge that it's for is due in, oh, a couple hours. I excel at procrastination! LOL!


Here is the inside:


I used the sketch from Retro Sketches #65:


Well, I mostly used the sketch. I took some liberty with it and omitted the first layer. I made this super CAS. And I also used some dimensional stickers that I've had for ever! Woo Hoo! Not my best work by far, but I tried to make a card in under a half hour and I did it! (Finally! Normal time to make a card? at least 2 hours. I know, it's so sad!) I get distracted by all the different papers, patterns, ideas, etc then I can't make up my mind what to do. Anyone else like that?

Anyhoo, that's all for this post. I have one more to do then I'm gonna relax and continue to read the book I'm into right now. I'm reading a series by Nevada Barr about a Park Ranger (Anna Pigeon) who always seems to find murder and mayhem at whichever park she's stationed at. A good whodunit series without all the blood and gore! LOL!

Have a great evening and thanks for stopping by!

Chris
Supplies
Stamps: Hero Arts - Everyday Sayings

Ink: Memento - Tuxedo Black
DP: American Crafts - Color Crush
David Tutera card base
Adhesives: SA by 3L - MyStik
Accessories: K& Co. Ladybug Stickers; Fiskars corner rounder

Friday, May 17, 2013

Paper Smooches Sparks DT Call

Hi all! I have a couple more cards to share. I'm also entering them for the Paper Smooches Sparks DT Call:

Here is my first card:


Wait for it - here is the inside:


LOL! I know right?! I based my card (loosely) from the January 2013 Picture Perfect challenge, and also used Retro Sketch#63.


I had the stamp for the inside sentiment already, and as soon as I saw the shopping bag die I HAD to use them together! I even crinkled and distressed the bag to look old! LOL! I've said it before and I'll say it again: I LOVE a good punny line!!

Here is my second card:


and the inside:


I based this card from the October 2012 Picture Perfect challenge


Another graduation card done! Woo hoo! I googled the school colors and mascot again. Go figure, the colors are black white and 'Vegas gold' (whatever that is. I just went with yellow) The mascot is a phoenix, and this is the actual mascot. I just saved the image onto my computer. (There's a tiny amount of orange in the flames, so I hope you'll forgive me for that!) I embossed congradulations in white and colored the photo corners with a yellow marker before adhering to the grey card base. After stamping the inside, I colored a couple of the letters with gold Smooch ink.

So there you have it. Wish me luck! Oh, and if you are also trying out, good luck to you too! Thanks for stopping by!

Chris
Supplies for Happy Birthday card:

Stamps: Paper Smooches - Digits; Unity Stamp Co. - July 2012 KOM
Ink: Memento - Tuxedo Black; Ranger DI - Walnut Stain
DP - October Afternoon - 9 to 5
Card stock: Recollections (kraft); David Tutera card base
Adhesives: SA by 3L - MyStik, 3D foam squares; Scotch Scrapbooker's Glue
Accessories: Grand Calibur; Paper Smooches - Shopping Bag Die; MME - rhinestones; Die cut arrows from my stash

Supplies for Congradulations card:

Stamps: Paper Smooches - Smarty Pants, Slang Gang, Knick Knacks
Ink: Memento - Tuxedo Black; Versa Mark
Card stock: DCWV (grey); Bazzill Basics (black)
Strathmore water color paper
Adhesive: SA by 3L - MyStik, 3D foam squares
Accessories: Clip art from internet; Avery photo corners; Marvy Uchida marker; Stampendous White Embossing Powder; heat gun; Clear Snap Gold Smooch Ink

Tuesday, May 7, 2013

Happy Mother's Day - RS#62

Good Morning my lovelies! I can't believe that it's been over a week since I last posted anything! I've been away having fun at our annual 'Girl's Week at the Beach'. My sister's good friend (and neighbor) owns a beach house on Topsail Island in NC, and we've been renting it for the last few years at this time to get away from hubbys, kids, life, reality, etc. and to celebrate my sister's birthday, which was this past Sunday. I'll talk more about it but first I want to share a card I made using the current Retro Sketch #62:


Here's the inside:

and the sketch:

I kept it simple and followed the sketch closely. After I stamped the image, I colored it lightly with Prismacolor pencils, just to give it a hint of color. I fussy cut and popped it using some foam squares onto an ombre panel. I really like how the hint of color in the image looks against that bold ombre background.

So, quick-like, getting back to the beach, even though I didn't bring any paper crafting supplies, I did do some crafting! Mary did some updating in her house and one of the things she did was add a cute little shelf in the master bathroom. She asked me to glue some seashells to the shelf to give it a more beachy look. Here's what I did:


Simple and easy to do! Mary had the glue gun there already and we just used found shells! How cool is that?! If you are interested in renting a beach house, THIS is the house to rent! She has everything there! (well, you do have to bring your own food, booze, and clothes! LOL!) Here is a link to the beach house: Nextasea  to get information on this house and see some pictures of it. (Ok, so I told Mary that was going to blog about the shelf, but didn't tell her that I was going to try to get her house rented! LOL!)

Thanks for stopping by and I hope that you all have a wonderful day!

Chris

Supplies:
Stamps: Unity Stamp Co. - April 2012 KOM; Hero Arts (Happy Mom's Day); MFT (Enjoy...)
Ink: Memento - Tuxedo Black
DP: American Crafts - Color Crush
Card stock: Bazzill Basics
Adhesives: SA by 3L - MyStik, 3D foam squares; Glue Dots
Accessories: Prismacolor pencils; Doodlebug twine

Wednesday, April 17, 2013

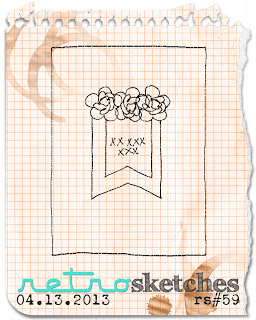
Deepest Sympathy.../RS59

Good morning lovelies! I have a card I'd like to share with you today. It's based on Retro Sketch #59:


the inside:


Here is the sketch:

I liked the simplicity of this sketch and followed it pretty closely. Yes, another sympathy card, I just made one last week. They're not kidding when they say bad news travels in threes. Unfortunately, I just found out about a death in another friend's family, so I'll be making a card for her also.

Ok, enough depressing talk. Let me show you a couple pictures I took a little while ago. When I let the dog outside, I noticed all this grass and weeds lying on my deck table.


It wasn't there yesterday. Then I looked up:


Some bird decided that our umbrella would make a great place to build it's nest! LOL! I hope it's not too mad when I get rid of what he started to build!

That's it for now. I hope that you have a great day and thanks for stopping by!

Chris

Supplies

Stamps: The Alley Way Stamps - Chatterbox
Ink: Memento - Tuxedo Black; Clear Snap - Chestnut Roan
DP: MME - Follow Your Heart (aqua grid); DCWV (tan floral)
Card stock: Recollections
Adhesives: SA by 3L - MyStik, 3D foam squares; Recollections - red tape
Accessories: Offray - flowers; Simplicity - lace

adding pinterest script 3. Changing the Position of the Pin it! button The cool thing about this code is that you have some freedom over where the Pinterest button for Blogger will go over the image. Take a look at the code that you just copied and pasted into the HTML for the word 'center'.