Showing posts with label Dare 2B Artsy. Show all posts

Thursday, March 16, 2023

Sunshine and Rainbows

 Hello and welcome!
The other day was a very exciting one for me.
I met Jules, one of my fellow design team sisters face to face
for the first time from the
We had a nice visit, getting to know each other better,
and having a good time.


(Don't mind the mess. We recently moved and we are still 
trying to figure out where things go!)

Jules made quite the impression on Colby. We tried to
get him in the picture with us, but all he wanted to do
was play tug-of-war with her!


We look forward to getting together when she's in town again. 😊

Yesterday was a sunny, but another very cold day here, so
I spent some time making some bright, cheerful cards.


here's the inside:

I played with the color arrangement and created
some more cards:


and the inside:


I've had this stamp set for a few years and I think only
used it once, so it was time for it to see some ink again.
I love how you get a different look to the rainbow
simply by changing which color you start with!

Well, that's it for now. Colby is in my face telling me
he wants to go out. LOL! Thanks for visiting,
and I hope you have a great day!


I'd like to enter this at:


Supplies:
Stamps: Dare2BArtzy - Sunshine and Rainbows; Hero Arts - Let's Celebrate
Ink: Memento - Lady Bug, Tangelo, Dandelion, Cottage Ivy, Bahama Blue, Paris Dusk, Grape Jelly, Tuxedo Black
CS: Neenah; Taylored Expressions
Accessories: MISTI; GC; Penny Black - Elegant Stitching rectangle die
Adhesives: SA by 3L - tape runner


Saturday, April 30, 2022

SISTERHOOD OF SNARKY STAMPERS #209 - U is for Underwater


Hello and welcome back snarky peeps!
It's time for the new challenge at the
For the next two weeks, we'd like to see your
underwater creations!
Here's what I came up with:


I used a new (to me) die cut plate that cuts an underwater
scene. Some blue ink blended DP serves as my watery backdrop.
The three fish cut outs I glued in the middle. I gave my
mermaid silhouettes some glam with gilding flakes, then added some
second generation bubble stamps at the top, and a few 
shells to finish the front.


 A simple sentiment finishes the inside.


I hope that you'll join my Sisters and our reigning Queen,
Monika, for our Underwater challenge at the

Thanks for visiting!


Supplies:
Stamps: Dare2BArtzy - Under the Sea Sentiments; Hero Arts - Let's Celebrate
Ink: Memento - Teal Zeal
DP: Craft Consortium - Ink Drops: Ocean
CS: Neenah; Taylored Expressions
Accessories: GC; Hero Arts - Reef Boarder and Frame die; Impression Obsession - mermaid dies; Spectrum Noir markers; MISTI; Cosmic Shimmer - summer meadow gilding flakes
Adhesives: SA by 3L - tape runner, thin 3D foam squares, adhesive sheets; Ranger - MMM


Friday, April 15, 2022

It's Demo Day to Go at Photo Scraps!

 Happy Friday peeps!
Just popping in to let you know that I made two card kits for
Demo  Day to Go at Photo Scraps! 
It takes place tomorrow the 16th from 10 AM TO 4 PM.

Yes, I just realized the date is off.)

If you're in the MD, VA, PA, DC area, why not take a road trip
and snag some card kits! You can click on the Photo Scraps
link above to see all the cards available, but here are
the two cards I've created:


*****


Close-up of that cute bunny:


Here is the list of Spectrum Noir markers I used, but you can
color the image any way you want to:


Lisa, Nancy, Becky and Jill have made some fantastic cards
also, so be sure to stop in if you can and snag some card kits!

Thanks for visiting. I hope you have a great day!


Supplies for seashell card:
Stamps: Dare 2B Artzy - Under the Sea Sentiments
Ink: Memento - Rich Cocoa
DP: Mintay - Paradice; Pinkfresh - Holiday Magic
Accessories: GC; Lawn Fawn - Scalloped Rectangle Stackables die; Avery Elle - Double Pierced rectangle die; Taylored Expressions - Tag Stacklets #1; Westcott hole punch; MME - twine; MISTI
Adhesives: SA by 3L - tape runner, 3D foam squares; Glue Dots

Supplies for Feel Better card:
Stamps: Lawn Fawn - Better Days
Ink: Memento - Tuxedo Black, Gray Flannel
DP: Echo Park - New Day
Accessories: Spectrum Noir markers; GC; Sunny Studio - Stitched Circles small die; Spellbinders - Splendid Circles die; MFT - Open Simply Scallops Trio border die; Paper Rose - Stitched Square die; MISTI; Nuvo Glitter Drops - white blizzard
Adhesives: SA by 3L - tape runner, 3D foam squares


Wednesday, March 23, 2022

Underwater birthday

 Hello and welcome!
Just popping in with a card I made for
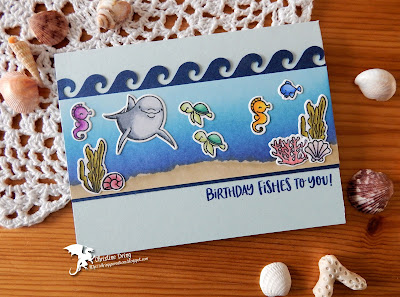
the current AAA Birthday #35 - Under the Sea challenge:


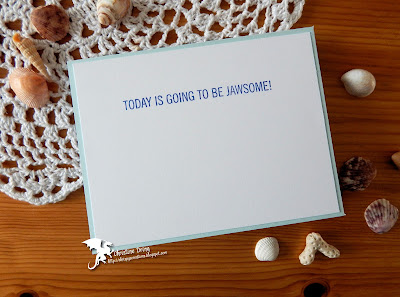
Here's the inside:

The background was made by blending kraft and a couple blue inks onto
white card stock. I ripped some scrap paper to use as masks for where the sandy bottom
and the ocean meet. This was matted using a much-neglected wave punch, then
adhered to a pale blue card base. I stamped multiples of all the undersea critters 
and foliage, colored and die cut. Once everything was glued in place, 
I stamped the sentiment and another one on the inside.
I feel like it's been forever since I've colored anything, so it was
good to use my markers again. 💗

That's it for now. Thanks for visiting, and I hope you have a good day!


Supplies:
Stamps: Mama Elephant - Marine Friends; Dare 2B Artzy - Under the Sea Sentiments; MFT - Sharky Sentiments
Ink: Memento - Tuxedo Black, Paris Dusk, Teal Zeal; Gina K - Kraft
CS: Spectrum Noir; Taylored Expressions; Neenah
Accessories: Spectrum Noir markers; GC; Mama Elephant - Marine Friends dies; EK Success - Tidal Waves punch; MISTI; Taylored Expressions blending brushes
Adhesives: SA by 3L - tape runner; Ranger - MMM


Thursday, July 16, 2020

Bright & Beautiful Birthday

Hello and welcome!
I've done a thing: I made a card the same day a
challenge came out. I know. Don't fall off your chair.
I'm usually entering challenges at the 11th hour.
Here's what I made:


and the inside:

 I had to let all the Stickles that I applied dry, so that's why I'm
only blogging today. Still...


This is the first time I've used this stamp set. NBUS! Another
rarity is that I bought it last month and am using it this month,
and not, say, next year sometime, like I usually do.
*cough - hoarder - cough*
There are so many different pieces in this set to make a gazillion 
different rainbows. To keep my brain from exploding in trying to
decide what color inks and parts to put together, I simply 
mimicked one of the samples on the back of the packaging.
Thank you, that was a life saver!
This is a very CAS card for me, but I'm starting to dig it. ☺

Well, guess I should go and do something productive. LOL!
Thanks for visiting. Have a great day!


I'd like to enter this at:
Seize the Birthday #195 - non neutral card base


Supplies:
Stamps: Dare2BArtzy - Sunshine & Rainbows; Taylored Expressions - In & Out Birthday
Ink: Memento - Dandelion, Tangelo, Rhubarb Stalk, Paris Dusk, Tuxedo Black
DP: scrap
CS: TE, Bazzill, Darice
Accessories: MISTI; GC; Paper Rose - stitched square die; Ranger - Crystal Stickles
Adhesives: SA by 3L - tape runner

Thursday, August 23, 2018

Zombie love

Hey there friends and welcome!
I had some fun coloring up a bunch of zombies the other day,
and here's one of the cards I made with them:


Here's the inside of my card:

Halloween is my favorite holiday. I think I decorate my house more 
for it than for Christmas. LOL!
These fabulously ghastly creatures were colored using Distress inks and a water brush.
I love the mottled colors!
Well, off to get some actual housework done now. Ugh!
Thanks for visiting!


I'd like to enter this at:


Supplies:
Stamps: Stampers Anonyous/TH - Zombies, Mr. Bones; Dare 2B Artsy - texture
Ink: Versamark; Ranger DI - evergreen bough, iced spruce, twisted citron, vintage photo, hickory smoke, fired brick, fossilized amber; Memento - tuxedo black, London fog
DP: Martha Stewart - Vampire
CS: Thunderbolt; Strathmore water color paper
Accessories: Inkadinkado - black EP; heat gun; MISTI; water brush; blending tool
Adhesives: SA by 3L - tape runner, 3D foam squares
adding pinterest script 3. Changing the Position of the Pin it! button The cool thing about this code is that you have some freedom over where the Pinterest button for Blogger will go over the image. Take a look at the code that you just copied and pasted into the HTML for the word 'center'.