and the inside:
Sorry for the not so good photos. Sometimes my camera must add a bluish tint to the entire photo, and editing doesn't work. (And I was too lazy to retake the pics. *koff*) For my experimenting, I tried using what papers I had on hand. These particular ornaments were created from the TE Sugar Cube cardstock, which is 100lb. I also tried this using Canson Bristol 96lb paper, as you can see in this picture:
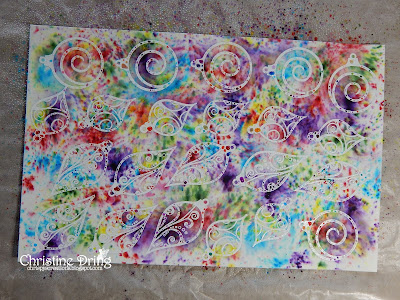
starting with the papers heat embossed with the ornaments
this is the Taylored Expressions paper
this is the Canson Bristol paper
I used different colors for each type of paper. I love how, depending on the paper you use, you get such different results on how the colors react and blend! Lynne wasn't kidding when she says that the paper will get soaking wet! At this point you want to handle them as little as possible, so you don't accidentally rip the paper. Just set aside overnight (or two) and let them dry naturally. (yes this was a project that took a few days to do, but the results are amazing!)
After the papers were dry, I set about fussy cutting the ornaments, then added crystal Stickles, because, glittery! The stamps I used had the hang-y thing built into the stamp, so what I did was take a paper piercer and pierced through to make holes. (once the Stickles dried) That way, I was able to tie the gold floss onto them. (a tedious thing that. I think I almost went blind from stringing these ornaments!) I then took a smaller panel and embossed it, adhered 3 ornaments with different thicknesses of foam squares, and taped the ends of the floss to the back side. I heat embossed the sentiment in gold before adhering the main panel with more foam squares. Another sentiment finishes the inside.
If you find the urge to try a fun technique with your powder inks, I would highly recommend this! I'm going to guess that any type of powder inks would work. (Brushos, Color Burst, etc)
That's it for now. Thanks for visiting! I hope that you have a great day!
I'd like to enter this at:
Happy Little Stampers Christmas challenge - ATG - no twist, unless you count making these ornaments a joy!
Addicted to Stamps and More #225 - I was inspired by the rainbow of colors!

Stamps: So Suzy Stamps - ornaments & inside sentiment; Lawn Fawn - And a Partridge
Ink: VersaMark; Memento - Tuxedo Black
CS: TE; Bazzill
Accessories: Magenta Nuance dye powders in bright yellow, grass green, turquoise, scarlet, purple (I used raspberry, orange, jade, royal blue, and golden yellow on the Canson Bristol paper); Stampendous - white & champagne EP; heat gun; DMC- gold floss; paper piercer; water spritzer; paint brush; paper towels; Ranger - Crystal Stickles; MISTI; GC; Darice EF
Adhesives: SA by 3L - 3D & Thin 3D foam squares; Alene's double sided tacky tape


I'm definitely going to try this, Chris. Your ornaments are fantastic and a great take on the inspiration photo. Thanks for sharing your card with us at ATSM.
ReplyDeleteOh WOW! Chris this is gob smackin' gorgeous out of this word amazing. Love the technique you used and great tutorial from Lynne. What an awesome way to get all inky. Totally awesome. Can you tell I LOVE IT!
ReplyDeleteStunning results with this technique, definitely have to check that link out! Love your ornament card, simply gorgeous! Thanks for sharing and joining in at HLS Christmas Challenge.
ReplyDeleteSmiling all over my face in seeing your lovely ornaments, inspired by the inspiration photo! Gorgeous - and the tutorial is a marvelous bonus! Delighted that you shared your creativity in the Addicted to Stamps and More Gallery!
ReplyDelete~carol
Very beautiful card. Thank you for sharing with us in the HLS. Good luck!
ReplyDeleteBozenA DT HLS
Omgosh, how seriously cool!
ReplyDelete