Saturday, May 30, 2020

SISTERHOOD OF SNARKY STAMPERS #161 - I is for Inks


 Look at those awesome sleeves Edna is sporting! That's a lot of ink,
which happens to be the new challenge starting at the 
Let's see what you can do with your ginormous stash of ink pads/sprays!

Here's a little something I whipped up:


shiny embossing!
 

and the inside:
 

The panel was created by pressing Distress Ink pads directly to the stencil, spritzing 
with water, and flipping it onto some mixed media paper. I put a paper towel
over it and applied some pressure before carefully peeling up the stencil.
Once that dried, I dipped a toothbrush in the Dylusions black ink spray bottle
and splattered it. The image and sentiment were stamped and heat
embossed in black. I went around the edges of the panel with some more
Vintage Photo to grunge it up a bit more.

And since I liked how the panel came out, I made another one:


and the inside:

Yep, there's more of me. I have two brothers and two sisters, and we've
all been blessed with a snarky, sarcastic sense of humor.
This will go to my younger brother in a couple months. He's
going to love it!  LOL!

Now it's your turn. Let's see what you can do with your inks and link
up at the Sisterhood of Snarky Stampers! For more ideas, do check
out what my Sisters and our GD Stephanie have created for
your viewing pleasure. Thanks for stopping by!


I'd like to enter this at Simon Says Stamp Wed. Challenge - ATG


Supplies:
Stamps: Picket Fence Studio - My Man My Friend; Technique Tuesday - Umpteenth Birthday
Ink: Ranger DI - Vintage Photo, Evergreen Bough, Fossilized Amber; Versamark; Memento - Tuxedo Black
CS: Strathmore - mixed media; TE; Darice
Accessories: ARTplorations - Arrow Which Way stencil; Inkadinkado - black EP; heat gun; MISTI; water mister; Dylusions - Black Marble ink spray; Fiskars corner rounder; PFS blending brush
Adhesives: SA by 3L - tape runner

Tuesday, May 26, 2020

SHOPPING OUR STASH #421 - Stuck On You


Hello and happy Tuesday!
We have a fun new challenge starting today at
You guessed it - we want to see what you can make with those
hoarded stickers in your stash!
I've used stickers from a sheet so old, it didn't have the packaging
any more, so I've no idea what company these are from.


Here's the inside:


I made this a few weeks ago and sent it to my Mom for Mother's Day.
Her favorite color is yellow, so I try to use it predominately on
the cards I make for her. 

Ok, so now it's your turn to break out those neglected stickers and
create something magical with them! We'd love to see it, so be sure
to link up at Shopping Our Stash so we can admire it! Need
more ideas? Simply check out what my teammies created
to inspire you!
Thanks for visiting, have a great day!


Supplies:
Stamps: Hero Arts - Celebrate Everyday; Everyday Sayings
Ink: Memento - Tuxedo Black
DP: DCWV - The Spring Mix Stack
CS: TE; Darice
Accessories: Gemini; SB - wreath die; MISTI; ancient mystery stickers; FMS#432
Adhesives: SA by 3L - tape runner; Ranger - MMM

Saturday, May 16, 2020

SISTERHOOD OF SNARKY STAMPERS #160 - Y is for Yellow


Good morning snarky peeps and welcome!
Doesn't Edna look divine in that (possibly borrowed) yellow ball gown?!
Yellow being the key word here, as that is our new challenge
 I must admit, it's not a color I wear a lot of. In fact, I think the only yellow
article of clothing I own is a t-shirt. But I persevered and came up
with this little gem of a card:


I don't know why I picked that particular embossing folder except
for thinking yellow=bees=honeycomb. This was an entirely different
design than first thought. The white panel was die cut from a 
rectangle die and originally was going to be centered on the base.
 I put it down, and it landed in about the same position as you see now, 
and I thought, hmmmm, I kinda like that.
So I lightly pencil marked where I needed to trim it,
stamped the image then cut it.
I couldn't think of anything snarky to go with this, so I made
up for the lack of snark with a couple swear words. LOL!


All the little dots around this chic have been dotted with some Nuvo Glitter Drops.
but even trying an angle shot specifically to see that, it still doesn't
show up at all. Again, crack photography skillz! 
I hope that you find some time to play along in our YELLOW challenge
For more ideas, do check out what my sisters and our reigning
Queen, Rosmarie, have created to enthrall you.
Thanks for visiting and have a great day!


Supplies:
Stamps - Unity - Celebrate the New, Keep That Shit Up
Ink: Memento - Tuxedo Black
CS: SN; TE
Accessories: Spectrum Noir markers; GC; Avery Elle - Pierced rectangle die; Sizzix - Honeycomb EF; homemade folder frame; MISTI; Nuvo Glitter Drops - White Blizzard
Adhesives: SA by 3L - tape runner, 3D foam squares

Friday, May 15, 2020

STAMPlorations May Theme & Photo Prompt challenge reminder


Good morning and welcome back, crafty friends!
Just popping in with a reminder about the 

I created a simple card using some pretty tropical themed papers
along with stamps from the Wanderlust Hipster Icons and the
Beach Vibes stamp sets.


I die cut the larger frame from the Succulently CUTplorations set and
heat embossed the little island and sentiment in gold embossing powder.
On some matching green paper, I traced around the die then 
cut it out to use as a matte. That was adhered with foam squares.
Pretty simple!

You still have plenty of time to link up your project at 
love to see how you interpret the theme and/or photo!
If you're in need of some retail therapy at the
STAMPlorations store, feel free to use my discount code,
STAMPGIRLCHRIS
for an extra 20% off!

Thanks for visiting. Have a great day!


Supplies:
Stamps: Wanderlust Hipster Icons, Beach Vibes
Ink: Versamark
DP: Basic Grey - South Pacific
CS: Neenah
Accessories: CUTplorations - Succulently dies; Gemini; Stampendous - Champagne EP; heat gun;
MISTI
Adhesives: SA by 3L - tape runner, 3D foam squares

Tuesday, May 12, 2020

SHOPPING OUR STASH #420 - Oh The Places You'll Go


Hello and welcome!
I hope that you are all doing well during these crazy times.
Dreaming of getting away? Why, we have just the thing, or,
challenge, at SHOPPING OUR STASH!
Oh The Places You'll Go is our new challenge, and we are looking
for maps, specific places, or just a basic travel theme on your projects.
Here's what I came up with:


Sadly, I don't have much in the way of travel themed items in my 
stash. But, I did come across this world map paper and decided
it would serve perfectly for my card. I just trimmed it to size,
added a navy border (which was another paper from the collection),
and printed out the sentiment onto a die cut piece of white card stock.
So simple and easy!

I hope that you find some time this fortnight to link up your travel
themed projects at Shopping Our Stash! We'd love to see them!
For more ideas, please do check out what my teammates 
created for your viewing pleasure, and leave them some bloggy love!
Thanks for visiting, and have a great day!


Supplies:
DP: Basic Grey - South Pacific
CS: Neenah
Accessories: computer & printer (for sentiment); GC; Labels 1 Nesties
Adhesives: SA by 3L - tape runner


Sunday, May 10, 2020

Jumbo Zinnia? Yes please.

Hey there and welcome!
Happy Mother's Day to all who are celebrating,
whether you have human babies or fur babies!
This crazy time has really been messing with my
creative mojo, but I did find the spark again, a bit, to
make this card yesterday:


here's the inside:
 

With my crack photography skillz, both the stamped background and flower do not
match the same shade of dark purple that the sentiment banner is in this
picture, but I assure you they match rather well in real life.
The flower was stamped twice, colored (well just a coating of the light purple
where it would be covered up with the next layer), fussy cut and layered together.
I've added a bit of Diamond Stickles to the centers of the stamens. Both layers
are popped up with foam squares onto the card base, then a simple sentiment
and some sequins finish the front.

That's all for now. Got to get going and get some dinner on. Sadly,
Mother's Day isn't a 'thing' in my household. Sigh. I DO have
a fur baby. That should count, I believe. Oh well. LOL!
Have a great day, whatever you do!


I'd like to enter this at:


Supplies:
Stamps: Stampendous - Jumbo Zinnia; TE - Shiplap Background; Lawn Fawn - Wavy Sayings; MFT - Birthday Greetings
Ink: Memento - tuxedo black, grape jelly
CS: SN; TE; Darice
Accessories: Spectrum Noir markers; MISTI; Gemini; Lawn Fawn - wavy sayings dies; Nicole - sequins; Ranger - Diamond Stickles
Adhesives: SA by 3L - 3D & thin 3D foam squares; Ranger - MMM

Saturday, May 2, 2020

SISTERHOOD OF SNARKY STAMPERS #159 - M is for Magic


Abracadabra! It's time for a new challenge at the
This time around it's M for MAGIC!

I've combined a fairy Godmother Stella with the Magic Iris die from
Lawn Fawn for my card: 


And the inside:

This die has accompanying dies to go with it, one being a scalloped circle.
But since I didn't think to purchase that, I made my own:


The trick is to take the die cut 'doughnut' part, line it up on
the scalloped circle die cut and trace around the center opening.
Then you take a regular circle die that matches the size of the 
traced opening and die cut that. Easy peasy! Sort of...


I hope that you get a chance to play along in our Magic challenge 
Do yourself a favor and visit the blogs of my Sisters to see what 
fantastic magical creations they made.
Thanks for stopping by, and I hope you have a fabulous day!


Spectrum Noir markers used:
Skin: FS3, FS9, TN2, CR3
Dress/flower: AP1-4
Stockings: AP1, AP2, BT3, BT4
Boots/wand handle: RB1, RB2, RB4
Hair: BGR1, BGR2, BGR3
Wings: BT1, BT3, BT4
Headband/wand star: CT2, CT4, GB7
Eye shadow: TB2
Glasses: IG3, IG5

Supplies:
Stamps: Bugaboo Stamps: Stella Tidbits Fairy digi; Lawn Fawn - Offset Sayings; Taylored Expressions - Party Grumplings
Ink: Memento - Tuxedo Black
DP: MME - Collectable
CS: Spectrum Noir; TE; Neenah; scrap
Accessories: Gemini: Lawn Fawn - Magic Iris die; Spectrum Noir markers; MISTI; Ranger - Glossy Accents & Star Dust Stickles; WOS pen; computer & printer; GC; Std. Lg Circle & Scalloped Circle Nesties
Adhesives: SA by 3L - tape runner, 3D foam squares; Glue Dots


Friday, May 1, 2020

STAMPlorations May Theme & Photo Prompt challenge


Hello and happy May! We have a fun new Theme & Photo Prompt Challenge at STAMPlorations!
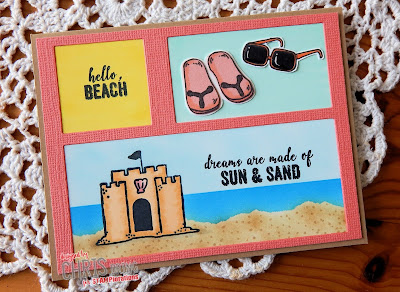
Yep, I'm sooooo ready for warm weather and the beach!
Here's my take on it using both theme & photo prompt:


I first die cut my frame using parts from the


On white card stock, I lightly penciled in where the opening would be,
then stamped the castle image from the Beach Vibes stamp set and masked it.
Using some scrap copy paper, I used the straight edge and torn edge to blend
a few Distress Inks for my sky, ocean and beach.


Removing the mask, I colored the sand castle, and the backgrounds of the
two smaller areas with markers. I stamped two of the sentiments from
the Beach Vibes stamp set.


I assembled the card, then stamped, colored and fussy cut the sunglasses and flip flops
from the same set and adhered to the upper right area. You can't tell in the
photo, but I gave the glasses a coating of Glossy Accents for a bit of shine.


I hope that you'll play along at STAMPlorations Theme & Photo Prompt Challenge!
We'd love to see your take on it! For some amazing ideas, do check
out what my teammies have created and leave them some bloggy love!
If your visiting the STAMPlorations store, feel free to use 
my personal discount code:
STAMPGIRLCHRIS
for an extra 20% off!

Thanks for stopping by. Stay safe and have a wonderful day!


Supplies:
Stamps: STAMPlorations - Beach Vibes
Ink: Memento - Tuxedo Black; Ranger DI - Tumbled Glass, Salty Ocean, Antique Linen, Vintage Photo
CS: Spectrum Noir; Thunderbolt; Bazzill
Accessories: Spectrum Noir markers; scrap paper; PFS - blending brushes; CUTplorations - Basic A2 Panels Nesting dies;Gemini; MISTI; Ranger - Glossy Accents; WOS pen
Adhesives: SA by 3L - tape runner; Ranger - MMM


adding pinterest script 3. Changing the Position of the Pin it! button The cool thing about this code is that you have some freedom over where the Pinterest button for Blogger will go over the image. Take a look at the code that you just copied and pasted into the HTML for the word 'center'.