Tuesday, September 25, 2018

SHOPPING OUR STASH #373 - Smooshing Technique


 Hello and happy Tuesday crafty peeps!
The new challenge at SHOPPING OUR STASH is a
fun one - use the smooshing technique!
Here's what I came up with:


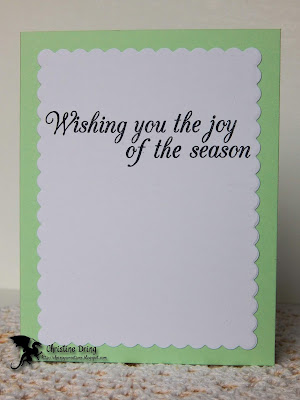
here's the inside:

I started with this smooshed panel, which was the mop up panel from this card. 
(I couldn't just waste all these lovely ink colors, now could I?)
  I decided to die cut the solid ornament layers from this, then the outline
layers from silver foil paper.


I added some splatters with one of the same inks used on the panel,
stamped the sentiment, added some silver floss and it all came
together pretty quickly.

I hope you find some time this week to join the smooshing fun at
Shopping Our Stash! We can't wait to see what you create in our gallery!
Need more ideas? Simply check out what my teammates smooshed up
for your viewing pleasure, and leave a comment while visiting their blogs.
We love and appreciate comments!
Thanks for visiting. Have a great day!


Supplies:
Stamps: STAMPlorations - Christmas Bells Medley; Hero Arts - Merry Christmas Message
Ink: Ranger DI - cracked pistachio, twisted citron, lucky clover, aged mahogany; Memento - tuxedo black
CS: TE; Neenah; Darice
DP: Recollections - silver foil
Accessories: GC; STAMPlorations - Christmas Baubles 1 & 2 layering dies; Lawn Fawn - scalloped rectangle die; MISTI; DMC floss; paint brush; water mister
Adhesives: SA by 3L - tape runner, thin 3D foam squares

Saturday, September 22, 2018

SISTERHOOD OF SNARKY STAMPERS #119 - M is for Monster


Hello and welcome snarky peeps!
We have a fun challenge starting today at the
This fortnight, it's all about MONSTERS!
You may already know, but Halloween is my favorite
holiday, so I colored up some more creepy zombies for my card:


and the inside:

Love it when you find some DP to help create the scene and mood. LOL!
This bug-eyed zombie is hiding behind a tombstone, not so patiently
waiting for his buddy to emerge from six feet under so that
they can go hunt for a bite to eat. Of course, I couldn't
resist adding a little snark to my card.

Now it's your turn to make something featuring a monster. Creepy or cute,
we'd love to see it in the gallery at the Sisterhood of Snarky Stampers!
Need more inspiration? Simply check out what my Sisters, and our
newest Guest Designer, Sharon, have created for your viewing pleasure!
Thanks for visiting!


Supplies:
Stamps: Stampers Anonymous/TH - Zombies, Mr. Bones
Ink: Versamark; Ranger DI - evergreen bough, iced spruce, twisted citron, vintage photo, hickory smoke, fired brick, fossilized amber; Brilliance - platinum planet; Memento - tuxedo black, London fog
DP: Martha Stewart - Vampire; MME - Everyday Tango
CS: TE; Strathmore water color paper; Darice
Accessories: water brush; GC; TE - grass border die; MISTI; Inkadinkado - black EP; heat gun
Adhesives: SA by 3L - tape runner, 3D & thin 3D foam squares

Tuesday, September 18, 2018

SHOPPING OUR STASH #372 - Welcome Home


Hello and happy Tuesday!
This week at SHOPPING OUR STASH, the challenge is called
Welcome Home: we are looking for projects using items that
represent where you live, or, where you came from!

We are both originally from Illinois, but I moved to Maryland after my 
husband and I were married. He was attending 
Johns Hopkins University at the time, and after graduating, we stayed.
For my project, I created a 5" x 7" frame that shows my 
state flag, Maryland, in the background: 


On a recent rare excursion to the scrap-booking store nearest to me,
I picked up this fun paper one of the ladies there created.
I just added some washi tape along the sides, and die cut the 
home sweet home words using my Slice die cutter. It's hard to
see in this picture, but I covered the words with Glossy Accents. I glued
them onto some white card stock once dry, fussy cut around the words,
glued them to the background, and popped into a frame. 
Super simple to make!

I hope you find some time to create something using
items that represent where you are from (or came from), and
link up at Shopping Our Stash! We'd love to see what you create, and
also learn a little bit more about you!
Thanks for visiting, and I hope that you have a great day!


Supplies:
CS: Neenah; Taylored Expressions
Accessories: MD flag paper - Photo Scraps store; Making Memories - Slice die cutter and
Words & Expressions Holiday cartridge; Ranger - Glossy Accents; Recollections - washi tape; 
Nicole - picture frame
Adhesives: SA by 3L - tape runner; Ranger - multi medium matte

Tuesday, September 11, 2018

SHOPPING OUR STASH #371 - Upcycling


Hello and welcome friends!
This week at SHOPPING OUR STASH, we challenge
you to Upcycle something! It could be as simple as adding a paperclip or 
a bit of a corrugated box to your project. The sky is the limit!
I had this idea to turn a shoe box into a storage shelf for some of 
my ink pads. Get your beverage of choice because this is a photo heavy post.
I'll not go into detail, but my supply list is at the end of my post, and if you 
have any questions, simply leave them as a comment and I'll get
back to you when I can!
Ready? Here we go:


My sister gave me a bunch of scrap paper that she collected when my
nephews were young and she was a teacher's helper. Just look at
this paper! So cool! The paper I used on the inner sides of my shelf were 
part of the same paper collection, and so I used paints on the outside
 of the box to coordinate with it.


Velcro tabs hold it on the wall, and I can take it down and put it somewhere
else if I need to!


In retrospect, I'm not happy with the outer sides being all different colors. I like
the purple the best, so I may repaint the other sides the same....may....eventually.
I do love that I repurposed a shoe box into a much needed shelf for my
ever growing stash of ink pads.

Ok so you don't have to go overboard with the upcycling like I did, but
we'd love to see what you do upcycle in the gallery at Shopping Our Stash! 
For more ideas, please do check out what my teammates created,
and while visiting their blogs, leave a comment. We love and
appreciate comments!

Yay! You made it to the end of my post! Thanks for
visiting, and I hope you have a fantastic day!


Supplies:
Substrate: shoe box
Elmer's foam board
X-Acto knife
hot glue gun
Golden Gesso and Matte Medium
various paint brushes
DP: Sandylion - Color Me Artsy
DecoArt Americana acrylic paint: titanium white, berry red, brilliant purple, Irish moss, coral blush, banana cream, citron green, holly green
Stamps: VLVS; Dare2BArtzy/Totally Tracy
Stencils: TCW; Dylusions; STAMPlorations
Ink: Staz On - jet black, iris, blue Hawaii, emerald city
Command picture hanging strips


Saturday, September 8, 2018

SISTERHOOD OF SNARKY STAMPERS #118 - L is for Leaves


Happy Saturday and welcome!
Now that the last big Summer holiday has passed us by,
Edna is getting into the spirit of Autumn by
jumping into a big pile of leaves!
And wouldn't you know, that's the new challenge at the
L is for Leaves!

Here's what I came up with:


I pretty much cased a card by Maria Peters. (Thank you for the inspiration!)
Of course, I've added some snark to my card.
(I've said this before, and I'll say it again: memes are
a fantastic source of inspiration for sentiments!)

Now it's your turn to break out your leaf stamps/dies/stencils/papers, etc. and
make something. Link up at the Sisterhood of Snarky Stampers  so
that we can admire your brilliance! For even more leafy projects,
do check out what my Sisters and our newest Guest Designer, Lisa D,
have concocted for your viewing pleasure, and leave some bloggy lovin!
Thanks for visiting. Have a fantastic day!


Supplies:
Ink: Ranger DI - twisted citron, mowed lawn, lucky clover, evergreen bough
CS: TE; Neenah; Core'Dinations
Accessories: GC; Simon Says Stamp - Leafy Circle die; blending tools; computer & printer
Adhesives: SA by 3L - tape runner, thin 3D foam squares

Tuesday, September 4, 2018

SHOPPING OUR STASH #370 - Crazy for Coloring


Good Tuesday morning and welcome crafty friends!
Can you believe it's already SEPTEMBER?!!
WHERE did this year go?! (It went way too fast,
that's where it went!)
Since it's Tuesday, that must mean a new challenge starts
This week is super easy: simply color something on your project!
Any medium is welcome: markers, pencils, zigs, crayons, gelatos, etc.

Here's my card:

and the inside:

Who doesn't love a pirate cow with a parrot?!
I colored Captain Jack Spar-moo on kraft card with my
Prismacolor pencils, and used snippets of some
Graphic 45 papers on the design. (an older Freshly Made Sketch, #201) Jack is 
popped up on the circle element with some foam squares.

I hope you find some time this week to join the SOS Crew for some
coloring fun at Shopping Our Stash. We'd love to see your projects in
our gallery! Need more ideas? Simply visit the blogs of my teammies
to see what they created for your viewing pleasure.
Thanks for visiting, and I hope that you have a great day!


Supplies:
Stamps: Taylored Expressions - Grumplings in Costume; Hero Arts - Celebrate Everyday
Ink: Memento - Tuxedo Black; Ranger DI - Hickory Smoke
DP: Graphic 45 - An Eerie Tale
CS: Thunderbolt
Accessories: Prismacolor pencils; Faber Castell - Artist PITT pen; GC; TE - Grumplings dies; MISTI
Adhesives: SA by 3L - tape runner, Thin 3D foam squares
adding pinterest script 3. Changing the Position of the Pin it! button The cool thing about this code is that you have some freedom over where the Pinterest button for Blogger will go over the image. Take a look at the code that you just copied and pasted into the HTML for the word 'center'.