Wednesday, December 28, 2016

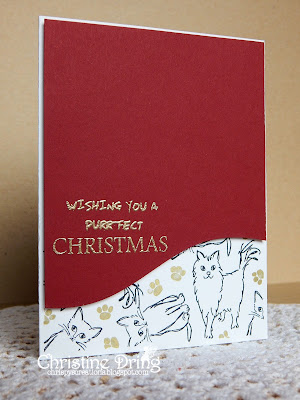
One more Christmas card

Hello crafty peeps! I wanted to pop in and share one more Christmas card I made a few weeks ago. I had to wait until after Christmas before posting it, since it was for my neighbors, who we celebrated Christmas day at. I didn't want to risk them seeing it before, as I had it tucked in with their gift. ☺


 and the inside:

This could have been an easy stamp job, but I decided, after cutting the red panel to size, to mask a very thin border around the bottom of the card base to line up with the edges of the panel. After randomly stamping two cats and paw prints, I removed the masks. I masked off the 'merry' from the Christmas stamp, stamped the rest of the sentiment, and heat embossed in gold. It's adhered with foam squares. Another sentiment finishes the inside.

I hope all who celebrated had a very Merry Christmas, and wish a Happy Hanukkah and Happy Kwanzaa to those who are enjoying your holiday! I'm hoping to get at least one more post in before the new year, but just in case, I wish all the best to you for a happy and healthy 2017!


I'd like to enter this at:
STAMPlorations December Theme & Sketch Challenge - I used the sketch
STAMPlorations - Never ending ATG challenge


Supplies:
Stamps: STAMPlorations - Pets, Christmas Bell Medley, Peace Love Joy; Paper Smooches - Chubby Chums (paw print)
Ink: VersaMark; Memento - Tuxedo Black, Rhubarb Stalk; Colorbox/Susan K. Weckesser - Shimmer
CS: Taylored Expressions
Accessories: GC; Paper Smooches - Borders 1 die; Stampendous - Champagne EP; heat gun; MISTI; Post-It notes
Adhesives: SA by 3L - 3D foam squares

Friday, December 23, 2016

Some Exciting News!

Hello crafty friends! I've been holding onto this news for a while and I'm sooooo happy to announce that I've been picked as a Guest Designer for the STAMPlorations Theme & Sketch challenge!  


The GDT call went out in August, using that months theme & sketch prompts: 


Here is the card I submitted, using both the theme and sketch:


I started by cutting the main panel from the CUTplorations Crazy Double Running Stitch Rectangle Nesting dies and sponging a few Distress Inks over it using the ARTplorations Retro Circles stencil. I stamped and die cut one of the birds from the STAMPlorations Birds of Paradise stamp and die set, colored it and added Stickles. After stamping the sentiment, I die cut another bird from black card stock and glued it to the back of the colored one, offsetting it. After adhering the panel to my card base, I added the bird using foam squares. I just love these sketchy birds!

I also want to say congratulations to my Just Us Girls teammate, Ina, who was chosen to be
a Guest Designer for the CAS Card Challenge!

I am beyond excited to be crafting for the next three months alongside the amazing designers
at STAMPlorations! Again, thank you so much, Shery, for this
incredible opportunity!


Supplies:
Stamps: STAMPlorations - Birds of Paradise
Ink: Memento - Tuxedo Black; Ranger DI - Twisted Citron, Cracked Pistachio, Peacock Feathers, Mermaid Lagoon
CS: Crafter's Companion; Bazzill
Accessories: Spectrum Noir markers; GC; CUTplorations - Crazy Double Running Stitch Rectangle Nesting dies, Birds of Paradise dies; ARTplorations - Retro Circles stencil; Ranger - Crystal Stickles
Adhesives: SA by 3L - tape runner, 3D foam Squares

Tuesday, December 20, 2016

SHOPPING OUR STASH #283 - Winter Wonderland


Hello crafty peeps! Are you all done with all of your holiday shopping and card making? I still have a couple items to get, then I'm done. Well.... I still need to wrap the presents I've bought, but other than that, I'm done. LOL!

For our last challenge of the year at SHOPPING OUR STASH, we want to see your Winter themed cards or projects, but not Christmas themed. Here's what I came up with:


 here's the inside with a bit of snark...


I was lamenting a few posts back about the fact that I have no silver foil paper. Well, when I was searching through all my paper, I came across this holographic silver snowflake paper that I've had for a couple years at least, but it was hidden by other papers. Score!! I used a couple rectangle dies to make a frame out of it. I used my MISTI to line up the word stamps (each word is a separate stamp), stamped in Versamark ink and heat embossed in white EP. The snow globe is a new purchase, but it worked well for this challenge. I backed a scrap of white CS with an adhesive transfer sheet before die cutting it. Then all I had to do was peel off the backing sheet and stick it on my card. 

We hope that you have a chance in your busy holiday schedule to play along this week at Shopping Our Stash! This is our last challenge for 2016, but we'll be back on January 3rd with a new challenge! I'd also like to say thank you to our Guest Designer, Beth, for joining the SOS Crew this month! It was a pleasure to have you create with us, and we hope to see your fabulous creations in our gallery in the future!

Just a reminder: We are looking for Guest Designers! If you would like to be considered for January, simply leave a 'DT' after your name when you link up! Super easy.

I wish you all happy holidays and all the best for 2017!


Supplies:
Stamps: Winnie & Walter - Big, Bold & Party; Crackerbox Palace - Belated...
Ink: VersaMark
DP: HOTP - Snowflake Silver Holographic paper
CS: Taylored Expressions
Accessories; GC; Avery Elle - Double Pierced Rectangle dies; Impression Obsession - Deer Snow globe die; Stampendous - white EP; heat gun; MISTI
Adhesives: SA by 3L - tape runner, adhesive transfer sheets

Saturday, December 17, 2016

JUST US GIRLS #374 - Color Week


Hello and welcome crafty peeps! This week is Color Week at JUST US GIRLS! Lisa is your hostess and she's picked ORCHID, NAVY and GOLD to play with. I gotta say, I was a little scared at first of this color combo. But after awhile I started to get an idea. Here's what I came up with:


 and the inside:

I let the die cut sentiment do all the work. It's cut from shiny gold foil CS. I die cut the frame twice from white and navy CS. At first I was going to leave the white panel as is, but there was just too much white space. Out came a flowery background stamp and fixed that. LOL! I used the leftover navy CS panel on the inside, stamping the sentiment in gold ink, and my card was done. ☺

We hope that you can play along with us this week at Just Us Girls! Need more inspiration? Then check out what the design team, and our Guest Designer, Teresa, have made and leave some bloggy lovin! This will be our last challenge for 2016. The girls will be taking a short break for the holidays to spend time with their family and friends. I'd like to thank Teresa for guesting with us this month. We've loved having you as our GD and hope to see your amazing creations in our gallery in the future!

Just a reminder, if you are picked as Chic of the Week for any of our December challenges, you'll be in the running to be our Guest Designer for the month of February! 

I'd like to wish you all a very Merry Christmas and all the best for 2017! 


Supplies:
Stamps: Sizzix/Hero Arts - flower stamp; STAMPlorations - Fond Expressions
Ink: Memento - Nautical Blue; Colorbox/Susan K. Weckesser - Shimmer Gold
DP: Bazzill - gold foil
CS; Paper Smooches, Bazzill, Darice
Accessories: GC; CUTplorations - Happy Birthday dies; Simon Says Stamp - Frames die
Adhesives: SA by 3L - tape runner; Scotch - Scrapbooker's glue

Tuesday, December 13, 2016

SHOPPING OUR STASH #282 - Tag, You're It


Hello crafty friends and welcome! This week at SHOPPING OUR STASH, we'd like to see you make a tag. It could be a stand alone tag, any theme or holiday, maybe an element added to a card, it's all good! Here's my tag:


I made a tag out of white card stock using a couple dies from the CUTplorations ATC Tag builder die set. I sponged over it in Iced Spruce DI, then using a stencil, sponged over again in Pine Needle DI. I stamped the sentiment onto the tag. The image was stamped, colored in Prismacolor pencils, fussy cut, and adhered with foam squares. I added a few sequins and ribbon, then decided it needed twine as well. With jingle bells tied to the bow. Much better! LOL! I'm still deciding if I should stamp "To: and From:" on the back side, or just add it to a card. We shall see. ☺

I hope you get a chance in the mad Holiday rush to play along with our tag challenge at SHOPPING OUR STASH! We'd love to see what you create! For more inspiration, do visit the blogs of my teammies, and our December Guest Designer, Beth (a.k.a. Myoriah) and leave them some bloggy lovin!

Want to be considered for our Guest Designer in January? Simply add a "DT" after your name when you link up! Super easy!


Thanks for visiting! I hope you have a great day!


I'd like to enter this at
STAMPlorations CUTplorations December challenge - (my inspiration was the colors)
STAMPlorations - never ending ATG challenge


Supplies:
Stamps: STAMPlorations - Peace Love Joy, Christmas Bell Medley
Ink: Memento - Tuxedo Black; Ranger DI - Iced Spruce, Pine Needles
CS: Taylored Expressions
Accessories: Prismacolor pencils; ARTplorations stencil; GC; CUTplorations - ATC Tag builder dies; May Arts - ribbon; Martha Stewart - twine; Darice - sequins; Fray Check; Creatology by Michael's - bells
Adhesives: SA by 3L - 3D foam squares; Ranger - Glossy Accents

Saturday, December 10, 2016

SISTERHOOD OF SNARKY STAMPERS #74 - X is for XXX Christmas


Welcome snarky peeps! It's the challenge the Sisters over at the SISTERHOOD OF SNARKY STAMPERS have been waiting for all year! Our annual XXX Christmas challenge! That's right. It's time to create a card or project that is naughty/risque'/off color! You know you want to! Here's the card I came up with:


 and the inside:


Love a great saucy card! The image was colored with SN markers. I added Crystal Stickles then once that was dry went over all the glasses with Glossy Accents. This is really sparkly and shiny in real life. LOL! (And thank you internet memes for my sentiment idea. HA!) The inside is stamped with a couple sentiment stamps and then I was done.

I hope that you get the chance to play along at the Sisterhood of Snarky Stampers! This is our last challenge for 2016, so you have an entire month to link up. For more naughty inspiration, do yourself a favor and visit the blogs of my Sisters and leave some love! 

Thanks for stopping by, and I hope that you have a great day!


I'd like to enter this at:
Catch the Bug - Holiday Chaos day 5 - Funny Photo Inspiration
Mojo Monday #477


Supplies:
Stamps: Bugaboo - SASJJ Christmas Cheer digi; Taylored Expressions - In & Out Christmas, Impression Obsession - Naughty is..
Ink: Memento - Bamboo Leaves, Lady Bug
DP: American Crafts - Wishlist
CS: Taylored Expressions; Crafter's Companion; Darice
Accessories: Spectrum Noir markers; GC; SB - Std. sm & lg circle Nesties; Ranger - Glossy Accents & Crystal Stickles; Cloud 9 Designs - epoxy stickers; computer & printer; sentiment computer generated
Adhesives: SA by 3L - tape runner, Thin 3D foam squares

JUST US GIRLS #373 - Trend Week


Hello and welcome crafty friends! It's Trend Week at JUST US GIRLS. Judy is your hostess, and she's picked 'jars' as your inspiration. Here's my card:


 and the inside:


I took a mason jar stamp and die and made a Christmas 'snow globe jar' shaker card. I used an ancient dimensional sticker (soooo easy!) for the sentiment. I filled it with a couple different glitter mixes and some insanely tiny clear beads.

I hope you get some time this week to play along at Just Us Girls! For more inspiration, please check out what my teammates, and our Guest Designer, Teresa Gregory, have made for your viewing pleasure! Thanks for visiting! I hope you have a fantastic day!


I'd like to enter this at:


Supplies:
Stamps: Paper Smooches - Crystal Clear (2013), Joyful Greetings (2012 or 13?)
Ink: Memento - Tuxedo Black, Rhubarb Stalk
DP: HOTP
CS: Taylored Expressions, Crafter's Companion, scrap
Accessories: GC; Paper Smooches - Crystal Clear jar die; Avery Elle - Pierced Rectangle die; Recollections - tree sticker; Stampendous - Multi Crystal mix & Silver Glass mix glitter; Craft Outlet - glass beads; Crafter's Companion - acetate
Adhesives - SA by 3L - tape runner; Scotch - foam tape; Ranger - Glossy Accents


Tuesday, December 6, 2016

SHOPPING OUR STASH #281 - Pretty Packaging


Good morning friends and welcome! We have a fun challenge starting today at SHOPPING OUR STASH: Pretty Packaging! We'd like to see your gift, or gift card, packaging. Think altered boxes, bags, tags, anything that would hold a gift or gift card. I bought a package of white pillow boxes a couple years ago, and so that's what I used for my project:


Yep, I made two! I used strips of patterned paper and snowman stickers  I've had in my Christmas stash for years. Once I adhered the patterned paper to the pillow box, I die cut two sizes of ovals, and a scalloped frame. Stuck the sticker on the white oval, glued the scalloped frame to it, then that to the black oval. Then used a few foam squares across the back of the oval to adhere to the pillow box. Lastly, I tied on some twine. Super easy and fun to make!

I hope you find some time to play along this week at Shopping Our Stash! Also, since it's a new month, we have a new Guest Designer! Welcome Beth! (a.k.a. Myoriah!) We are thrilled to have you join us this month! 

For more inspiration, do check out what my teammates came up with for this challenge, visit their blogs and leave them some bloggy lovin!

Just a reminder: We are looking for Guest Designers now! If you'd like to be considered for January, simply leave a "DT" after your name when you link up! Easy peasy lemon squeezy!

Thanks for visiting! I hope you have a great day!


Supplies:
DP: Colorbok; MME
CS: scraps
Accessories: Bags & Boxes by Deluxe Co. - pillow boxes; GC; Simon Says Stamp - Frames die; SB - Classic Lg & Sm Oval Nesties; Cloud 9 - stickers; Martha Stewart/MME - twine
Adhesives: SA by 3L - tape runner, 3D foam squares
Saturday, December 3, 2016

Just Us Girls #372 - Word Week


Hello and welcome crafty friends! It's Word Week at JUST US GIRLS! Nancy is your hostess this week and she challenges you to add a Christmas tree to you card or project! Here's my card:


 Here is the inside:

I apologize for the not so good pics. Life got in the way this week, and yesterday was the first time I got to play in my craft room all week. I was running late and lost daylight by the time I finished my card. The good thing was that I got to try out a new (to me) stamp set for the first time. The tree is my first layering stamp set, and I think I'm going to be needing more of these! LOL! Soooo much fun to play with! 

I hope you get a chance to play along this week at Just Us Girls! For more inspiration, check out what my teammates have created and leave them some bloggy love. Also, since it's a new month, we have a new Guest Designer! Welcome Theresa Gregory! Looking forward to seeing what you create with the JUGS team! 

Just a reminder: If you are picked as Chic of the Week for any of our December challenges, you'll be in the running to be our Guest Designer for the month of January! Good luck and happy crafting!


Supplies:
Stamps: Hero Arts - Layering Christmas tree, Merry Christmas Message
Ink: Memento - New Sprout, Bamboo Leaves, Rich Cocoa; Ranger DI - Evergreen Bough, Pine Needles, Iced Spruce; Colorbox/Susan K. Weckesser - Kiss
DP: HOTP - green paper; American Crafts - red glitter
CS: Taylored Expressions; Darice
Accessories: MISTI; Spectrum Noir markers - GB5 & IG2; Recollections - Red rhinestones, star rhinestones
Adhesives: SA by 3L - tape runner

Tuesday, November 29, 2016

SHOPPING OUR STASH #280 - Paper Strip Art


Hello friends and welcome! This week at SHOPPING OUR STASH, we are going to help you use up some of those paper scraps you are holding on to, by using the BARGELLO TECHNIQUE! Here's the card I came up with:


 and the inside:

The great thing about this technique is that there are so many patterns you can make from it! Think about it: cut up 4 or 5 different papers, change out the design per card, and wah-lah! Cool cards and you used up some of that hoarded paper stash!

We hope that you find some time to play along at Shopping Our Stash, and we look forward to seeing all of your cards in the gallery! For more inspiration, do check out what the Design Team came up with. Also, this is Cornelia's last post as Guest Designer with the SOS Crew. Thank you so much for joining us this month! You have an amazing talent and we hope to see more of your works in our gallery in the future! 

Thanks for visiting, and I hope you all have a great day!


Supplies:
Stamps: Bugaboo - snowman digi; Simon Says Stamp - Oh Dear; Hero Arts - Merry X-mas
Ink: Memento - Tuxedo Black
DP: Recollections - Believe
CS: Crafter's Companion; Darice
Accessories: Prisma Color pencils; GC; SB - Std. Classic sm Oval Nesties; MFT - Single Stitch Line Oval Frame; Cuttlebug - Labels and Such die; printer & computer; twine from my stash; Westcott - hole punch; Marvy Uchida - cherry red marker
Adhesives: SA by 3L - tape runner, 3D & Thin 3D foam squares

adding pinterest script 3. Changing the Position of the Pin it! button The cool thing about this code is that you have some freedom over where the Pinterest button for Blogger will go over the image. Take a look at the code that you just copied and pasted into the HTML for the word 'center'.