Tuesday, August 30, 2016

SHOPPING OUR STASH #267 - Learn Something New (to you)


Hello crafty peeps! This week at SHOPPING OUR STASH, we challenge you to try a new (to you) technique. Whether it be something that's been around for years and you've yet to try it, or a brand spanking new technique that's all the rage, we'd like to see it! For my card, I tried out the shaving cream technique. This was the first time trying it out. It is messy. It is fun! 


Here's the finished inside:

I have about a dozen Spectrum Noir reinkers, so I used two of them for my project. I pretty much followed along exactly from the video tutorial. The only thing I did different was instead of putting another panel in the shaving cream, I smooshed the two panels together, then pealed apart, wiped them off and let them dry. I cut one of them down to size for my card. I loved trying this out! The only thing I don't really care for is that now my card reeks of shaving cream! LOL!

I hope to see what fun new (to you) techniques you use on your projects. Please be sure to link up at Shopping Our Stash so we can find more techniques to try, I mean, to see what you created! While there, please check out what my teammates came up with, and leave them some bloggy lovin! Thanks for visiting!


I'd like to enter this at:
Retro Sketches #229
Seize the Birthday - Anything Goes


Supplies:
Stamps: LOL Stamps - Officially Old; Paper Smooches - Happy Birthday
Ink: Memento - Tuxedo Black
DP & CS: scraps
Accessories: shaving cream; Spectrum Noir reinkers - CG4 & TB4; paper plate; craft stick; MISTI; Amscan - doily; Jo-Ann's - ribbon; mystery black metal dots; Fray Check
Adhesives: SA by 3L - tape runner; Recollections - red tape; Glue Dots

Saturday, August 27, 2016

JUST US GIRLS #358 Photo Week


Hello and welcome crafty peeps! Judy is your hostess for Photo Week at JUST US GIRLS! She's found this amazing picture for you to be inspired by! What jumps out at you when you look at it? The fairy woman? The feathers? The birds? The butterflies? The colors? Soooo much eye candy! I was compelled to make a mixed media canvas for my project:


This is gonna be a photo heavy post, so get your favorite beverage and get comfy. I started with a 5" x 7" canvas and applied Gesso over it. Once that dried, I painted acrylic paints over it, using the colors in the photo. (Luckily, I already had most of them in my stash of paints) 


As much as I loved how this came out, I knew I wanted to try adding a stencil and mask over this. (Andy was not happy that I covered the colors up, but he just doesn't get mixed media. LOL!)  My inspiration was this art journal by Lynne Mizera. Her art journal pages look so amazing! I loved how she used the circle stencil and the butterfly mask. Since I had that same mask, I knew butterflies were going to be a major element on my canvas. I also liked the gold touches, and I thought stenciling in the next layer in gold paint would look cool. I was right! (Unfortunately, I forgot to take a picture of the canvas after stenciling the gold. DOH!) 
After that dried, I went over it using the butterfly mask.


While this was drying, I stamped, colored and fussy cut Tess Girl. At this point, I thought I was also going to incorporate feathers onto my canvas. I experimented with using die cut feathers, colored to look like the feathers in the photo. Obviously, I took another road. *wink*
So when this dried, I outlined the butterflies with a waterproof black marker. (Make sure it's a waterproof marker, otherwise, any future layers you add will smear the marker ink) 


I couldn't handle all the white space, so I stamped some texture using archival ink.


Sorry for the blurry picture. (I was using my cell phone camera while creating, since I was too lazy to go downstairs to get my good camera.) At this point, I wasn't sure if I should stamp the sentiment directly to the canvas. Well, I was terrified to do that, since I didn't want to screw it up. That's when I called Lynne for advice, and she gave me a tip on how she gets around that: you stamp onto tissue paper using archival ink, and adhere it using gel medium, or glossy medium. She goes into detail about this on her blog here. 


Another tip that Lynne gave me is that not all tissue papers are created equal. She suggested using the tissue paper that comes from a shoe box. It's more durable. That Lynne, she's brilliant!! Thank you for all your help! I rooted around trying to find shoe box tissue paper that didn't have printing already on it, or at least enough space around the pre-printed paper to stamp around it. This was the best I found. I took a wet paintbrush and went around the sentiment, then carefully ripped it out. At this point I decided I wasn't going to use feathers at all, and decided to punch tiny butterflies from coordinating card stock. The next picture shows my placement before adhering everything down.


I didn't have glossy or gel medium, just matte medium, so that's what I used. Note to self: get glossy medium, as matte will cover the 'glossy' of the acrylic paints. (Hey, I'm a rookie at this mixed media shtuff! I'm still learning!)


I did wind up lining up the stencil and carefully adding more gold paint around the sentiment. I also carefully added more brown paint around the sentiment, and redrew some of the outlines of the butterflies when that was dry. It's not perfect, but I'm pleased with how it came out. It still needed something so I added rhinestones to all the punched butterflies. That's when my inner muse said I was done. Shew!

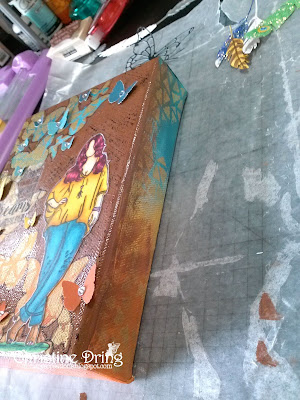
Here are some side views, because you need to paint all the sides too! (And yes, I stenciled them also) If you look, you'll see the feathers that I colored, and Stickled, then decided not to use. There's also another die cut butterfly I thought to use, but didn't.


Congrats to you for making it til the end of my photo heavy post! I hope that you find some time to play along for Photo Week at Just Us Girls! For more inspiration, please visit the blogs of my teammates, and Colleen, our guest designer, and leave them some bloggy love! 

Just a reminder that if you are picked as Chic of the Week for any of our August challenges, you'll be in the running to be our Guest Designer for the month of October! Have fun and happy crafting!


I'd like to enter this at:


Spectrum Noir markers used:
Skin: FS2, FS3, TN2,CR3
Hair: DR5, TN9, DR7
Jeans: BT5-7-9
Shirt: GB3-7-9
nails/heart/bangle: PL1-2-3
Shoes: TN3, TN6, EB4
Ground: LG5, JG1, JG3


Supplies:
Stamps: Unity Stamps - Tess Girl; Raisin Boat - Edgy Accents
Ink: Staz On - Jet Black; Memento - Tuxedo Black
Paint: Adirondack - Terra Cotta, Stream, Butterscotch, Cloudy Blue; Delta - Gleams 14K Gold; Plaid - Wicker White; Plaid - Stencil Gel - Russet
Stencils: ARTplorations - Shower of Flutters; Dylusions - Triangles
Spectrum Noir markers; PrismaColor pencil - 70% warm grey
Golden - Gesso, Matte Medium
Nicole/Recollections - rhinestones
various paint brushes, foam brush, stencil brush
Martha Stewart - butterfly punch
shoe box tissue paper
AC Moore - canvas


Tuesday, August 23, 2016

SHOPPING OUR STASH #266 Stand Up And Be Counted


Hello crafty friends! Today starts a new challenge at SHOPPING OUR STASH! This week we want to see numbers on your projects! Here's the card I made:


 and the inside:


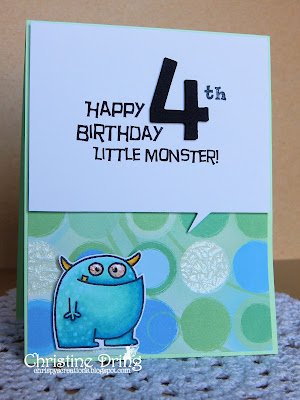
My best friend's little boy turned 4 years old last week, and I made this card for him. (Don't worry, she shares the same warped sense of humor I have, so she'll get a kick out of this!) The sentiment was computer generated, but the number 4 is a Thicker sticker. That background paper is about 10 years old, and check it out. It had crackle paste on it even back then. Who knew?!!

I hope that you get a chance to play along with our numbers challenge at Shopping Our Stash this week. We'd love to see your creations in our gallery! For more inspiration, please visit the blogs of my teammies and leave them some lovin! 

Just a reminder, we are looking for Guest Designers! If you wish to be considered, simply leave a "DT" after your name when you enter any of our challenges! 

Thanks for visiting, and I hope you have a great day!


I'd like to enter this card at Naughty or Nice Challenges #30


Supplies:
Stamps: Paper Smooches - Falling for You; Stampendous - Birthday Wish; Studio G - alphas
Ink: Memento - Tuxedo Black
DP - Paper Adventures
CS: Darice; Crafter's Companion
Accessories: Spectrum Noir markers; Paper Smooches - Cardbooking dies; Thickers - #4 sticker; Ranger - Glossy Accents; Marvy Uchida - red marker (on eyes); sentiment computer generated
Adhesives: SA by 3L - tape runner, 3D foam squares

Monday, August 22, 2016

Wishing you a purr-fect birthday

Hello and good morning crafty peeps! Here's a card I made yesterday while playing in my craft room. (It was raining on and off all day. What better way to spend the day?!)


I die cut the crazy double stitches first, then stamped and heat embossed my kitty in gold embossing powder. Then I embossed the panel with the swirls, also using a folder frame so that the kitty didn't get embossed. The area that didn't get embossed left a fair bit of flat space above the kitty, so I searched my stickers for tiny hearts. These are Mrs. Grossman's stickers. Remember those?! I stamped the sentiment using my MISTI (It's actually 3 separate stamps. Using a MISTI really helps to line the words up evenly!), then heat embossed the sentiment onto black card stock and adhered with foam squares. Another CAS card - I must be possessed! LOL!

That's all I have for now. The oppressive heat finally broke last night here in the mid-Atlantic region. I'm going to go an enjoy it! Have a great day, and stay crafty my friends!


I'd like to enter this card at:
STAMPlorations August CAS card challenge
STAMPlorations never ending ATG challenge
Can You Case It? #134


Supplies:
Stamps: STAMPlorations - Pets
Ink: VersaMark
CS: Bazzill; Darice
Accessories: GC; CUTplorations - Crazy Double Running Stitch Rectangle dies; Cuttlebug - EF; Stampendous - Champagne gold EP; heat gun; Mrs. Grossman's - heart stickers; Darice - folder frame
Adhesives: SA by 3L - tape runner, thin 3D foam squares

Saturday, August 20, 2016

SISTERHOOD OF SNARKY STAMPERS #66 H is for Hounds


Hiya, peeps! This fortnight, the SISTERHOOD OF SNARKY STAMPERS is going to the dogs. Well, that would be the new challenge starting today. We want to see a dog or doggies on your card/projects! Here's my card:


 ...and the inside:


That wiener dog stamp is from a set I won years ago from playing at the Moxy Fab World challenges. Remember those? Amazingly, this is the first time any of the stamps in that set have been inked.

(Again, hoarder)

I love a great punny sentiment. This one was computer generated, since I don't have a stamp that already says it. (Hey, use the tools that you have. In this case, my computer and printer!) I stamped the inside and called it done. ☺

Now it's your turn to break out those doggy stamps and papers and make something! Just link it up at the Sisterhood of Snarky Stampers so we can admire it! While there, please check out what my Sisters have created to inspire you, and also give a warm welcome to our newest members of the Sisterhood - Majo and Jane - and leave some bloggy lovin on their blogs! Thanks for visiting!


Supplies:
Stamps: Lawn Fawn - Critters at the Dog Park, Home Sweet Home; Stampendous - Tricky Words
Ink: Memento - Tuxedo Black
DP - DCWV - Spooky Delight
CS: Darice; Bazzill; Crafter's Companion
Accessories: GC; Lifestyle Crafts - Inverted Sqs dies; Spectrum Noir markers; sentiment computer generated
Adhesives: SA by 3L - tape runner, Thin 3D foam squares

JUST US GIRLS #357 - Color Week


Hello crafty peeps and welcome! It's a new week and a new challenge starting at JUST US GIRLS! Lisa is your hostess for Color Week, and she's picked Aqua, Kraft, and White as your colors to play with. You are also welcome to use any neutrals. Here's what I came up with:


 and the inside:

I've been crushing on the 'coloring on kraft' look lately, and I thought I'd try it out. I scored this background stamp earlier this year at Tuesday Morning, and bonus, it came with an embossing folder! I stamped it 3 or 4 times using my MISTI in white ink, so I got a nice bright image, then heat set it. Then I just filled in the flowers and flourishes using Prisma Color pencils. I ran it through the embossing folder, matted it with aqua paper, and added rhinestones, because, shiny! A simple sentiment finishes it.

I hope you find some time to play along with our color challenge at Just Us Girls! For more inspiration, please check out the blogs of my teammates and our August Guest Designer, Colleen Foelker, and leave them some bloggy love! Remember, that if you are picked as Chic of the Week for any of our August challenges, you'll be in the running to be our Guest Designer for the month of October! Thanks for visiting, and I hope you have a great day!

I'd like to enter this at Seize the Birthday - ATG


Supplies:
Stamps: Hero Arts/Sizzix; MFT
Ink: Memento - Teal Zeal; Memento Luxe - Wedding Dress
CS: Darice; DCWV
Accessories: PrismaColor pencils; GC; Sizzix/Hero Arts EF; Recollections - rhinestones; MISTI; heat gun
Adhesives: SA by 3L - tape runner, 3D foam squares

Wednesday, August 17, 2016

Aw nuts!

Hello crafty friends! Just popping in with a quick card to share. Well, it should have been quick, but every time I started working on it, life interrupted. I started this on Sunday, slowly working on it until last night, when I finally finished it. Ugh!


 Here's the inside:


Yet another sort of CAS card. I know, right?! What's wrong with me? Where are all my beloved layers! All the white space was again freaking me out, so I stamped a music score stamp in VersaMark to break it up some. It's very subtle. You card barely see it in the photo, which is, of course, what I totally meant to do. ☺

I'm entering this (at the last minute. Again.) at Taylored Expressions Share Joy challenge #48. So, I'd best go and enter it. LOL! Thanks for visiting! Have a great day!


Supplies: Taylored Expressions - Party Grumplings; Stampendous - Music Score
Ink: Memento - Tuxedo Black; VersaMark
DP: scraps
CS: Taylored Expressions; Crafter's Companion
Accessories: Spectrum Noir markers; GC; SB- Edgeabilities - Mix & Match Classic Edges, Deckled Rectangles Nesties; Prisma Color pencils; K&Co. - cupcake sticker
Adhesives: SA by 3L - tape runner, Thin 3D foam squares; Scotch - scrapbooker's glue

Tuesday, August 16, 2016

SHOPPING OUR STASH #265 - What's the Good Word


Hi there friends! We have a fun new challenge starting today at SHOPPING OUR STASH: we want to see Word Dies on your cards or projects! A very easy challenge! Here's what I came up with:


 ...and the inside:

I die cut holiday cheer four times, stacked and glued them, and adhered to my card. This is one of those rare (almost) one layer cards I made. (I like my layers!) The martini glass and olive were stamped and die cut. I stamped the olive stick in the glass, colored in the liquid, and added shading on the olive with my Spectrum Noir markers before gluing the olive die cut behind the glass. The glass got a coating of Glossy Accents. Here's an enbiggened view of the die cut words and glass. I used a black rhinestone as the dot for the 'i'. (because nobody got time to stack and glue those itty bitty dots!)


Ready to play along at Shopping Our Stash in our word dies challenge? Of course you are! We can't wait to see what you create, just link it up in our gallery so we can admire your crafty genius. While there, please stop by the blogs of my teammates, and leave them some bloggy lovin!

Just a reminder, we are now going to have a Guest Designer crafting with us starting in September. If you would like to be considered, simply add "DT" after your name when you link up.

Thanks for visiting and I hope to see you in the gallery!


I'd like to enter this card at:
TGIF#68
Jingle Belles - Rudolph the Red Nosed Reindeer


Supplies:
Stamps: Paper Smooches - Free Spirits, Christmas Sampler
Ink: Memento - Tuxedo Black, Bamboo Leaves
DP: MME - Signature Christmas
CS: Crafter's Companion; Taylored Expressions; Darice
Accessories: GC; Paper Smooches - Free Spirits icons & Christmas Words dies; Sizzix - EF; Spectrum Noir markers; Ranger - Glossy Accents; Recollections - rhinestone
Adhesives: SA by 3L - tape runner, Thin 3D foam squares; Scotch - scrapbooker's glue

Sunday, August 14, 2016

Happy Grumpy Birthday

Hello and happy Sunday to you, crafty peeps. I have a card that I want to share:


 Here is the inside:

Love these Grumplings! When I was on vacation last month, I took a bunch of images and my Spectrum Noir markers with me so I could get some craft time in, you know, on a rainy day. ☺ This is one of the images I colored. I paired this kitty with some bright happy papers to offset his sour attitude. LOL! And yes, a bit of snark on the inside. Couldn't resist. 

Well, as usual, when I'm crafting just for fun, I tend to use challenges that are about to end, this is no exception. My card is based on Tuesday Morning Sketches #364, and I'm also entering this at Seize the Sketch - Anything Goes. Gotta run, but thanks for visiting!


Supplies:
Stamps: Taylored Expressions - Party Grumplings; Lawn Fawn - Home Sweet Home
Ink: Memento - Tuxedo Black, Teal Zeal
DP: American Crafts - #Summer
CS: Bazzill; Crafter's Companion
Accessories: GC; Taylored Expressions - Party Grumplings dies; SB - Lacey Oval & Std Sm Oval Nesties; Spectrum Noir markers; MME - Enamel Dots; MISTI
Adhesives: SA by 3L - tape runner, Thin 3D foam squares
adding pinterest script 3. Changing the Position of the Pin it! button The cool thing about this code is that you have some freedom over where the Pinterest button for Blogger will go over the image. Take a look at the code that you just copied and pasted into the HTML for the word 'center'.