Tuesday, August 28, 2018

SHOPPING OUR STASH #369 - Quit Buggin' Me


Hello and happy Tuesday!
Summer is still in full swing here in the Mid Atlantic, and
that means the bugs are still out. That brings us to our
new challenge at SHOPPING OUR STASH:
Quit Bugging Me! We want to see a bug or bugs on your projects!
I was inspired by the dragonflies that have lately been zipping around
our house. (Which I love since they eat the skeeters!)
I colored some mixed media paper with Magenta Nuance
powder dyes and a water spritzer. Once it was dry I made
a couple cards from it.
Here's my first card:


It's based on the now ended Freshly Made Sketch #351. This was
pretty fast to make. I only had to die cut the dragonfly.. The flowers
I found in my UFO (UnFinished Objects) container, and the strip of blue from
my scrap file.

I used a dragonfly cover plate and a lot more of the colorful panel on my second card:


A glittery gold embossed sentiment was all this needed.

Ready to play along? Of course you are! Simply create something with a 
bug(s) on it and link up at Shopping Our Stash so we can admire it.
There are a lot more ideas to see,  made by the uber talented 
SOS Crew. You should buzz by their blogs to check them out!
Thanks for visiting!


Supplies card 1:
Stamps: STAMPlorations - sketched simple gift
Ink: Memento - Tuxedo Black
CS: Neenah; Strathmore mixed media paper; scraps
Accessories: Magenta Nuance powder dyes - turquoise, purple, jade; water mister; GC; STAMPlorations - dragonfly layering dies, Trendy Spring Bloom dies; Wink of Stella pen; MISTI
Adhesives: SA by 3L - tape runner, thin 3D foam squares; Ranger - multi medium matte

Card 2:
Stamps: STAMPlorations - balloon & banners
Ink: Colorbox/Susan K. Weckesser - Shimmer
CS: Neenah; Strathmore mixed media paper
Accessories: Magenta Nuance powder dyes; STAMPlorations - Dragonfly cover plate; GC;
Stampendous - jeweled gold EP; heat gun; MISTI
Adhesives: SA by 3L - adhesive sheets


Saturday, August 25, 2018

SISTERHOOD OF SNARKY STAMPERS #117 - A is for Apple


Hello and happy Saturday to you!
There's a new challenge starting today at the 
A is for Apple!

You guessed it, we'd like to see something relating to apples on your
projects. I of course, went with a bushel filled with drinks
instead of apples:
 
aannnnndd the punch line:

So true.
(And if anyone's wondering, those are
two appletinis, the blue tropical drink has a splash of pineapple juice,
and there are two glasses of sangria sans the fruit,
apples being one of them, but I already ate them.)
Sorry, not sorry.

Now it's your turn to play along! Simply use some sort of apple on your
project and link up at the Sisterhood of Snarky Stampers!
We'd love to see your take on the challenge. For more apple ideas,
do check out what my Sistahs came up with, along with our newest
reigning Queen and GD Lisa! 
Thanks for dropping by. Have a wonderful day!


Supplies:
Stamps: The Alleyway Stamps - it's fall about you; Paper Smooches - free spirits, shadows
Ink: Memento - tuxedo black, rhubarb stalk, London fog
CS: TE; Crafter's Companion
Accessories: Spectrum Noir markers; GC; PS- free spirits dies; MISTI; wink of Stella pen; computer and printer for sentiment; Avery Elle - pierced rectangle die; X-Acto knife
Adhesives: SA by 3L - tape runner; Ranger - multi medium matte

Thursday, August 23, 2018

Zombie love

Hey there friends and welcome!
I had some fun coloring up a bunch of zombies the other day,
and here's one of the cards I made with them:


Here's the inside of my card:

Halloween is my favorite holiday. I think I decorate my house more 
for it than for Christmas. LOL!
These fabulously ghastly creatures were colored using Distress inks and a water brush.
I love the mottled colors!
Well, off to get some actual housework done now. Ugh!
Thanks for visiting!


I'd like to enter this at:


Supplies:
Stamps: Stampers Anonyous/TH - Zombies, Mr. Bones; Dare 2B Artsy - texture
Ink: Versamark; Ranger DI - evergreen bough, iced spruce, twisted citron, vintage photo, hickory smoke, fired brick, fossilized amber; Memento - tuxedo black, London fog
DP: Martha Stewart - Vampire
CS: Thunderbolt; Strathmore water color paper
Accessories: Inkadinkado - black EP; heat gun; MISTI; water brush; blending tool
Adhesives: SA by 3L - tape runner, 3D foam squares

Tuesday, August 21, 2018

SHOPPING OUR STASH #368 - Hot, hot, hot!!


Welcome friends! This week at SHOPPING OUR STASH,
we are getting Hot, Hot, Hot!!
Which means, we'd like to see anything that is hot on your projects,
for instance, the weather, spicy food, cooking related, etc.
Me? I touched on the theme in a very personal, yet humorous way:


Hot flashes. Aren't they the best? - said no one ever.

I unearthed an ancient paper pack from Webster's Pages for my card. 
As soon as I saw this particular paper, I knew I was going to use it,
because of the bit of leopard print on the edge.
(Sort of a nod to the Cougars out there! LOL!)
And only used one piece of paper. The hounds tooth is the B side. Love it!
I screwed up when using a tiny hole punch on the earrings. I cut off a bit on the 
second one, so I embraced the oops and snipped the other earring for a
more cohesive look. (As if I totally meant to do that!) 
You can't tell, but I've added Glossy Accents to her fabulous glasses.
(Am I the only one who wants a pair shaped like these too?)
Somehow, I don't already own a stamp with this sentiment, (a travesty!),
so I used my computer and printer this time around.

Now it's your turn! How would you interpret the Hot theme? We'd love
to see your take on it in the gallery at Shopping Our Stash!
Need more ideas? Simply check out what my teammies created.
While visiting their blogs, please leave a comment about what you think.
Thanks for visiting. Hope you have a great day!


Supplies:
Stamps: Art Impressions - Golden Oldies Eunice
Ink: Memento - Tuxedo Black; Ranger DI - Ground Espresso
DP: Webster's Pages; scraps
CS: Crafter's Companion; TE; scraps
Accessories: Spectrum Noir markers; Prismacolor pencils; MISTI; computer & printer; Ranger - Glossy Accents; Westcott- hole punch; GC; MFT - vertical greetings II die; blending tool
Adhesives: SA by 3L - tape runner, 3D & thin 3D foam squares; Ranger - Multi Medium Matte


Sunday, August 19, 2018

Another fast watercolor card

Hi there and happy Sunday to you!
Just popping in with a another card I
made using the fast watercolor technique
I am really loving how this technique looks, and will
probably be making more cards. Be warned. LOL!
Anyway, here's my card:


couldn't resist a bit of snark on the inside:

just about dry:
 

The sentiment was stamped, then I doodled around the edge. Once I fussy
cut everything, the sunflowers were adhered with foam squares, and the leaves
directly to the card base.

Such an easy method, the only thing hard about it is waiting for
the ink to dry! LOL!
Thanks for visiting, and I hope you have a wonderful day!


I'd like to enter this at:


Supplies:
Stamps: Dare2BArtzy/Totally Tracy - find your purpose; Spellbinders/Richard Garay - just because; Inkadinkado - humorous birthday
Ink: Versamark; Memento - rich cocoa; Ranger DI - mustard seed, wild honey, gathered twigs, evergreen bough, twisted citron, vintage photo
CS: Strathmore watercolor paper; Thunderbolt
Accessories: Inkadinkado - black EP; heat gun; water mister; MISTI; Faber Castell - medium black Artist PITT pen
Adhesives: SA by 3L - tape runner, 3D & thin 3D foam squares

Wednesday, August 15, 2018

Twofer!

Hello there!
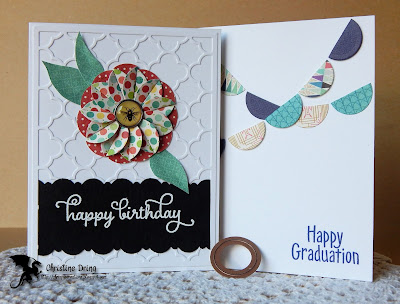
I wanted to share a couple cards I made for the
current Twofer Challenge - geometric.


I used a small circle die for my cards:


Onefer:
I die cut like a gazillion circles (nine) and 
folded them to make my flower medallion. I found a cute bee brad in my stash and added it to
the center. The leaves I cut free hand.
I prepared the card base with a quatrefoil panel, stamped and heat embossed
the sentiment. Used a border punch along the edges before adhering,
then added my flower.


Here's the inside:


Twofer:
Yep, I die cut more circles to use as my banners. I cut the circles in half,
adhered the first 'string' directly the my card base, then popped the other
'string' up with foam squares. Stamped my sentiments and that was it!


and the inside:

We finally are getting a day without rain today! (YAY!) I'm going to
go enjoy it now. Thanks for visiting and I hope you have a great day!


Supplies:
Onefer: Stamps: Taylored Expressions - In & Out Birthday
Ink: Versamark; Memento - Tuxedo Black
CS: Neenah; scrap
DP: MME - Quite Contrary
Accessories: GC; SB - lg std circle nesties; TE - quatrefoil cover plate; Stampendous - white EP;
heat gun; MME - brad; MISTI; EK Success - deco scallop border punch
Adhesives: SA by 3L - tape runner, adhesive sheet; Ranger - multi medium matte

Twofer: Stamps: Hero Arts - celebrate everyday; SSS - messages for everyday
Ink: Memento - Paris dusk
CS: Neenah; scrap
DP: Basic Grey - Aurora
Accessories: GC; SB - lg std circle nesties; MISTI
Adhesives: SA by 3L - tape runner, thin 3D foam squares


Fast watercolor flowers

Good morning all!
I want to share a card I made for the current
Just Us Girls challenge: fast watercolors. 

 There's a link on the challenge site to this technique by Jennifer McGuire.
It was a lot of fun, but waiting for the images to dry, ugh! LOL!
Here's what I created:


and the finished inside:

I remembered to snap a pic while the images were still wet:
 

Again, it was torture to put this aside to let air dry, but I did it. ☺

Once dry, I fussy cut the images.* I die cut my main panel using
a pierced rectangle die, and for more interest also die cut 
the ring collage die. (which of course is mostly covered from
the flowers. LOL!)
I stamped the sentiment, then arranged the flowers and adhered
with foam squares. Another sentiment finishes the inside.
I love how this turned out, so I'm going to be making more cards
using this technique! It was so much fun!

That's it for this post. I've got more card pictures to edit now. LOL!
Thanks for visiting and I hope you have a great day!


*I started to fussy cut these Monday, but then the mother of all storms let
loose over us, and I had to put down the scissors to combat the water
flowing into our basement. NOT a fun time, that. Luckily, we didn't get too much.
Finally finished my card yesterday.


Supplies:
Stamps: Dare2BArtzy/Totally Tracy - power of words; Simon Says Stamp - messages for everyday;
Hero Arts - good things
Ink: Versamark; Ranger DI - mermaid lagoon, wilted violet, spiced marmalade, picked raspberry, lucky clover, twisted citron; Memento - bahama blue
CS: Strathmore watercolor paper; Neenah
Accessories: water mister; Inkadinkadoo - black EP; heat gun; MISTI; GC; Avery Elle - pierced rectangle die; Poppystamps - ring collage die
Adhesives: SA by 3L - tape runner, thin 3D foam squares


Tuesday, August 14, 2018

SHOPPING OUR STASH #367 - Leaf It To Me


Hi there crafty friends! I'm hosting this week's challenge at
and as our challenge title suggests,
we want to see a leaf or leaves on your project!

Here's my card:

and the inside:

I tried mono-printing with a stencil for my background, based on
this tutorial. I chose ink colors to represent the changing leaf colors in Autumn.
After it dried, I added two strips of burlap ribbon then on top of that a
strip of brown card stock heat embossed with my sentiment.
I remembered that somewhere I had a package of wooden leaves.
(So glad I found them. LOL!) I stained one of them using the same
ink on the background and glued that on. Another
sentiment finishes the inside.

Now it's your turn! We'd love to see your projects linked up
in the gallery at Shopping Our Stash! Looking for more 
inspiration? Simply visit the blogs of my teammates to see
the amazing projects they created, and while there leave
some bloggy lovin!
Thanks for visiting. I hope you have a fabulous day!


I'd like to enter this at CAS Mix It Up challenge - stencil monoprint/stamping/heat embossing/wood/burlap


Supplies:
Stamps: STAMPlorations - Balloons and Banners
Ink: Ranger DI - cracked pistachio, twisted citron, lucky clover, mahogany; VersaMark
CS: TE; Neenah
Accessories: STAMPlorations - leaf prints stencil; water mister; Recollections - burlap ribbon & wooden leaf; MISTI; Stampendous - champagne EP; heat gun; Fray Check
Adhesives: SA by 3L - tape runner; American Crafts - tacky tape; Ranger - Multi Medium Matte

Saturday, August 11, 2018

SISTERHOOD OF SNARKY STAMPERS #116 - D is for Denim


Hello snarky friends and welcome to another fun challenge
D is for Denim!

Look at Edna, spitting in the face of the fashion police, and getting
her double denim on! Such a rebel! LOL!

I haven't made an art journal page in months, so that's what I did for this challenge:


I found a quote to use while searching on Mr. Google.
I couldn't find the source of this quote, so if anyone
knows, leave me a comment so I can give credit. Thanks!

I tried using rubbing alcohol and a scrap of denim as a resist on the gal's dress,
to make it look as if her dress was denim.
On my first attempt, the scrap of denim was too saturated, and 
bled way too much. 


My second attempt worked much better!


Tip: if you try this technique, do this step first, and
be sure the rubbing alcohol is completely dry before coloring the
rest of it, otherwise what you color next will bleed.

I colored her with Spectrum Noir markers and added details
with Prismacolor pencils. I fussy cut her out and set aside to
work on my page.

I used pink, coral and orange acrylic paints for the base, then added
different stenciled images using the coral plus white and blue. I used
too much paint on some of the stencils, but decided to embrace the mess.


To hide the blobby blue mess I made with the blue paint, I simply
put the stencil back over it when it was dry and traced the image with a black
Artist PITT pen. I used alpha stamps to stamp the sentiment on copy paper.
I trimmed and glued them along with my peace gal onto the page with
matte medium.


After everything was dry, I added a shadow under her to ground her,
and doodled around the words and also added white dots to the blue leaves.
I still wasn't finished stenciling, so I used another one and traced some
flowers with a gold pen. I also added Stickles to her flower tiara and the 
peace sign she's holding.


Here's another pic of the finished page:


Yay, you made it to the end! LOL!
Now it's your turn to make something pertaining to denim, and link up at
the Sisterhood of Snarky Stampers! We'd love to see your take on
this challenge. Need some ideas? Simply visit the blogs of my Sisters to
see what amazing creations they came up with, and please leave some
bloggy love while there. We all love comments!
Thanks for visiting, now go forth and get your craft on!


I'd like to enter this at:


Supplies:
Strathmore Art Journal
Stamps: MFT - ALM Groovy Girl; Studio G - Alphas
Ink: Memento - Tuxedo Black; Staz On - Jet Black
CS: Crafter's Companion; copy paper
Accessories: Spectrum Noir markers; PrismaColor pencils; Ranger - Stardust Stickles; Golden gesso;
DecoArt Americana acrylic paints - coral blush, tangerine, cotton candy, blue harbor, snow; various
paintbrushes; Dylusions stencils - fronds of foliage, old school numbers; Simon Says Stamp stencil - jazz dance; STAMPlorations stencil - daisy play; Faber Castell - bold & medium black Artist PITT pens; Sakura - gold and white Gelly Roll pens; General's black & brown chalk pencils; DecoArt Media matte medium; rubbing alcohol; scrap of denim
adding pinterest script 3. Changing the Position of the Pin it! button The cool thing about this code is that you have some freedom over where the Pinterest button for Blogger will go over the image. Take a look at the code that you just copied and pasted into the HTML for the word 'center'.