Saturday, February 27, 2016

JUST US GIRLS #332 - Photo Week


Hello friends and welcome! Lisa is your hostess for Photo Week at JUST US GIRLS! Since this is a Leap Year, that's what she's picked as your inspiration. There is many ways to interpret this, as evidenced by what the design team came up with! Here's my take on the challenge:


 Here's the inside:

I took my cue from the word 'leap'. Frogs are usually associated with Leap Year, so I went with that. I colored him with my Spectrum Noir markers, and used bright, happy colors in my papers. I used a really old sketch from MFT Wednesday challenge (#78!)* The sentiment was masked from a couple different stamps (Hoppy Easter and Happy Belated Birthday). Another simple sentiment finishes the inside.

I hope you get the chance to join us this week at Just Us Girls! We'd love to see your take on this challenge. While there, please leave some bloggy love for my teammies, and our Guest Designer, Pamellia. This is her last challenge guesting with us and I'd like to say a big thank you for sharing your amazing talent and cards with us! 

Just a reminder, if you are picked as Chic of the Week for any of our February challenges, you'll be in the running to be our Guest Designer for the month of April! Thanks for visiting!

* The day I made this card, we had no internet service. Before I got my laptop, I was printing out sketches/color challenges, etc. and kept them in a folder. Since I never got rid of those, I just pulled out the first sketch on top and used it!


I'd like to enter this at:


Supplies:
Stamps: Paper Smooches - A Little Lovin, A Magical Spring, Happy Birthday, Birthday Sampler
Ink: Memento - Tuxedo Black
DP: Graphic 45 - Bohemian Bazaar
CS: Bazzill, Darice, Crafter's Companion
Accessories: Spectrum Noir markers; GC; MFT - open simply scallops die
Adhesives: SA by 3L - tape runner, 3D & Thin 3D foam squares; Scotch - Scrapbooker's glue

Tuesday, February 23, 2016

SHOPPING OUR STASH #240 - One is a Lonely Number


Hello and welcome. It's time for a new challenge at SHOPPING OUR STASH! This time around, we challenge you to make a One Layered Card! The bane of my existence. I find it incredibly hard to make one layered cards. I like my layers. Otherwise, the card seems so flimsy. Am I alone in this thinking? Anyone? (crickets chirping) Hmmmm..... Anyway, here's my card:


 Here is the inside:


It's been a while since I've stamped an image onto kraft and colored it with Prismacolor pencils, so that's what I did. After that I stamped the sentiment twice using my MISTI to get a nice dark coverage. It still needed something, so I drew a frame around it using a ruler and a fine tipped marker. Another sentiment finishes the inside.

I hope that you get a chance to play along with our one layer challenge at Shopping Our Stash! I'd love to see what you make (so maybe I can CASE it) LOL! While there, please check out what my teammies created and leave them some bloggy love. Thanks for visiting!


I'd like to enter this card at:
CAS on Sunday #77 -  One Layer Wonder


Supplies:
Stamps: Winnie & Walter - In Bloom: Addie's Garden, The Big The Bold & Party
Ink: Memento - Tuxedo Black, Rich Cocoa
CS: Reflections
Accessories: Prismacolor pencils; MISTI; Faber Castell - PITT Artist pen

Saturday, February 20, 2016

SISTERHOOD OF SNARKY STAMPERS #53: M is for Mixed Media


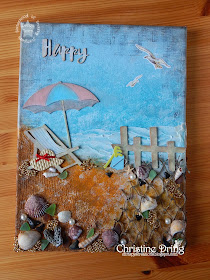
Good Morning snarky peeps! We have a fun challenge starting today at the SISTERHOOD OF SNARKY STAMPERS! It's all the rage right now - Mixed Media! So grab your inks, paints, stencils, stamps, gesso, texture paste, do-dads and what-nots and have some fun! I really embraced this challenge and stepped wwwaaayyyyyyy outside my comfort zone to make a mixed media canvas! Grab your favorite beverage and a snack, because this is a photo heavy post:

TA-DAH!!!

Ok, so I can't take credit for this. I pretty much CASEd a canvas by Gabrielle Pollacco, on her blog: Such a Pretty Mess. Thank you Gabrielle!! What's more, she made a video tutorial on how she made her canvas! Score! Also, hers is a 6" x 6" canvas as mine is an 8" x 10". Also, I don't own any of the things she used, except for maybe the gesso, I winged the rest of it. My supply list, as always, is at the very bottom of my post. It's lllloooonnnnnggggggg! I'm not going to go through step by step to tell you how I made this, but I did remember to take some pictures along the way. Just watch her video and you'll find I pretty much followed what she did. Sort of.

Some of the things I used, but not the Matte Medium, because the cap is glued to the bottle with Matte Medium. I still can't get that giant bottle open!


First layer: acrylic paints, gesso, cheesecloth, I mixed Graphite Glimmer Mist with some Gesso to add some gray smudges in the top corners and randomly in the blue area.

Gessoed and inked chipboard - the chair and umbrella store bought, the fence I die cut 4 times from kraft paper, stacked, and glued together. 

I stamped around the top portion edges of the canvas with a texture stamp I found in my stash and never used until now. I was following the video little by little, and covered the bottom corner with gesso like Gabrielle did on hers. In hindsight, just like her, I should have just left it as is. (facepalm) I fixed it by stippling more paint carefully under the netting later. The 'ocean' is texture paste. Once it dried, I thought it was still too stark white, so I sponged over it some with Mermaid Lagoon DI. My spare bedroom has a nautical theme to it, and I have netting on the wall over the bed with starfish entwined in it. I just cut a chunk off and used it here! LOL!

I die cut HAPPY 4 times, stacked, glued and gessoed. Then I used ink to distress it some. I glued the chair, umbrella and fence. Added the hat/sand pail dimensional stickers, and started gluing real shells, sea glass and shark teeth, all from my personal collections of them. The seagulls are ancient rub ons. I rubbed them onto white cardstock, fussy cut and glued down. 

Some close ups:
I added seed beads and pearls for a finishing touch.


I thought the umbrella was too washed out, so I went over the outlines with a fine tipped pen, and colored the underside with a Spectrum Noir marker. Much better. 

One last look at the finished product:


I gotta tell ya, this was so much fun to make! By not stressing about not having the exact items Gabrielle used on her canvas, and using what I had, it freed me to just get messy, and inky, and have fun just creating something new (to me)! I really hope you will join us at the Sisterhood of Snarky Stampers for our Mixed Media challenge! Be sure to link up so we can see what you created! While there, please leave some love for my Sistahs and our newest Queen and Guest Designer - Lorraine (a.k.a. Lols)! 

Thanks for visiting and congratulations for getting all the way through my long winded, photo heavy post! Have a great day and now go forth and get your craft on!


I'd like to enter this at:
Creative Artiste Challenge #11 - ATG with mixed media


Supplies:
Michael's canvas;  Golden Gesso;  Adirondack - acrylic paint - Butterscotch, Cloudy Blue, Stream, Espresso;  Tatered Angels - Graphite Glimmer Mist;  Ranger DI - Abandoned Coral, Fossilized Amber, Vintage Photo, Hickory Smoke, Peeled Paint, Mermaid Lagoon, Walnut Stain;
Colorbox - Chestnut Roan, Black;  American Crafts - Texture stamp;  Various paint brushes, painters knife, sponge, paper towels (LOTS of paper towels!);  Bradshaw Corp - cheese cloth;  Netting from my guest bedroom wall!;  Cousin - seed beads;  Studio 112 - pearls;  Jolee's Boutique - dimensional stickers;  mystery seagull rub-ons; Darice - kraft paper; Grand Calibur;  Simon Says Stamp - Happy Birthday die; Slice die cutter and Toil & Trouble cartridge(for fence);  Dreamweaver embossing paste;  Fab Scraps - chipboard umbrella and chair;  Spectrum Noir GG2 marker;  Faber Castell - Black PITT Artist pen;  Ranger - Glossy Accents;  Helmar 450 glue


JUST US GIRLS #331 - Color Week


Hello and welcome friends! It's Color Week at JUST US GIRLS! Cheryl is your hostess this week and she's come up with a trio of BLUES for you to craft with: Teal, Aqua and Navy. Neutrals, such as white, black, kraft, ivory, etc. can be used also. Here's what I came up with:


This could have been made easier if I used the navy for the flower base and the teal for the outline, but nnnoooooooo! I had to die cut the outline 3 times and Frankenstein it back together. LOL! But it was worth it, as I like how it gives the flower a sort of stained glass look to it. (Well, that's my story and I'm sticking with it!) The sentiment was stamped and clear embossed, although you can't tell that from my photo. I scattered some rhinestones and called it done. ☺

I hope you get a chance to play along this week at Just Us Girls! I'd love to see what you create with these colors. Please do yourself a favor and check out what my teammates created, along with our Guest Designer Pamellia! Just a reminder, if you are chosen as Chic of the Week for any of our February challenges, you'll be in the running to be our next Guest Designer for the month of April! Good luck and happy crafting!


Supplies:
Stamps: MFT - More Essential Sentiments
Ink: Memento - Paris Dusk; VersaMark
CS: Bazzill, Darice
Accessories: GC; Winnie & Walter - In Bloom: Maggie's Roses Cutaways; MFT - Stitched diagonal cover-up die; Nicole - rhinestones; WOW! - clear embossing powder; heatgun
Adhesives: SA by 3L - tape runner, 3D foam squares; Scotch - Scrapbooker's glue; Glue Dots

Tuesday, February 16, 2016

SHOPPING OUR STASH #239 - Fantastic Plastic


Happy Tuesday crafty peeps! We have a new challenge starting today at SHOPPING OUR STASH! This week, we would like to see you use plastic of some type on your card or project. Whether that be acetate for a shaker card, plastic buttons, you could even recycle something plastic! Many options out there, I went with recycling some plastic mesh. Have you ever bought one of those little crates of tangelos, and there's that plastic mesh covering them to hold them in the crate? Yep, that's what I used. Check it:


 Here's the inside:

I am so over with all the red/pink/kissy/mushy Valentine's Day stuff, that I made a Halloween card! LOL! I cut the mesh very wonky and adhered, then just searched my mega stash of Halloween supplies for some dimensional stickers. On the inside I inked the sentiment with red on the bottom and black on top before stamping to the card.  

Ooh! Shiny!

Want to play along? Sure you do! Just make sure to link up at Shopping Our Stash so we can see what you made! While there, please do check out what my teammies created for your viewing pleasure, and leave some love on their blogs! Thanks for visiting!


I'd like to enter this at:


Supplies:
Stamps: Hampton Arts - Beware
Ink: Memento - Tuxedo Black, Lady Bug
CS: Bazzill
Accessories: Anna Griffin - Boo sticker; Jolee's Boutique - spider sticker; red plastic mesh from a tangelo box!
Adhesives: Elmer's glue stick

Saturday, February 13, 2016

JUST US GIRLS #330 - Trend Week


Good morning and welcome! It's Trend Week at JUST US GIRLS! Ina is your hostess this week and she's picked a trend that is still going strong: TAGS! She is challenging you to add a tag to your card or project. Here is my card:


 And the inside:

I was in need of a sympathy card, and so this came about. The tags are actually a frame die, but I trimmed one side then rounded the corners. (because I like to do things the hard way.) Speaking of the hard way, the sentiment is also masked a few times. The stamp says 'sorry for your loss' all on one line. I wanted it to be two lines plus add the word so. I added Diamond Stickles to the wings, tail feathers and flower after I had everything adhered in place. 

Ready to play along? Sure you are! Just link up your card or project at Just Us Girls so we can admire it! While there, please leave some bloggy love for my teammates and our Guest Designer, Pamellia. Thanks for visiting, and I hope you have a great day!


I'd like to enter my card at:
Tuesday Morning Sketches #338
A Blog Named Hero - A bit of Sparkle


Supplies:
Stamps: Hero Arts - Everyday Sayings, Happy Mom's Day; Inkadinkado #96059
Ink: Memento - Tuxedo Black
DP: DCWV - Summer Magic Stack
CS: Darice, Simon Says Stamp, Crafter's Companion
Accessories: GC; MFT - vertical Greetings Die-Namics; Spectrum Noir markers; Ranger - Diamond Stickles; Fiskars - corner rounder; Wescott - hole punch; Wrights - ribbon; bakers twine from stash
Adhesives: SA by 3L - tape runner; Glue Dots

Tuesday, February 9, 2016

SHOPPING OUR STASH #238 - Bent Out of Shape


Good morning crafty peeps! This week at SHOPPING OUR STASH, we challenge you to make a shaped card! I'll admit I was a little nervous about this one. I don't usually do shaped cards, maybe a round card once or twice a year, but nothing major. Luckily, thanks to Pinterest, I found a relatively simple shaped card to CASE, and bonus, even a template to print out! Check it:


 Here's the inside:

Ok, I realize that an apron isn't that much of a stretch for a shaped card. Baby steps, people. There's a lot packed into this card: coloring, fussy cutting, decorative punches and scissors, and that frilly gingham ribbon! Love! 

Ready to play along? Sure you are! Whether you make a simple shaped card like mine, or something elaborate, we want to see it! Just link up at Shopping Our Stash, and while there, please check out what my teammies came up with and leave them some bloggy love! Thanks for visiting!


Supplies:
Stamps: Paper Smooches - Green Thumb; Hero Arts - Happy Mom's Day
Ink: Memento - Tuxedo Black
DP: Pebbles - Garden Party
CS: Simon Says Stamp, scraps
Accessories: Spectrum Noir markers; template via Pinterest; American Crafts & May Arts - ribbon; hole punch; Faber Castell - black Artist Pitt pen; EK Success - Deco Scallop punch; Provo Craft - scallop scissors; Fray Check
Adhesives: SA by 3L - tape runner, 3D foam squares: Recollections - red tape

Saturday, February 6, 2016

SISTERHOOD OF SNARKY STAMPERS #52 K is for Kiss....


Welcome welcome! It's time for another fun challenge at the SISTERHOOD OF SNARKY STAMPERS! K is for KISS: whether you finish that with 'Me" or "My A$$" is entirely up to you! LOL! I actually went the sweet route this time around. (Shocking, I know. My apologies for making you fall out of your chair. Now sit back in it. *wink*) I think I redeemed myself with googly eyes. I hope. Here, check it:


 Here's the inside:

I own exactly one stamp that says Happy V-day, so you'll be seeing this often on my cards this time of year. The back panel was made by inking up an embossing folder with Spun Sugar & Worn Lipstick DI, spritzed with water, and then the die cut panel layed down in the mess. It came out pretty cool, I think. My frog prince is paper pieced, and I used some Spectrum Noir markers to add shading on his body and crown, as well as coloring the mouth. The crown has Diamond Stickles on it, but again with my crack photography skillz, it doesn't show up. And there they are, the googly eyes. I stamped the hearts with Spun Sugar DI, then doodled around them so they showed up better. 

Ready to play along? Of course you are! Just link up your card or project at the Sisterhood of Snarky Stampers so we can admire your genius! While there, please do check out what my Sistahs, and our newest Guest Designer - Dotty Jo - have created for your viewing pleasure, and leave them some bloggy love! Thanks for visiting. Now go forth and get your craft on!


I'd like to enter this at:
Just Add Ink #297
Happy Little Stampers Feb. 2016 CAS challenge - embossing folder stamping
Paper Smooches Feb 2016 challenge - Fun & Cute


Supplies:
Stamps: Paper Smooches - Royal Cuteness, A Little Lovin; Hero Arts - Celebrate Everyday
Ink: Memento - Tuxedo Black; Ranger DI - Spun Sugar, Worn Lipstick
DP: scrap (I think MME)
CS: Darice; Bazzill
Accessories: GC; Paper Smooches - Flag Tag die; Simon Says Stamp - Frames die; Cuttlebug - Oxford EF; Ranger - Diamond Stickles; Spectrum Noir markers; Bel-Tree Corp - googly eyes
Adhesives: SA by 3L - tape runner, 3D foam squares; Elmer's glue stick; Ranger - Glossy Accents