Tuesday, March 31, 2015

SHOPPING OUR STASH #195 No Foolin' - Use a Faux Technique


Good morning all! We have a new challenge starting today at SHOPPING OUR STASH! As the subtitle suggests, we want you to push yourself and use a Faux Technique on your card or project. Just some suggestions: faux stitching, faux silk, faux leather, there are many faux techniques to try! I've chosen to try the faux metal technique. Here's my card:


 Here's the inside:

This was the first time trying this technique out. The first thing I did was Google 'Splitcoaststampers faux techniques' and found this tutorial. Looked easy enough. And it was. Of course, what you don't see is the first three images I tried this on, and rejected because I didn't get a good enough impression in the gooey mess. Also, because I did this four times, I used up half of my copper EP! LOL! I used a couple of my all time favorite sentiment stamps and made a guy card. Both Andy's and my family are blessed with a sarcastic sense of humor, so this will go to either one of my brother's or one of his. ☺ I love how the antique car really looks like it's cast from metal! 

Oooh! Shiny!

I hope you try a faux technique and play along at Shopping Our Stash! While there, please check out the amazeball creations that my teammies made! Thanks for hanging out with me! 


I'd like to enter this at:


Supplies:
Stamps: Unity Stamp Co. - February & July 2012 KOM
Ink: VersaMark; Ranger DI - Walnut Stain
DP: Echo Park - This & That Charming
CS: Darice; Core'Dinations
Accessories: Stampendous - Detail Copper EP; heat gun; Cuttlebug - Diamond Plate EF
Adhesives: SA by 3L - tape runner, 3D foam squares

Saturday, March 28, 2015

JUST US GIRLS! #286 - Photo Week


Hello and good morning to you all! It's Photo Week at JUST US GIRLS! Cheryl is your Hostess this week and she found this adorable picture! There is so much to inspire you: bunnies, the colors, the patterns, flowers - so much eye candy! Here's what I came up with:


 Here's the inside:

I was inspired by the bunnies and the colors in the photo. The bunny and basket are two separate stamps. I stamped the bunny twice and colored one completely and the other one only the arm, then fussy cut them. After coloring and fussy cutting the basket, I glued it to the bunny, then over that, I glued the other arm. I used patterned paper that had a lot of the colors in the photo to finish my card.

I hope you get the chance to play along this week at Just Us Girls! Please check out what the other gals made to inspire you! Also, a big huge THANK YOU to our March Guest Designer - Jen Mitchell! It was great to have you designing with us this month!

Remember that if you are picked as Chic of the Week for any of our March challenges, you'll be in the running for our Guest Designer in May! Hope to see you there!


Challenges I'd like to enter:
Tuesday Morning Sketches #293
Some Odd Girl Linky Party
Paper Issues SOG color inspiration challenge
Simon Says Stamp - Wednesday Challenge: Anything Goes


Supplies:
Stamps: Some Odd Girl; Hero Arts
Ink: Memento - Tuxedo Black
DP: DCWV - The Spring Mix Stack; MME - Everyday Tango
CS: Darice; Crafter's Companion
Accessories: Spectrum Noir markers; GC; Std. Sm. Circle Nesties; Darice - Flower Frenzy EF; MME - Enamel Dots; Sakura  white Gelly Roll pen
Adhesives: SA by 3L- tape runner, 3D foam squares

Tuesday, March 24, 2015

SHOPPING OUR STASH #194 - Neon Rainbow


Hello and good morning! We have a fun new challenge starting at SHOPPING OUR STASH! We are looking for rainbows! It could be interpreted as using a rainbow die cut, the colors of a rainbow, a picture of a rainbow, or, as the title suggests, you can use neon colors! Lots of options here! Here's the card I made:


 Here's the inside:

I started with a panel of water color paper. I stamped in VersaMark then heat embossed in clear EP. I used Distress Inks as my water colors. I smooshed the pads directly onto my craft mat, then took a paint brush loaded with water and scribbled on the colors, making sure each color touched the ones next to it so it bled together a bit. I'm digging this emboss resist technique! I rummaged around to find some iridescent rhinestones (more rainbows), and mounted the panel on my card base with foam squares. Super easy!

Here's a somewhat better pic of the embossing:

I hope that you get a chance to play along this week at Shopping Our Stash! Please check out what my teammies created - Wow! Amazing creations! Thanks for stopping by and I hope that you have a great day!


Supplies:
Stamps: Momenta; Some Odd Girl
Ink: VersaMark; Ranger DI - Barn Door, Squeezed Lemonade, Spiced Marmalade, Mowed Lawn, Faded Jeans, Dusty Concord; Memento - Tuxedo Black
CS: Strathmore water color paper; Darice
Accessories: WOW! - clear EP; heat gun; Recollections - rhinestones
Adhesives: SA by 3L - tape runner, 3D foam squares

Saturday, March 21, 2015

SISTERHOOD OF SNARKY STAMPERS #30 E is for Easter!

Edna's all ready to do the Bunny Hop!

Good morning crafty peeps! It's time for a new challenge at the SISTERHOOD OF SNARKY STAMPERS! The next two weeks are brought to you by the letter E - for Easter! That's right, Edna and the Sisters challenge you to make an Easter card or project. ☺ Last challenge I made a cutsie card with no snark on it - I broke out in hives. So, I remedied it this go around:


 Here's the inside:

Love this bunny stamp! It just speaks to my snarky heart! LOL! I hope that you get a chance to play along with the Sisterhood of Snarky Stampers for the Easter challenge. The Sisters want to thank both Majo and Glo for jumping in at the last minute to fill in for Jane, our newest Queen of Snark, who is on vacation at the moment. But don't worry, she'll be joining us for another challenge soon! If you have a chance, please check out the awesome creations that my Sisters made for this challenge - Sooooo amazing! Thanks for stopping by, and I hope you have a great day!


I'd like to enter this card at Nacho Average Challenge #133

Supplies:
Stamps: Crackerbox Palace - Chocolate Bunnies; Hero Arts - Celebrate Everyday
Ink: Memento - Rich Cocoa
DP: MME - Dolled Up
CS: Darice; scraps
Accessories: GC; Std. Sm circles & Classic Scallop circle Nesties; brown marker
Adhesives: SA by 3L - tape runner

JUST US GIRLS! #285 - Color Week!


Hello there, and happy Saturday to you! Color Week starts today at JUST US GIRLS! Nancy is your Hostess this week and she's picked Black, White.....and the 3rd color is YOUR choice! I can't wait to see what you all come up with. ☺ I picked red as my 3rd color - here's my card:


here's the inside:

I saw this card by the lovely Leslie, and knew I was going to CASE it. (but without the foil, and without lining everything up with a ruler. Living dangerously, that's me) Thus, weird spacing, but with the loopy script, perhaps you won't notice it too much. *koff* I needed some bling, so added a row of red rhinestones under the main thanks. A simple sentiment stamped in red finishes the inside.

I hope to see you play along this week at Just Us Girls! Be sure to check out what the rest of the team, and our March Guest Designer Jen Mitchell, created to amaze you! Remember that if you win Chic of the Week for any of our March challenges, you'll be in the running to be our Guest Designer for the month of May! Good luck, now go get your craft on!


Supplies:
Stamps: Paper Smooches - Many Thanks
Ink: Memento - Rhubarb Stalk
CS: Darice
Accessories: GC; Taylored Expressions - Thanks die; Recollections - rhinestones
Adhesives: SA by 3L - tape runner; Scotch Scrapbooker's glue

Tuesday, March 17, 2015

SHOPPING OUR STASH #193 - I Made This....Make your own background!


Good morning and Happy St. Patrick's Day! Time for corned beef and cabbage, and green beer! It's also the start of a new challenge at SHOPPING OUR STASH!! This week, we challenge you to make your own background! But - not just stamping a background stamp. Nope. You could make a collage, use washi tape, paint, stamps, stencils, emboss resist, or even alter patterned paper with doodles. Use your imagination! Here's my card:


and the inside:

My background was made using a wave stencil and three colors of Distress Ink. I started with one color, randomly sponging it on. I took the stencil off and flipped it around, then sponged on the next color. Repeated for the last color. I printed out this sultry mermaid digi and colored her up with my Spectrum Noir markers. The sentiment came with the mermaid. She was fussy cut and sits at the bottom of the ocean on cork 'sand'. A few holographic dots as air bubbles, some Stickles on the fin veins and scales, and she's done! 

I hope that you get a chance to make your own background and link up at Shopping Our Stash! We can't wait to see what you came up with! Please be sure to check out the fantabulous creations that my teammies came up with to wow you with! Have a happy St. Paddy's Day!! Erin go bragh(less!) 


Supplies: 
Stamps: Simply Betty Stamps - Spika the bad mermaid digi; Paper Smooches - Happy Birthday
Ink: Ranger DI - Salty Ocean, Broken China, Peacock Feathers
CS: Darice
Accessories: Spectrum Noir markers; Simon Says Stamp - waves stencil; Ranger - Crystal Stickles; Momenta - holographic dots
Adhesives: SA by 3L - tape runner, 3D foam squares


Saturday, March 14, 2015

JUST US GIRLS! #284 - Trend Week


Good morning crafty peeps! Sue is your hostess this time around for Trend Week at JUST US GIRLS, and she's picked SPLATTERS! How fun is this?!! Here's what I came up with:


 Here's the inside:

I started with white card stock and got out my Hero Arts neon ink cubes. I smooshed ink on my craft mat then spritzed with some water. Stirring it up with a paintbrush, I then spattered the white card stock with color. I repeated the process for all four colors. Once that was dry, I heat embossed the sentiment with white EP onto some black card stock, cut to size and adhered. I wrapped twine around one side, matted it onto black card stock then onto the blue card base. Of course, I felt compelled to add more, so out came the enamel dots. ☺ I trimmed another panel to size, matted it, stamped it, and adhered to the inside to finish my card. I really love the bright colors in this card. Makes me think that Spring is right around the corner!! 

I hope that you get a chance to play along with our splatter challenge at Just Us Girls! Also, please check out the incredible creations that my teammies and our Guest Designer, Jen Mitchell, created. A.Maz.Ing! I'm tellin' ya! Remember, if you are picked as Chic of the Week for any of our March challenges, you'll be in the running to be our Guest Designer for the month of May! Thanks for stopping by, and I hope that you have a great day!


I'd like to enter this at 
Seize the Birthday - Sentiment as focal point Topper


Supplies:
Stamps: Crafter's Companion - BeBunni Hooray; Avery Elle - Cheers
Ink: Hero Arts - Neon cubes; VersaMark; Memento - Tuxedo Black
CS: Darice
Accessories: Stampendous - white EP; heat gun; Doodlebug twine; MME enamel dots
Adhesives: SA by 3L - tape runner, thin 3D foam squares

Tuesday, March 10, 2015

SHOPPING OUR STASH #192 - Counting On You


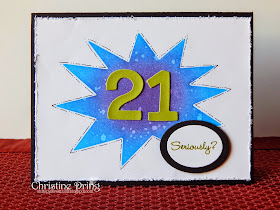
Hello and welcome! We have a new challenge starting at SHOPPING OUR STASH, and it's all about NUMBERS! We'd like to see you incorporate a number (or numbers) into your card or project. Here's what I came up with:


Here's the inside:

I had some fun with Distress Inks and masking. I die cut the larger Bam Bubble die and used the negative as my mask, then went to town using a couple different inks and sponged them in. I spritzed some water onto it then blotted off for the spots. The 'seriously' was stamped first in VersaMark then another DI color and embossed with clear embossing powder. I dug through my stash of number stickers and found these to use. Another stamp finishes the inside. 

I actually made three of these cards, all basically the same design, but with slight differences to them:


They all use the same three DI colors and all have the main panel edges distressed. I have four nephews that are all turning 21 this year. (two live in the same state, so I will need to make a different card for him) But since three of them live in different states, why not mass produce?! (And yes, 1994 was a very fertile year for both my hubby's and my family!) LOL!

I hope you get the chance to play along with this week's number challenge at Shopping Our Stash! Wait until you see the awesome creations that my teammies came up with! Please do visit their blogs and leave some love! Thanks for stopping by and I hope that you have a great day!

Challenges I'm entering:
CAS-Colours & Sketch #114
The Crooked Stamper Sketch Challenge #2
Addicted to Stamps and More #134 - clean & simple
Addicted to CAS #58 - Distress


Supplies:
Stamps: MFT - Twisted Threesome; Inkadinkado - Humorous Birthday
Ink: Ranger DI - Salty Ocean, Peeled Paint, Dusty Concord; Versa Mark
CS: Darice
Accessories: GC; Classic Sm & Lg Oval Nesties; Paper Smooches - Bam Bubble Die; water spritzer; WOW! - clear EP; heat gun; Faber Castell - black Pitt pen; Tim Holtz - bubble EF; Tonic - distress tool; AC - Thickers & mystery chipboard number stickers
Adhesive: SA by 3L - tape runner, 3D foam squares

Saturday, March 7, 2015

SISTERHOOD OF SNARKY STAMPERS #29 - L is for Leprechauns!

BUAHAHAHA! EDNA AS A LEPRECHAUN!!

Hello and good morning crafty peeps! We have a new challenge starting at the SISTERHOOD OF SNARKY STAMPERS! The Luck O' the Irish is upon us, so we want to see your St. Paddy's Day cards/projects!! Here's my card:


Here's the inside of my card:

I hope that you didn't fall off your chair because my card is snarkless. It's all right, and I'm ok. Just couldn't bring myself to snark up this adorable little bear. You'll just have to be satisfied with the punny sentiment on the inside. :)

My image is from Bugaboo stamps. I think it was a freebie last year, but this is the first time I've used it. (NBUS!) He's colored with Spectrum Noir markers and die cut from Nesties. The image already had a highlight drawn on the nose, but since it wasn't the side I used for my 'light source', I just colored it in with black, then added a white highlight with a white Gelly Roll pen.The paper is all older stuff from my hoarded stash. (the polka dot paper is dated 2006!) I've added Crystal Stickles to the buckle and the clovers because - glittery!!

 I hope that you get the chance to play along with our St. Paddy's Day challenge at the Sisterhood of Snarky Stampers! Please check out what my sisters and our guest designer, Dana, have come up to wow your socks off - you won't be disappointed!! Thanks for popping in and remember, March is National Craft Month - go make something awesome!!! 


Spectrum Noir markers used:
Bear: TN5, EB3, EB5; TN2, TN3, CR3, True Black
Clovers: LG2, LG5, JG7; GT2, JG3, JG7
Hat: LG2, LG5, JG7; LY1, GB7; IG2, IG5, IG8
Outline: TB2

Challenges I'd like to enter:
Sunday Stamps Challenge #96
Spectrum Noir March Challenge - use a sentiment


Supplies:
Stamps: Bugaboo - St. Patrick's Theodore Digi; Paper Smooches - A Magical Spring
Ink: Memento - Tuxedo Black
DP: Frances Meyer (dots); MME- Quite Contrary Jack & Jill
CS: Darice
Accessories: Spectrum Noir markers; Ranger - crystal Stickles; GC; Classic Scalloped & Std. Sm. Circle Nesties; Sakura - white Gelly Roll pen
Adhesives: SA by 3L - tape runner, 3D foam squares


JUST US GIRLS! #283 - Word Week!


Good morning all! It's the start of a new challenge at JUST US GIRLS! Ina is your hostess for Word Week, and she picked the word Masculine for you to incorporate into your card or project. Here's what I came up with:


 and the finished inside:


I just scored this wooden stamp at Tuesday Morning the other day (at a steal of a price!) while gallivanting about town with my neighbor. I loaded it up first with Versa Mark then with Paris Dusk ink before stamping and embossing it with clear EP.

Oooh! Shiny!!

I used the largest deckled rectangle Nestie (which was just too small), but I solved that problem simply by tracing around then fussy cutting it. (The things we do for our art!) The inside sentiment is also stamped with Paris Dusk, although it looks black. (Trust me, it's blue.) I stamped a tweed pattern on the card base with Versa Mark ink, and took my heat gun to it before adhering the main panel with thin foam squares.

I hope that you get a chance to play along and enter your masculine card or project at Just Us Girls! Remember, if you are picked as Chic of the Week for any of our March challenges, you'll be in the running to be our Guest Designer for the month of May! Sweet! Thanks for stopping by. Also, please check out what my teammies and our March Guest Designer, Jen Mitchell, have created to inspire you! Have a great day!

I'd like to enter this at Color Throwdown #332

Supplies:
Stamps: Momenta - growing old; Hero Arts - Tweed pattern; Stampendous - Party Invite
Ink: Versa Mark; Memento - Paris Dusk
DP: mystery scrap from my scrap heap
CS: Darice; Bazzill
Accessories: GC; Deckled Rectangles Nesties; WOW! - clear EP; heat gun
Adhesives: SA by 3L - tape runner, thin foam squares